

 TL;DR:
Resolve unsupported video format errors by identifying the file's specific codecs in VLC first, then either use a player with built-in decoders or convert a separate copy to a widely supported H.264/AAC MP4 without overwriting the original file.
● Updating VLC resolves most playback issues through built-in decoders, whereas Windows Media Player requires installing specific official add-ons, such as the HEVC Video Extensions from the Microsoft Store, to read H.265 streams.
● When using HandBrake or UniConverter to fix compatibility for specific phones or TVs, export a test file using an MP4 container, H.264 video, and AAC stereo audio, ensuring you match the target device limits rather than upscaling a smaller source.
● If a video exhibits blank metadata, an implausible duration, or fails to scan in any converter, the transfer is incomplete or damaged, requiring a fresh download or data recovery instead of changing file extensions or conversion settings.
Ask AI for a summary
 ChatGPT
 Perplexity
 Gemini
 Claude
 Grok
An unsupported video format message does not automatically mean your video is damaged. The player might not understand the file's container, its video or audio codec, or the settings used to encode it. Even two files ending in .mp4 can require different playback support.
Keep the original unchanged. First identify what is inside the file, then try a compatible player or the specific decoder it needs. Convert a separate copy only when you need the video to work in another app or device. If the original is incomplete or missing, resolve that problem before attempting conversion.
This guide separates those situations so that a codec error does not lead you to install unnecessary software, overwrite useful footage, or pay for a converter that cannot read the source.
In This Article
Part 1. What Does Unsupported Video Format Mean?
A video file has several layers of compatibility. The error usually describes the player's difficulty opening one of them, not a definitive diagnosis of the entire file.
- Container: MP4, MOV, MKV and AVI organize video, audio and related information. Renaming a filename changes none of that structure.
- Codec: H.264, HEVC/H.265 and AV1 describe ways of encoding video. Audio has its own codec, such as AAC or AC-3. A decoder is the software or hardware that reads the encoded stream.
- Encoding settings: Profile, level, bit depth, resolution and frame rate can exceed what a particular player or device accepts, even when its specification lists the codec.
- File condition: A partial transfer, missing media data or damaged structure can prevent a supported format from opening. A format error alone does not establish which of these occurred.
For example, an MP4 containing H.264 video and AAC audio is different from an MP4 containing HEVC video and AC-3 audio. The filename extension cannot tell you which decoder is missing. The distinction between H.264 and H.265 matters when the same recording works on one device but not another.
| What you observe | What to investigate first | Appropriate next action |
| The unchanged file works in another player. | Player or decoder compatibility. | Use that player, add an identified supported decoder, or make a compatible copy. |
| Audio plays but the picture is missing. | The video stream and playback pipeline. | Check the video codec and encoding settings; do not assume the audio codec is the problem. |
| Picture plays but there is no sound. | The selected audio track, output and audio codec. | Check audio separately rather than purchasing a video-only extension. |
| Only a phone, TV or editor rejects the file. | That target's format and encoding limits. | Export one test copy that meets the exact target specification. |
| No player reads it; its duration is missing or its size is unexpectedly small. | The source, transfer and file structure. | Obtain a complete original before repeated conversion attempts. |
| The original was deleted or disappeared. | Backups and the original storage location. | Stop writing to that storage and assess file recovery. |
Use the table as a diagnostic starting point, not a guarantee. A file that fails in two players might still use a specialized format that neither supports. Conversely, a player opening the first few seconds does not prove the whole file is intact.
Part 2. Diagnose the File and Fix Player Compatibility
These checks preserve the original video and help distinguish a missing decoder from a source that cannot be read. Work on a copy and change one thing at a time so the result remains meaningful.
Method 1. Check the Actual Video and Audio Codecs
Use this method when the file is available locally but its extension does not explain the error. Record the exact message, the player name and where the video came from before changing settings.
Step 1. Confirm that the download or transfer has finished. For a cloud file, obtain the actual local video rather than opening only a placeholder. Compare its size with the source where possible, and keep a separate copy with its original extension.
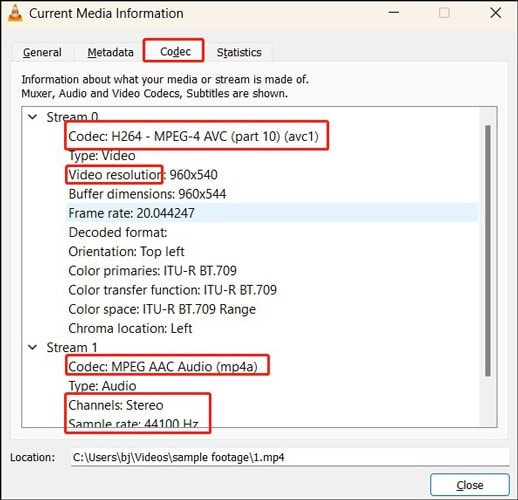
Step 2. Open the copy in VLC. On Windows, choose Tools > Codec Information. On Mac, open the media-information window from VLC's Window menu and select its codec details. Note the video codec, audio codec, dimensions and frame rate. The example below identifies H.264 video and AAC audio as separate streams.
Step 3. Compare those details with the target player's requirements. For deeper inspection, MediaInfo can report container, profile, bit depth and other properties that a basic file-properties panel may omit.
You now have a useful diagnosis when you can identify both streams and the specific support requirement. If metadata is blank or the source reports an implausible duration, request another export or repeat the transfer from the original device. Missing metadata is a warning to investigate, not proof that the footage is permanently lost.
Do not change .mkv to .mp4 or add an extension to an unknown download as a repair. That does not rewrite the container or create missing video data.
Method 2. Try a Compatible Player and Update VLC Correctly
A different player is a useful comparison when your current app says the format is not supported. Use a complete, unencrypted local video that you are authorized to view; service-managed offline downloads are a different case.
Step 1. Install or update VLC from VideoLAN's official VLC page or the platform's trusted app store. Avoid download advertisements that offer a separate codec installer.
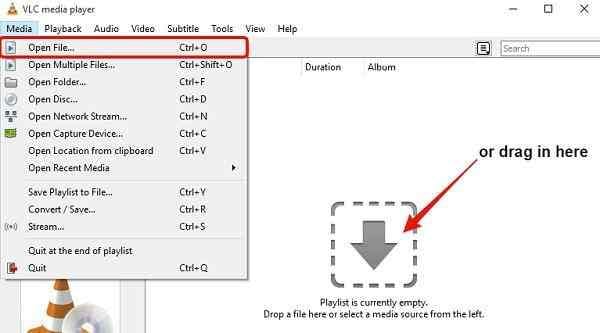
Step 2. On Windows, choose Media > Open File and select the unchanged copy. On Mac, use File > Open File. Play the beginning, middle and end, checking both sound and picture.
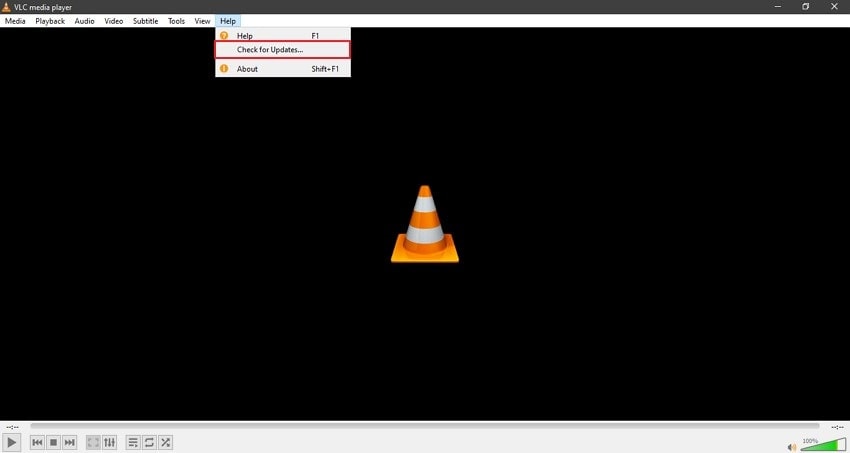
Step 3. If VLC is already installed, check for an application update. The Windows desktop menu is Help > Check for Updates; Mac uses the VLC application menu. Close and reopen VLC after updating, then test the same copy again.
Update the application, not a supposed standalone VLC codec pack. VideoLAN's Windows FAQ explains that VLC uses its own built-in codecs rather than Windows DirectShow or Video for Windows codec packages.
If the video plays correctly now, conversion is optional unless another destination requires it. If only VLC still fails, VLC playback troubleshooting covers player-specific output and decoding problems. If every application fails at the same point, return to the source-integrity check instead of installing more players indefinitely.
Method 3. Resolve Windows Media Player Codec or Encoding Errors
For a Windows Media Player unsupported encoding settings error, first establish which app you are using. The current Media Player app and Windows Media Player Legacy are not interchangeable, and instructions for one may not exist in the other.
Step 1. Identify the rejected codec using Method 1. Check whether the problem affects the video stream, the audio stream or both. Install available updates for the player and Windows before testing the file again.
Step 2. Consult Microsoft's supported codecs and Media Player troubleshooting guidance. For an HEVC/H.265 video, follow its Microsoft Store link to the official HEVC Video Extensions listing. Verify the publisher and system requirements before installing or buying anything.
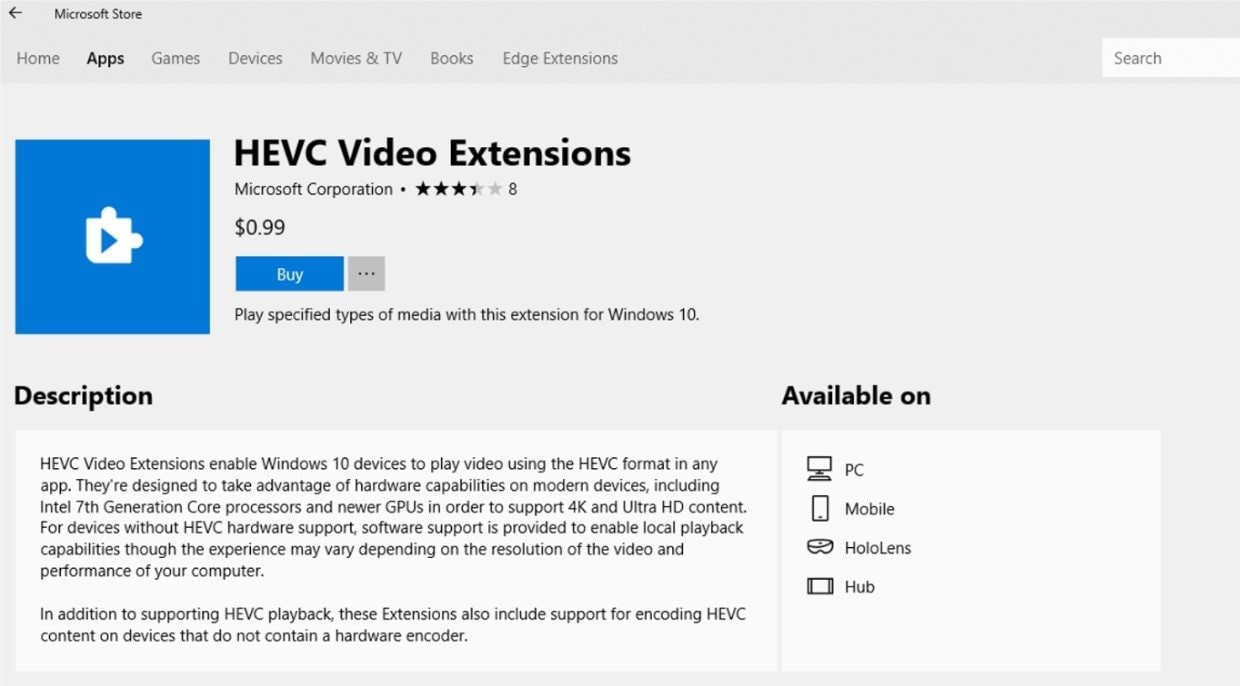
Step 3. Close the player, reopen the same original copy and check picture and sound. Use the current Store listing for availability and pricing; the older interface shown here identifies the extension, not its current price.
An extension is relevant only when it adds the decoder your application needs. It is not a universal fix for a malformed file, protected content, an unsupported profile or excessive resolution. Do not assume that adding a Store extension gives every Legacy player or third-party editor identical support. For a broader Windows Media Player cannot play the file problem, keep the exact error and app name when investigating further.
There is also an important audio exception: beginning with Windows 11 version 24H2, AC-3 is not included by default. An upgraded installation or a manufacturer's preinstalled codec may still provide it. Therefore, a file that has sound on one Windows PC but not another may need audio compatibility work, not an HEVC video extension.
If the appropriate decoder does not resolve the error, test the file in VLC or convert a readable copy. Avoid random codec bundles and do not disable security software to install them.
Part 3. Convert an Unsupported Video Without Overwriting It
Conversion is useful when a tool can read the source but the intended player cannot. A suitable unsupported video converter must support the input stream and give you control over the output, not merely change the filename.
| Output setting | Practical compatibility starting point | What to verify |
| Container | MP4 | The destination accepts MP4 containing the selected codecs. |
| Video | H.264 with a target-compatible profile | Bit depth, profile and level match the destination. |
| Audio | AAC stereo | The correct language/track is selected and audio is included. |
| Resolution and frame rate | A target-appropriate preset, often up to 1080p and 30 fps | Do not upscale a smaller source; lower limits may be necessary for older devices. |
| Save location | A different filename and folder | The original remains available for comparison and future exports. |
This is a starting point, not a format that every device must accept. Converting can reduce quality, change motion or remove features such as extra audio tracks. Keep the source, especially for HDR, high-frame-rate or professional camera footage.
Method 4. Make a Compatible MP4 With HandBrake
HandBrake is a free offline option for readable, unprotected video. Its official quick-start workflow begins with a source, a preset and a destination. An MP4/H.264/AAC output is a useful test when the original encoding is the obstacle.
Step 1. Open HandBrake and select Open Source. Choose the copied video and wait for the source scan. Confirm the expected title and duration before proceeding.
Step 2. Choose General > Fast 1080p30 as a broad-compatibility starting point, or a lower preset required by the target. Check Summary > Format for MP4 and Video > Video Encoder for H.264 (x264). HandBrake's preset specifications list the video, audio and size limits rather than guaranteeing every destination.
Step 3. Inspect Framerate (FPS) in the Video tab. Retain the preset's limit for a basic playback copy. When an editor specifically requires constant frame rate, choose a suitable frame rate and Constant Framerate; do not blindly copy the variable-frame-rate selection in the interface example.
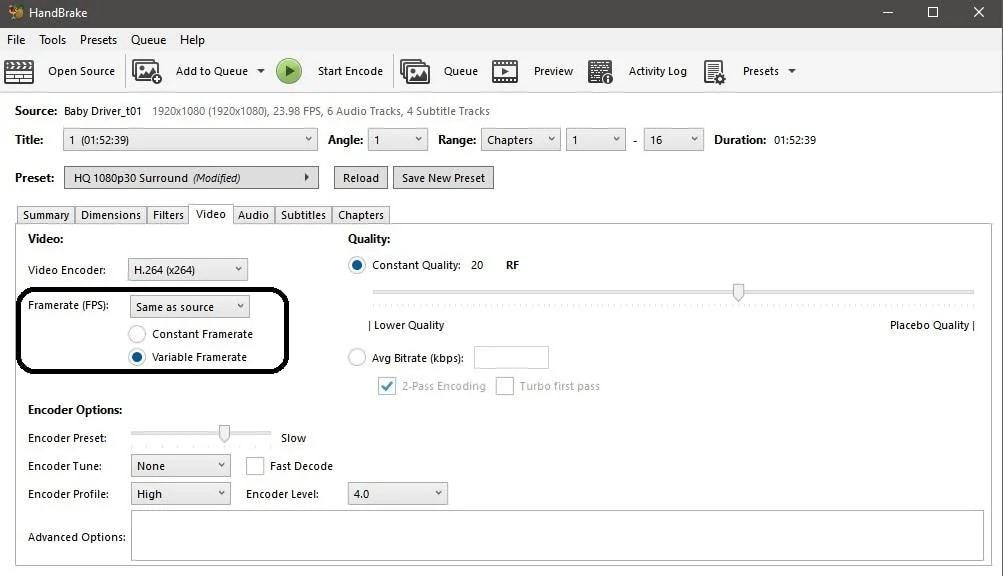
Step 4. In Audio, select the track you actually need and AAC stereo for the compatibility copy. Check subtitles separately. Choose a new output name, then select Start Encode.
Step 5. Open the completed file on the intended device, not only inside the converter. Check the full duration, picture, selected audio and synchronization. Keep the original until that test is complete.
If HandBrake cannot scan the source or stops repeatedly, inspect its Activity Log and obtain another original where possible. Its documented capabilities and limits do not make it a universal file-repair or copy-protection-removal tool. An output file appearing in a folder is not enough to call the conversion successful.
Method 5. Convert Files or a Batch With UniConverter
Wondershare UniConverter is an alternative when you prefer a conversion-focused interface or need to process several readable files. Test one representative video before converting a whole folder; a batch can contain different codecs even when every filename ends in MP4.
Step 1. Open the desktop app and select Converter. Use Add Files / Folder to import the copied source. These labels follow the current Wondershare UniConverter conversion guide.
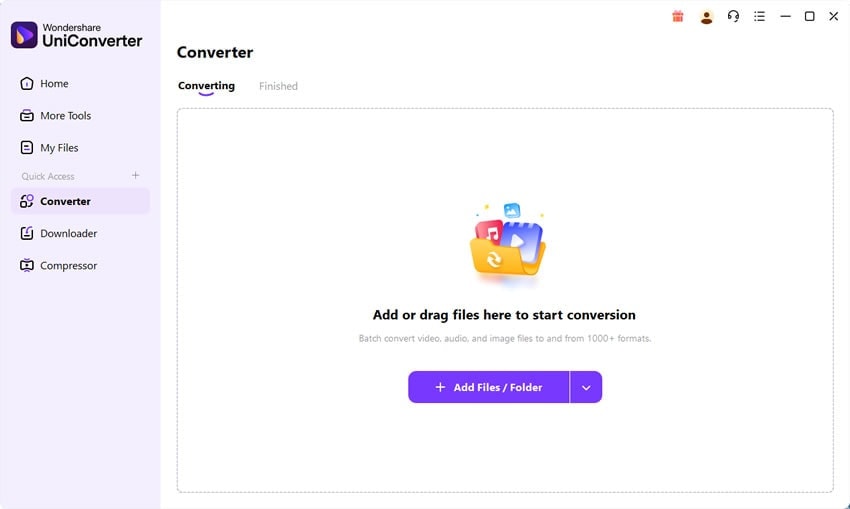
Step 2. Open Convert to, choose an MP4 output and open its Settings. Set the video encoder to H.264 and audio to AAC when those meet the destination requirements. Set resolution and frame rate to supported values rather than selecting the largest available output.
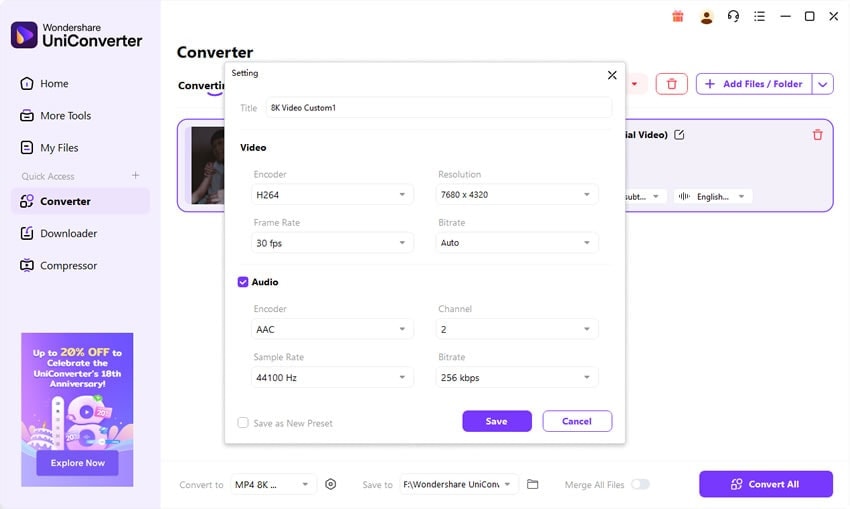
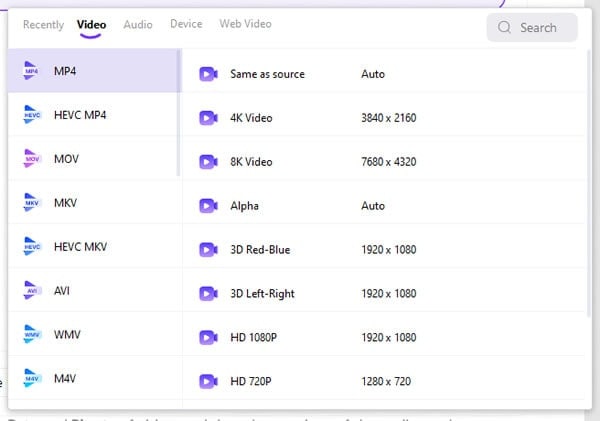
The settings example shows where the controls are located, including an 8K resolution field. That value is not the recommendation for an unsupported-video fix. Replace it with the appropriate target resolution, and preserve a smaller source rather than upscaling it.
Step 3. Select a separate Save to folder and start the single-file test with Convert All. When it finishes, open the result from Finished and test it in the receiving app or device.
Step 4. After the test passes, add the rest of the files and check their individual output settings. Keep merging disabled unless you deliberately want one combined video. Retain the original folder while you verify the batch.
Check the installed edition's current trial or paid-plan limits before processing important footage. No conversion-speed claim or successful repair is implied here. If the app cannot read the input, switching the output extension will not solve the underlying problem; review source integrity or the originating camera/editor export instead.
Part 4. Handle Phone, TV, Editor and Cloud Differences
When the video already plays on a computer, the remaining question is often where it needs to play next. Treat the destination as part of the specification rather than assuming the computer's support applies everywhere.
Method 6. Match the Export to the Actual Target Device
Use this branch for an Android phone, iPhone, smart TV or editing app that rejects an otherwise readable file. It is also relevant when one export works and another from the same camera does not.
Step 1. Find the exact model or app's supported media requirements. Compare the container, video and audio codecs, maximum resolution/frame rate, and any profile or bit-depth restrictions. Android's media-format documentation distinguishes platform support from device-specific capabilities; it does not promise that every phone handles every encoding setting.
Step 2. In either converter above, choose a matching device preset or a conservative MP4/H.264 output. In UniConverter, the output selector separates MP4 from HEVC MP4 and exposes different resolutions. Select deliberately: an MP4 label alone does not tell you that its video uses H.264.
Step 3. Convert one test copy, transfer it completely, and open it on the target. For a TV, use its documented USB or media-playback method. If the TV cannot see the storage device at all, investigate its supported connection and filesystem separately; do not format a drive containing the only copy.
Step 4. Confirm video, sound and duration before processing the remaining files. If an editor imports picture but not audio, verify its supported audio codec and the selected track. For time-sync problems, revisit frame-rate requirements rather than repeatedly converting the same incorrect settings.
For Apple devices, Apple's HEVC compatibility guidance notes limits on older hardware. The camera's Most Compatible setting changes future captures; it does not retroactively convert an existing HEVC recording. Existing videos need a separate compatible export.
When Google Photos or a Website Says the Video Is Unsupported
A cloud-processing label and a local playback error are related but different observations. Avoid deleting a cloud item merely because its preview cannot play.
Google provides an unsupported-video review and download workflow for Google Photos. Where a download is available, preserve that copy and check local playback before deciding what to remove. Google also specifies requirements such as a supported file type and a duration of at least one second. A failed cloud preview alone is not proof that every local player will fail.
Similarly, a website's message mentioning an unsupported format, a server or a network is not a diagnosis of a file on your disk. A hosted player can fail before a complete video reaches your device. Keep browser/server investigation separate from the local-file methods here, and obtain a permitted original download from the owner when available.
Prefer offline conversion for private recordings. Before using an online converter, examine its retention policy, upload limits and handling of sensitive files. Do not submit confidential footage just to test whether a codec is supported.
Part 5. Know When Conversion Is Not the Right Fix
If no tool can read the source, pause before another conversion attempt. A fresh export from the original project or another transfer from the camera can be more useful than changing output settings. Keep the existing file as evidence rather than overwriting it.
An existing but structurally damaged video may require file repair, while a deleted or missing original requires data recovery. Neither process guarantees usable footage, and neither adds permission to play protected service content. A reference sample cannot recreate scene details that were never recorded or whose data has been overwritten.
If a repaired or recovered copy opens, verify more than its thumbnail. Check duration, seeking, picture and sound throughout. A partially playable result may still be valuable, but it should not replace your remaining source copies.
Method 7. Recover a Missing Original Before Converting Again

This method applies only when a locally stored original was deleted or lost and a backup is unavailable. It is not a remedy for an intact file that merely needs a different codec. Stop recording, downloading or saving new files to the affected storage first.
After checking the Recycle Bin or Trash, backups and the originating device, Wondershare Recoverit Video Recovery can scan supported, detectable storage for missing video data. Use another drive for installation and recovered output where possible.
Step 1. Connect the original storage to a computer and open Recoverit. Select the drive or location where the video was lost, not the folder where you plan to save the output.
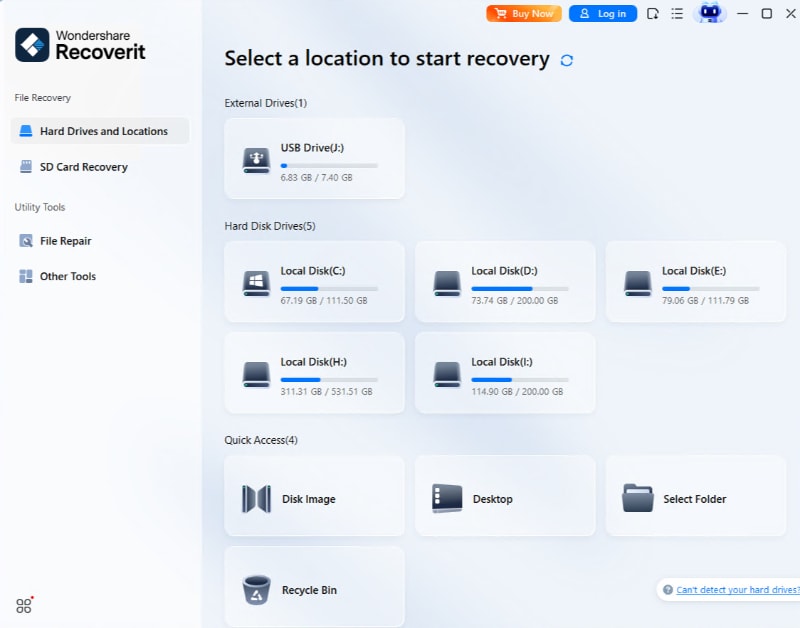
Step 2. Start the scan and inspect the results. Filter for video types and use names, paths, sizes or dates to narrow the candidates. Finding a familiar filename is not yet proof that the complete video is recoverable.
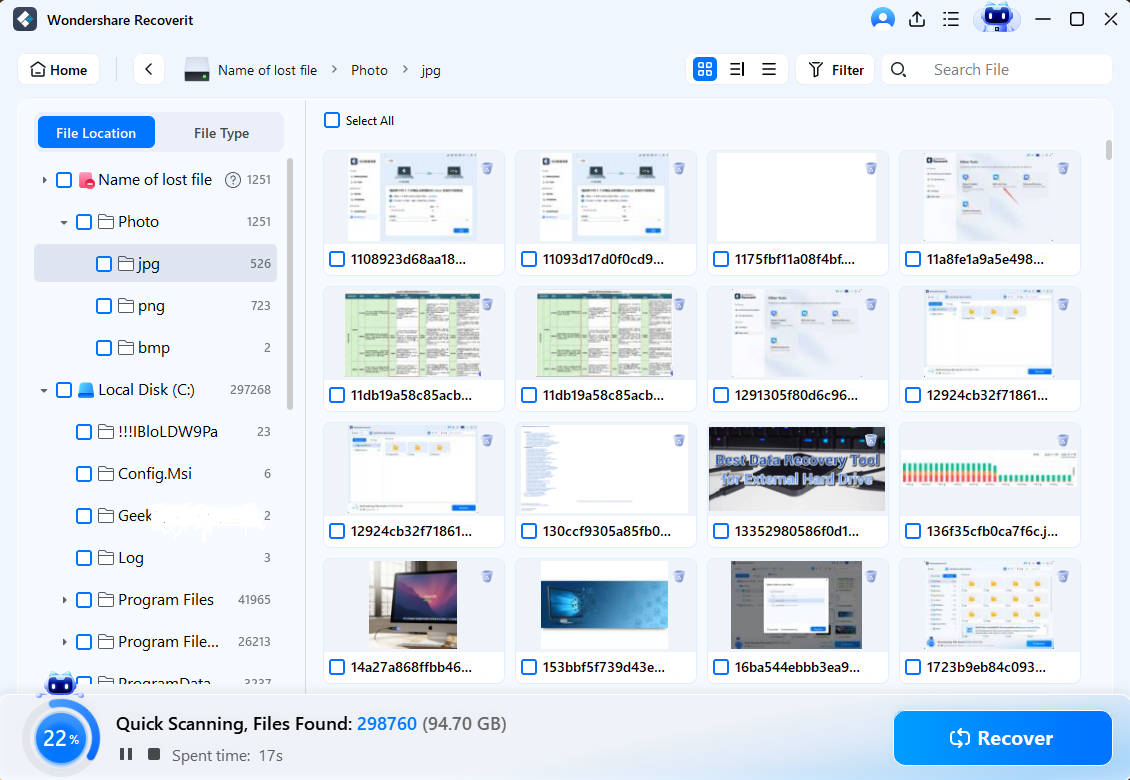
Step 3. Preview suitable results where available, then save selected files to a different drive. This follows the location, scan and recovery sequence in the official Recoverit Windows guide. Check the current license requirements for saving files; a free scan is not a promise of unlimited free recovery.
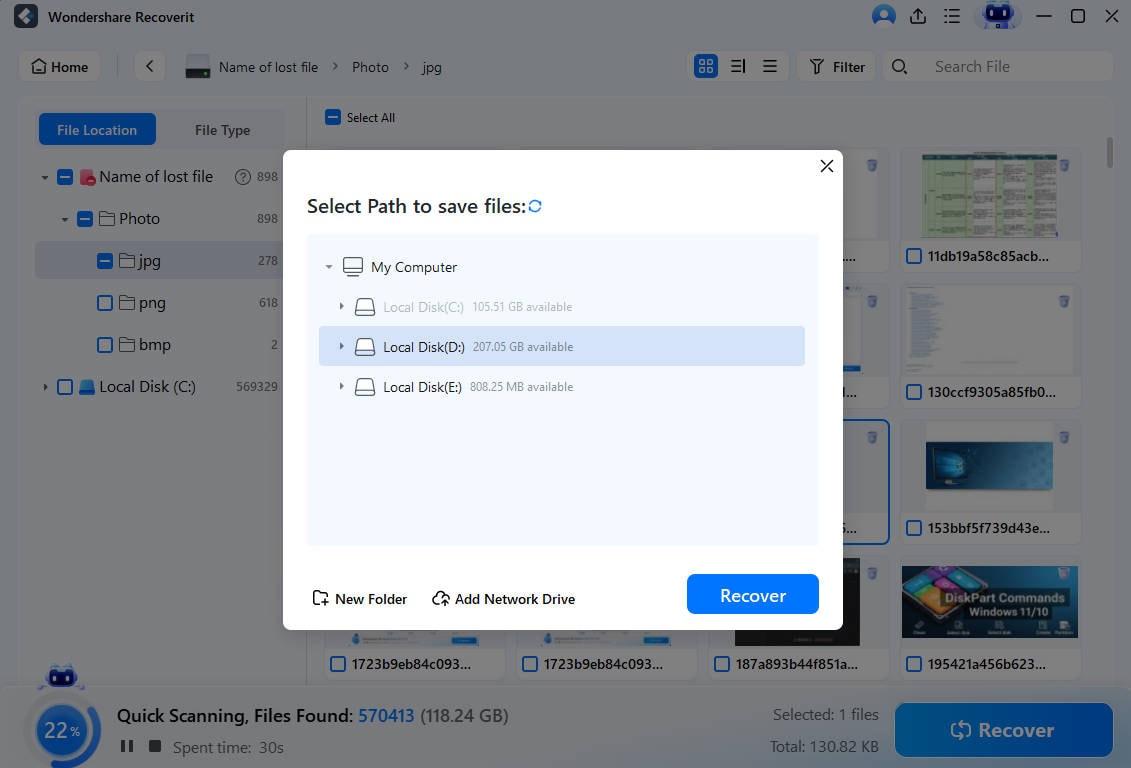
Step 4. Test the saved copy in an independent player before converting it. If it still cannot be decoded, return to the codec and file-condition diagnosis. If storage is physically failing or disconnecting repeatedly, stop and seek specialist help instead of continuing scans.
Overwritten data cannot be recovered by this workflow. Do not assume that connecting an Android phone or iPhone exposes its internal storage as a scannable computer drive. The procedure here is for supported computer and attached-storage sources, not a way to unlock an app's protected downloads.
Conclusion
The most useful fix for an unsupported video starts with the file's actual contents. Identify the video and audio streams, compare players, and add only the decoder that is genuinely missing. When another device needs a different encoding, create and test a separate copy with suitable container, codec and resolution settings. If the source is incomplete, corrupted or missing, address that condition first. Preserve every useful original until you have confirmed the result.
FAQ
-
Why does an MP4 video still say its format is not supported?
MP4 describes the container, not the complete encoding. The video or audio stream inside can use a codec your player lacks, or settings beyond its supported profile, bit depth, resolution or frame rate. An incomplete file can also produce a similar error. Inspect the streams and compare playback before choosing a remedy. -
Will renaming a video to .mp4 make it compatible?
No. Renaming changes the filename but leaves the container and encoded media untouched. Use a converter that can actually read the source and write a compatible output. Keep the original extension and a separate backup so that the source remains identifiable. -
Do I need to download codecs separately for VLC?
VLC normally uses its integrated codecs. Update the complete application from VideoLAN or a trusted app store rather than downloading a supposed VLC codec pack. If the updated player still fails, check whether the source is complete, protected, damaged or encoded in a format that the application cannot handle. -
Which settings should an unsupported video converter use?
MP4 with H.264 video and AAC stereo is a practical starting point for many destinations. Resolution, frame rate, bit depth and profile still need to match the actual target. Test one output there before running a batch; no preset guarantees playback on every old device. -
Can an unsupported video be fixed without losing quality?
Using a compatible player or adding the right decoder leaves the original media unchanged. Re-encoding creates a new representation and can reduce quality. A container-only remux may preserve existing streams, but it does not solve an unsupported codec. Keep the original rather than repeatedly converting previous outputs. -
Can data recovery software fix a codec-not-supported error?
Not merely because the message appears. An intact file usually needs compatibility troubleshooting or conversion. Data recovery becomes relevant when the original was deleted or lost. Recover a separate copy, verify its contents, and only then decide whether conversion or file repair is also needed.


