

 TL;DR:
To format a WD My Passport for Mac, use the built-in macOS Disk Utility application to erase the drive, ensuring you first back up all contents to prevent permanent data loss.
● Select the WD My Passport under the "External" sidebar in Disk Utility, click "Erase," and choose the "exFAT" file format if you need cross-compatibility to transfer large files between both Mac and Windows systems.
● If the drive is physically connected but not visible, enable the "External Disks" option in Finder Preferences, or run the "First Aid" tool within Disk Utility to repair minor identification errors.
● Utilize macOS Time Machine or cloud storage for backups prior to formatting; if the drive is already inaccessible or corrupted, you must extract missing files using data recovery software like Recoverit before initiating the erase sequence.
Ask AI for a summary
 ChatGPT
 Perplexity
 Gemini
 Claude
 Grok
Grok
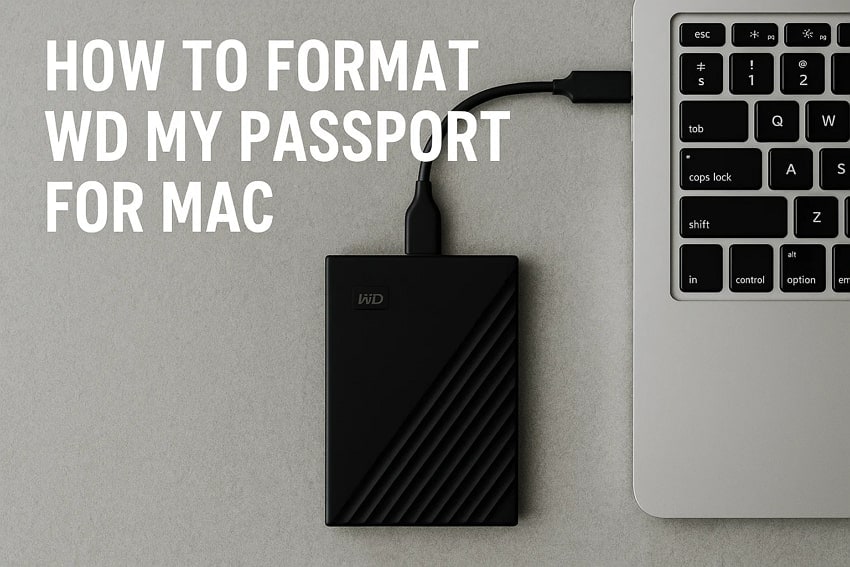
A professional photographer connects their WD My Passport to their Mac, only to find out that the drive isn't immediately read. In such situations, formatting an external drive ensures a seamless file transfer and reliable storage for the high-resolution images and videos. Not just photographers, every individual using a WD My Passport may want to format it for smoother performance and better compatibility with macOS.
There are various initial steps and methods you need to follow to format an external drive. In this guide, we will walk you through the complete process on how to format wd my passport for mac.
Try Recoverit to Perform Mac Data Recovery
 Security Verified. 3,591,664 people have downloaded it.
In this article

Part 1. Before You Begin: How to Format WD My Passport for Mac Without Losing Important Data
Formatting external drives like WD My Passport can be the ticket to convince, but you must be aware of the steps you need to follow before formatting. In this section of the article, we are looking into the 3 major aspects you need to remember before you format western digital my passport:
1. Back Up Existing Files
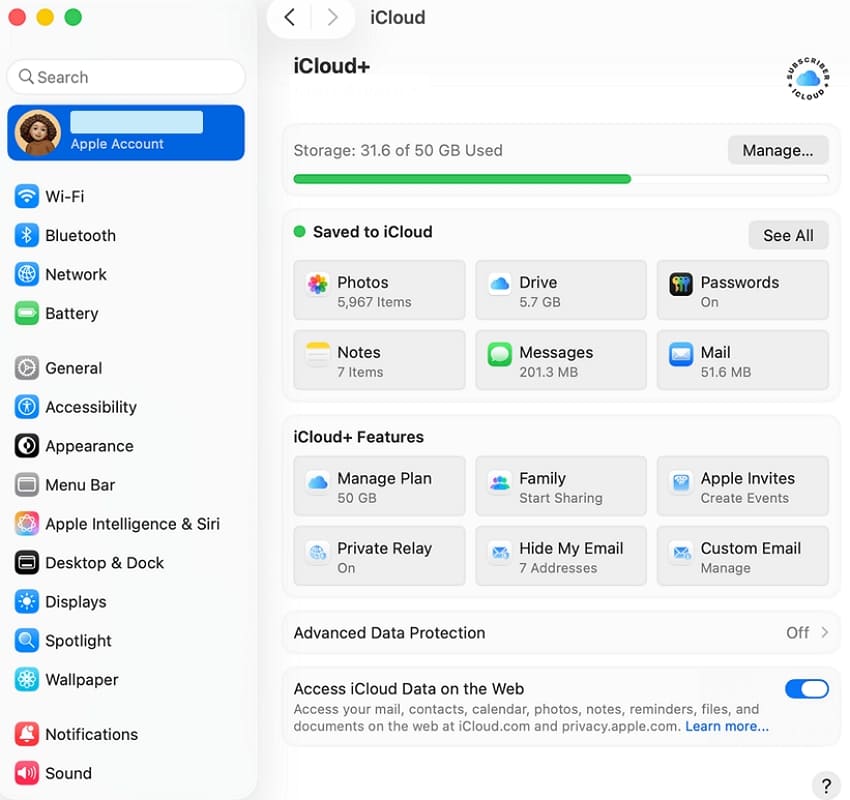
Securing your files with a cloud-based system is important before formatting. With iCloud, you can save important photos, documents, and videos in a secure place on the cloud so that you can retrieve them later on. It works best with macOS users, thus making your data available to other iOS devices. This ensures that you do not permanently lose any materials in the process of formatting the WD My Passport.
2. Understand That Formatting Erases Everything
format wd my passport for mac actually means that all the data on it is lost permanently. This formatting drive is given little attention by users, and they regret it when they lose files that they do not have any copies of. Knowing this risk may allow you to take measures during the formatting.
3. Choose the Right Backup Option
You also have the option of considering other backups like Time Machine, external drives, or a cloud-based solution. Focusing on Time Machine, it automatically backs up to every part of the system, external drives help make a physical copy, and the cloud provides remote storage. Select an option that allows you to store many files in a single location so that you do not lose the data permanently.
The easiest solution out of them all is Time Machine, which is an in-built feature of macOS. It makes restoring your data easier and faster than others. Before you learn how to use my passport for mac, dive into the guide below to figure out how to activate Time Machine on your macOS device:
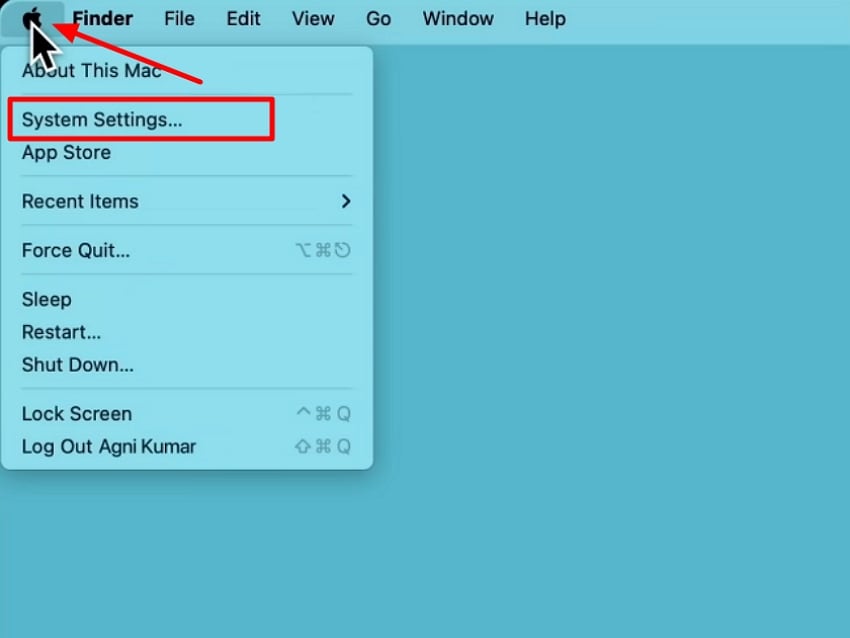
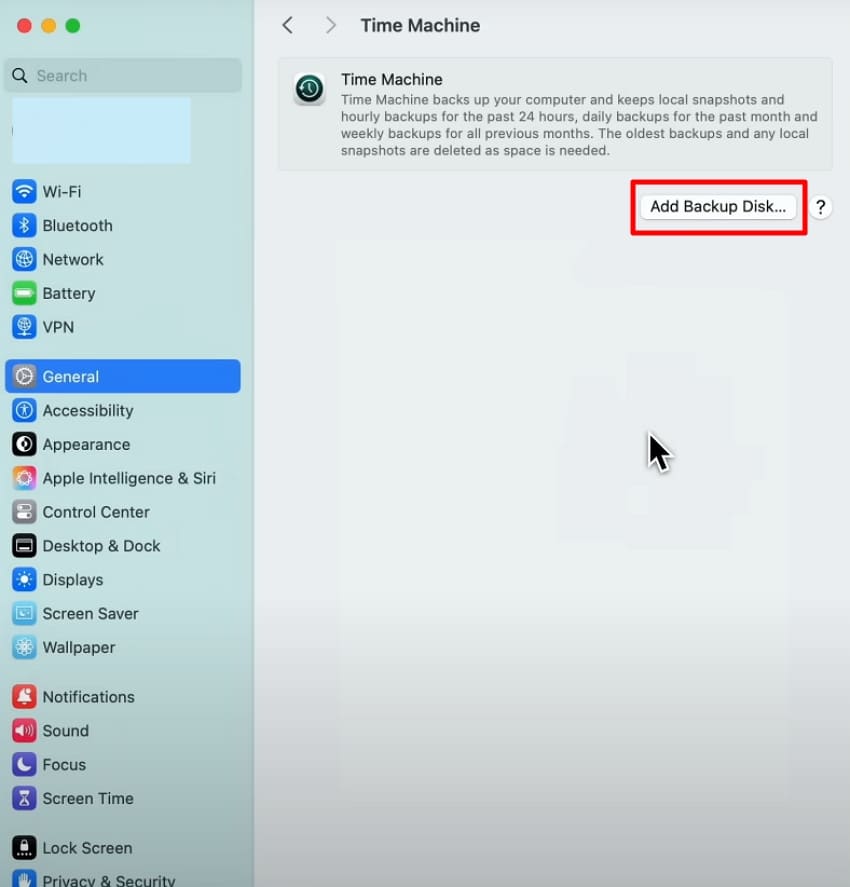
- Click on the "Apple" icon at the top left corner of the screen and pick the "System Settings" option from the list.
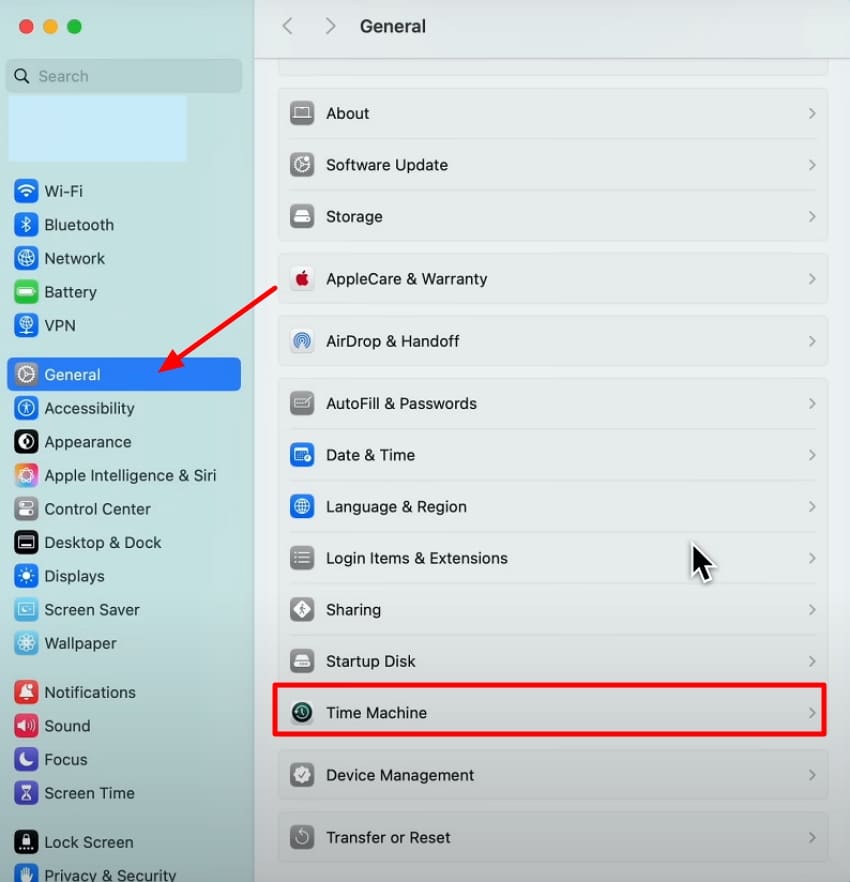
- From the left side bar, choose "General" and then scroll down to locate the "Time Machine" option.
- Click on the "Add Backup Disk" and choose the disk where you want to set up the backup.
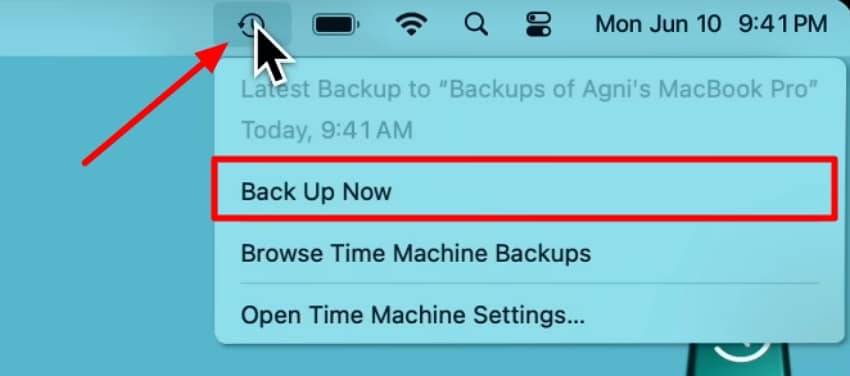
- Once backup through Time Machine is activated, you can start a backup manually at any time. Click on the "Time Machine" icon at the top right of the Mac screen to pick the "Back Up Now" option.
Part 2. How to Format WD My Passport for Mac? Detailed Guide
Earlier, we mentioned that before you format a format western digital my passport, you must back up all important data in it. After that, formatting will be a hassle-free process that increases compatibility with macOS, provides better performance, and gives you a blank slate. The following are specific directions for formatting your WD My Passport connected to your MacBook:
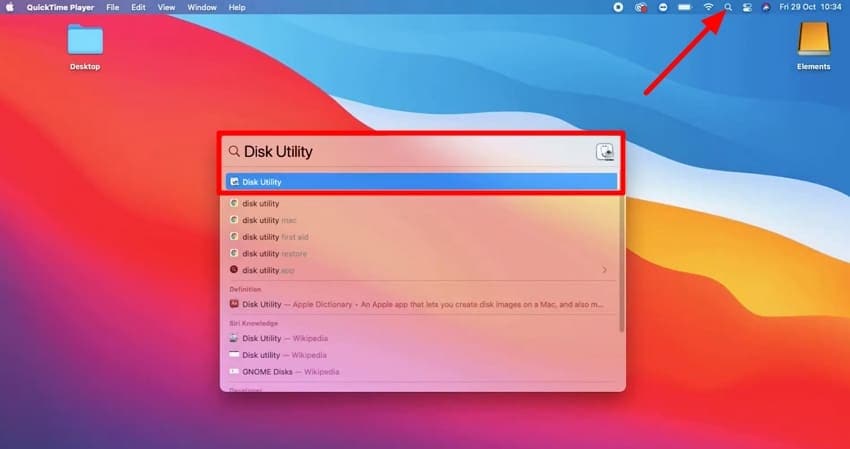
- Click on the "Magnify" icon at the top right bar, type in "Disk Utility" in the search bar, and launch the application.
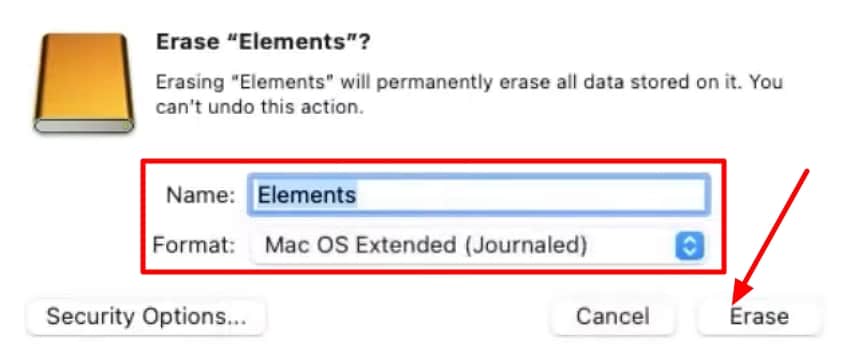
- From the "External" section on the left sidebar, choose the WD My Passport drive. Then, hit the "Erase" option from the top right bar.
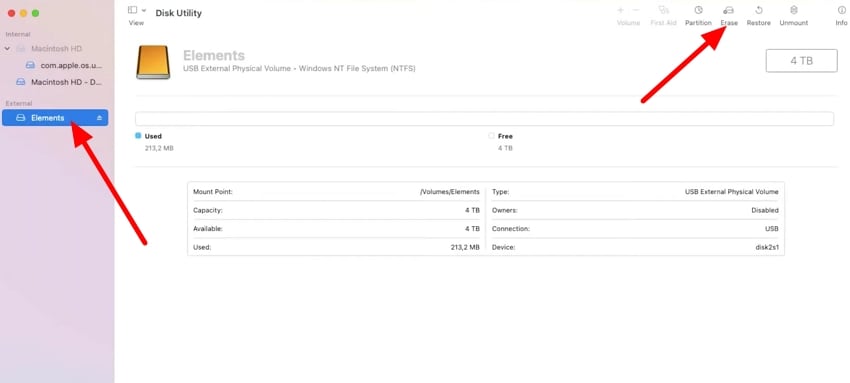
- From the pop-up dialog box, set the "Name" and "Format" sections. Now, click on the "Erase" button to start formatting the WD My Passport.
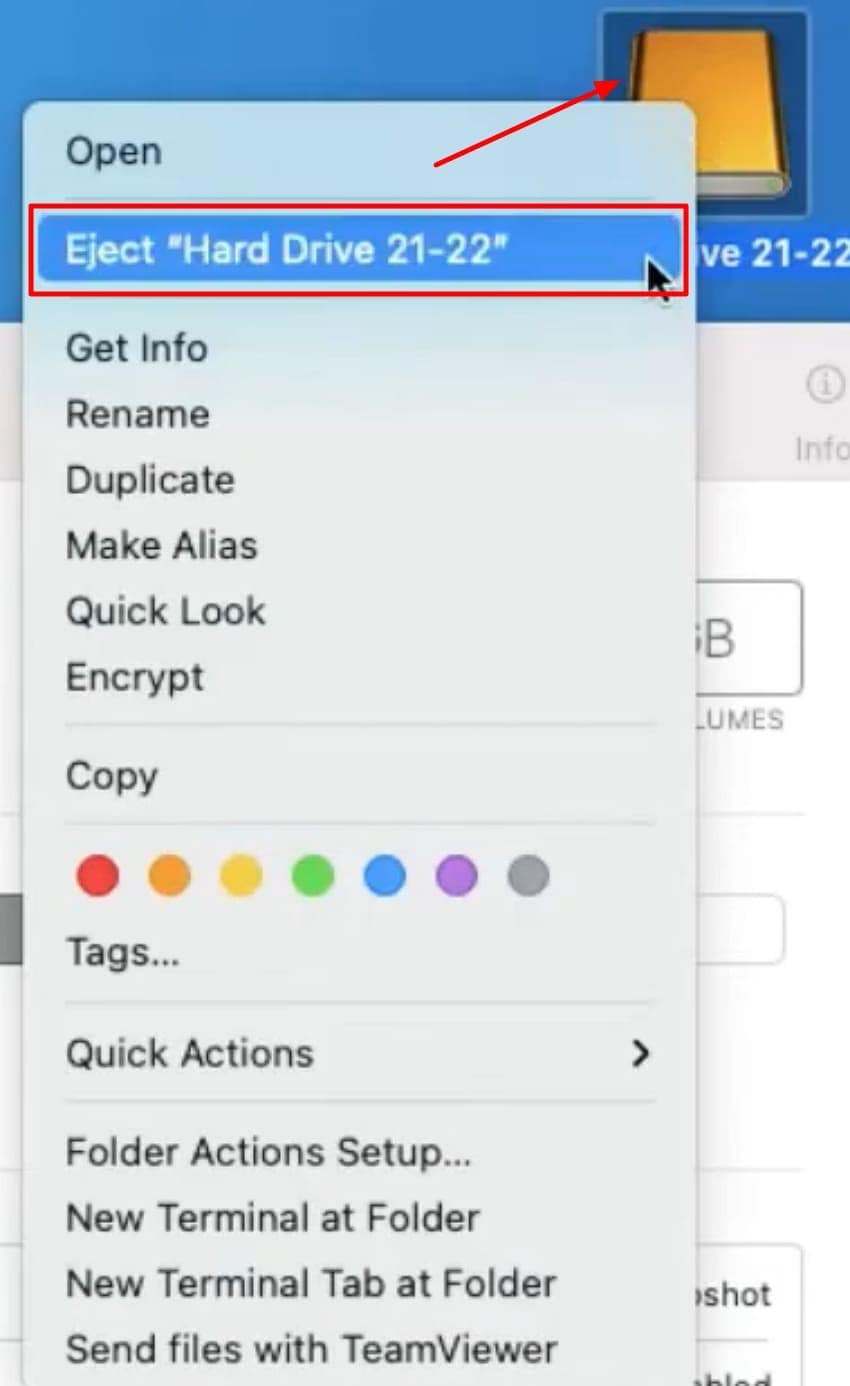
- Finally, after the external hard drive is formatted, right-click on the folder and choose the "Eject" option to disconnect from your MacBook safely.
Part 3. Fixing Issues: How to Format WD My Passport for Mac If the Drive Is Not Showing Up
You might come across a hurdle where you are trying to format your WD My Passport, but the drive is not visible in the Disk Utility. In such a situation, you need to try out a few fixes to get a smooth formatting process. In this section, we will be looking into the fixes you can try to easily format wd my passport for mac:
1. Check Physical Connections
In case your WD My Passport is not appearing, the first step that you should take is to check the physical connection. The cable, USB connection, or the port might be faulty, and therefore your Mac will not recognize the drive. Early troubleshooting of this problem will establish a stable connection between the drive and Mac, ensuring a simple and effective format.
2. Set Finder Preferences
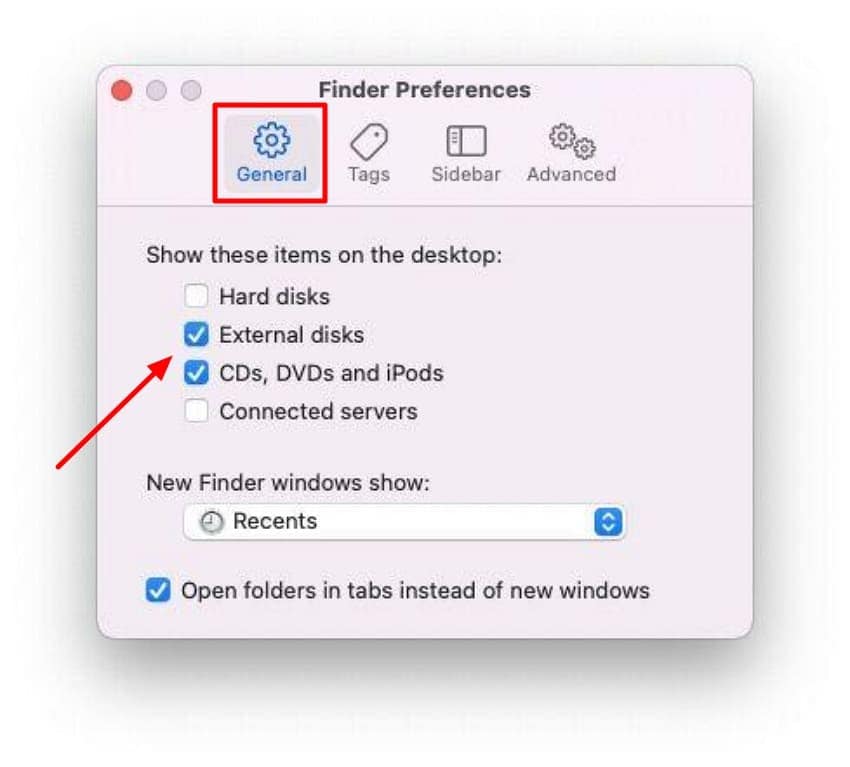
In a different instance, your drive is connected, but the Finder on your Mac is not showing the HDD. This can happen when the Finder preferences of your macOS are not configured to view external drives. When the preferences are wrong, the drive remains invisible. With the support of the correct settings through the steps below, you can format western digital my passport in a matter of a few minutes:
Instructions. Once you access the Finder menu, choose the "Settings" option. Here, select the "General" tab and tick the "External Disks" option to ensure that it shows on the desktop after this.
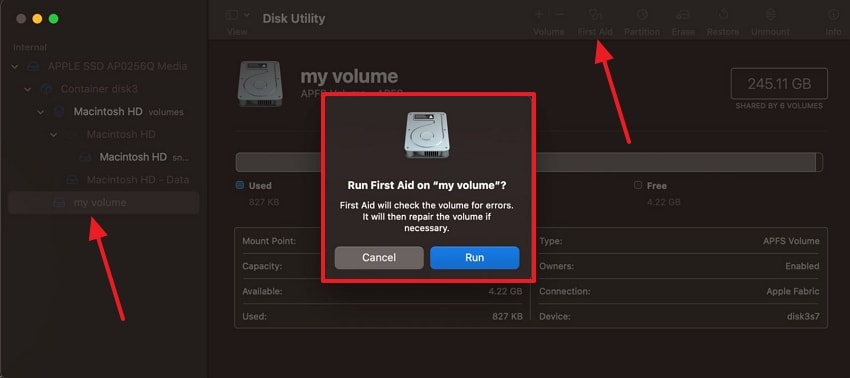
3. Run First Aid (Disk Utility)
When your WD My Passport does not appear, you can run First Aid in Disk Utility. This utility is a built-in function that searches and fixes small disk defects that could be causing the failure in identification. First Aid fixes the drive by establishing safe access. After performing the steps of First Aid below, you can learn how to reformat wd my passport for mac and avoid data corruption hurdles.
- Navigate to "Applications" from the Finder window and locate the "Disk Utility" app by scrolling through the options.
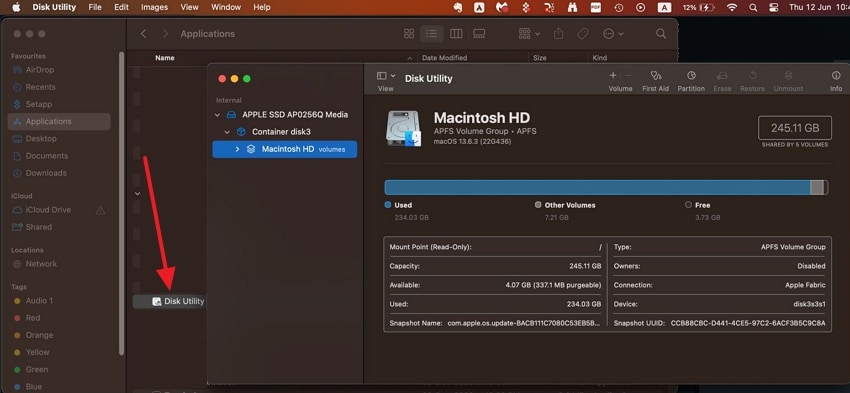
- Here, pick the "External Disk" from the left sidebar and hit the "First Aid" button at the top. From the pop-up dialog box, hit the "Run" button to start the fix.
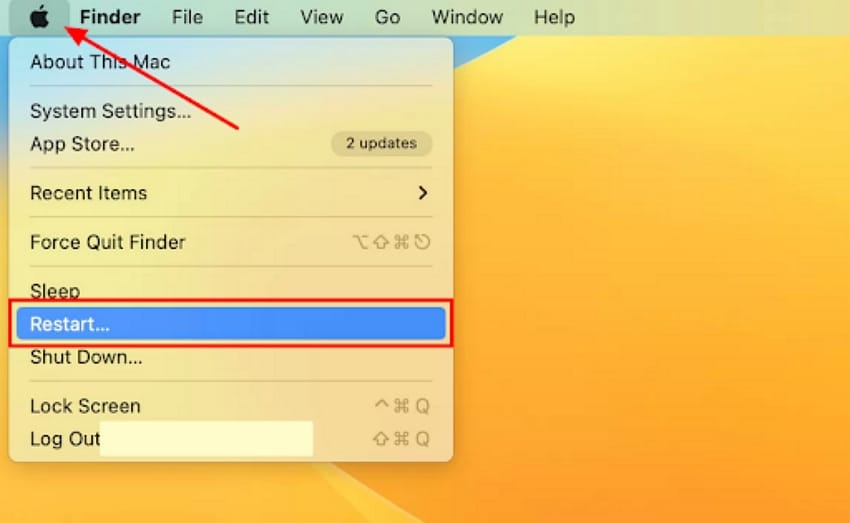
4. Reboot/Restart Your Mac
After you are done performing the other fixes, your last resort is to restart the Mac device to refresh the system processes. This will help you clear temporary glitches and might re-establish communication, allowing you to format wd my passport for mac easily.
Instructions. Click on the "Apple" icon at the top left corner and choose the "Restart" option from the drop-down menu.
5. Use Data Recovery Software
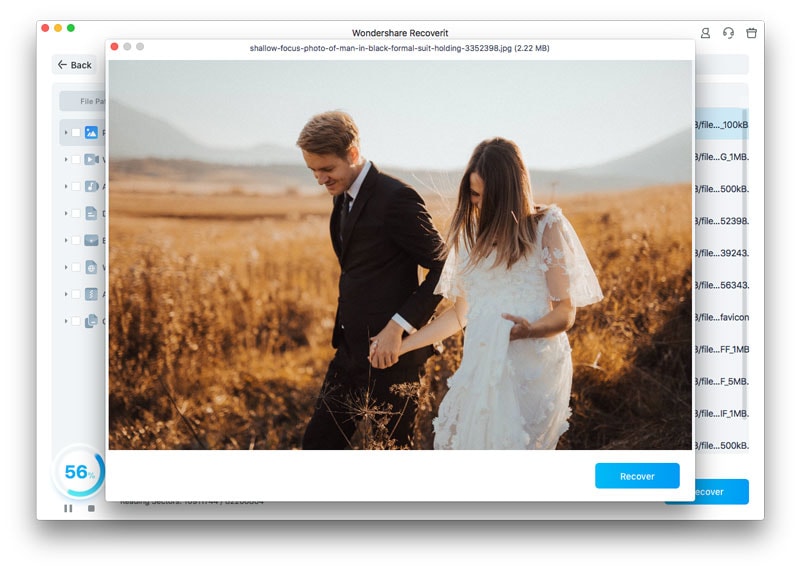
Your WD My Passport needs formatting, but the drive holds critical work files that you cannot afford to lose. In such situations, the smartest approach is to use a data recovery tool. Recoverit is a powerful and user-friendly option that restores lost or accidentally deleted files. It supports over 1000 types of file formats, so users do not have to shift between different recovery tools.
Recoverit not only supports a WD My Passport, but also supports more than 1 million storage devices, such as SSDs, USB flash drives, and many more. Whether you lost the files accidentally or deleted them, you can resolve it in no time since Recoverit supports more than 10000 data loss scenarios. It performs deep, intelligent, and fast scanning to help you locate missing files immediately.
Key Features
- Batch Recovery Process: Users get the ability to recover multiple files in one go to help speed up the process and avoid wasting time and energy.
- Preview Files: You can easily preview the file you want to recover before saving it to ensure the integrity of the file is maintained.
- Filter Out Files During Deep Scan: With the help of this tool, you can filter out the file type and path to locate the exact missing files.
Guide to Using Recoverit to Restore Files From WD My Passport
Here are the steps you need to follow to restore the HDD so that you can format wd my passport for mac:
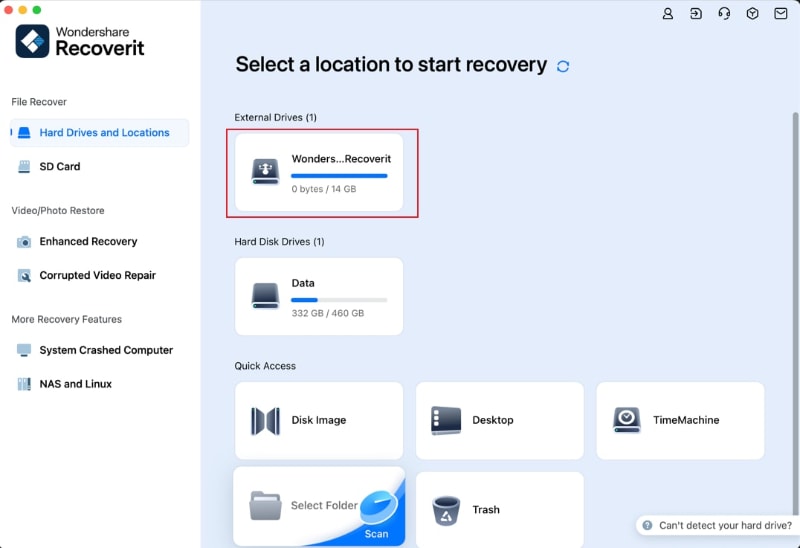
1. Launch Recoverit and Select the External Hard Disk
Once you launch the tool, shift to the "Hard Drivers and Locations" section from the left bar. Then, pick the connected WD My Passport to your Mac option.
2. Scan The Drive and Locate the Missing Files
Moving on, Recoverit will start the deep scan process. Click on the "File Path" and "File Type" filter tabs to locate the exact files. Next, hit the "Recover" button once you locate the missing files.

3. Preview the Lost Data and Save File to The Original Location
Finally, using the Preview option, review the quality of the file and hit the "Recover" button to save the lost file to its original place.
Why Choose It?
Selecting Recoverit makes format wd my passport for mac much safer. This software can recover and repair files that are corrupted, which would otherwise be lost. Its high-grade scanning ability locates all files, making it impossible to lose vital information. The user-friendly interface makes sure that all users can easily navigate around the platform. Using a reliable software such as Recoverit, you protect your data rather than losing it!
Part 4. Smart Practices: How to Format WD My Passport for Mac While Keeping It Secure and Long-Lasting
Here are some of the tips you need to practice as you are format western digital my passport drives:
- Backup First: Users must always save and create a backup of their files prior to formatting, as it deletes all the data.
- Connect to a Reliable USB Port: Try using reliable and high-speed USB ports to avoid interruptions in the connections between the Mac and the HDD.
- Avoid Interruptions While Formatting: Make sure that the computer is in a stable state of power when formatting files; when there is a breakage in the connection, the drive can get corrupted.
- Regularly Update Firmware: To avoid compatibility and stability problems, update the firmware or utility software of the WD drive.
- Monitor Drive Health: Users need to check errors and bad sectors within the WD Drive Utilities or Disk Utility First Aid of your Mac daily.
Conclusion
In conclusion, this article has discussed the top ways you need to create a backup of your HDD before you learn how to format wd my passport for mac. We then discussed the steps you need to take in order to format an external drive on your Mac.
Apart from this, we provided you with different fixes you can follow in case your connected drive is not visible on macOS. From these fixes, the best one for you to recover the field is by choosing Recoverit recovery software, as it is reliable and safe.
FAQ
1. How do I reformat WD My Passport to exFAT?
You can how to reformat wd my passport for mac to exFAT by opening Disk Utility on your Mac, selecting the drive, and choosing Erase. From the format options, pick exFAT and confirm to proceed. It is compatible with Mac and Windows, and therefore, file transfer becomes hassle-free across the systems.2. How to make WD Passport work on Mac and Windows?
To connect WD My Passport to Mac and Windows, format it to exFAT or FAT32 because both operating systems support cross-formats. The exFAT file format is usually better because it can support bigger files. When it is formatted, it is easy to transfer data across the two operating systems with no extra software.3. Is WD My Passport an HDD or SSD?
WD My Passport comes mostly in the form of an HDD (hard disk drive), which is economical and has a large storage capacity. Nevertheless, there is also the WD My Passport SSD, the faster and more solid-state variant offered by Western Digital. The one you own is determined by the type of model you bought.4. Why is my Mac not reading my WD external hard drive?
The WD drive cannot be read by your Mac because of some problems, such as failure to use supported file formats, connection problems, and disk damage. In some cases, it merely needs to be set in the Finder preferences, or First Aid needs to be run in Disk Utility.


