

When videos play in slow motion unexpectedly, first check whether the player is set below 1x. If it already shows Normal, the next question is whether the video moves smoothly but slowly, repeatedly stops to load, or drops frames while the audio continues. Those symptoms call for different fixes.
This guide separates unwanted slowdown from deliberate slow-motion playback. Start with your player's speed control, then use the troubleshooting checks only if the problem remains. For an iPhone video, also distinguish a Slo-mo recording or saved edit from a playback problem. Keep the original file before changing or exporting anything.
In This Article
Part 1. Identify Why the Video Looks Slow
A speed setting, an edited effect and a struggling player can look similar. Compare the speed indicator, the progress counter and one familiar passage before changing system settings.
| What you notice | What to check first | Best next step |
| The whole video plays evenly but slowly, and the player shows 0.5x or another reduced rate. | The selected playback speed. | Choose Normal or 1x in the relevant player. |
| Only a defined section of an iPhone recording is slow. | A Slo-mo region or a speed edit. | Review Photos or the original editing project. |
| The picture stops, a loading indicator appears, then playback resumes. | Buffering or delivery interruptions rather than a deliberate slow rate. | Compare lower streaming quality, another connection and a complete local file. |
| Audio continues while the picture stutters or falls behind. | Decoding, rendering or workload in the affected app. | Compare a second player, resource usage and hardware decoding. |
| One exported file looks slow everywhere, although players show 1x. | The timing already stored in that version. | Compare the export with the original and the project's speed settings. |
For a simple timing check, watch ten seconds of the player's counter against a separate clock. At a selected 0.5x rate, ten seconds of media normally takes about twenty seconds to play. Irregular pauses suggest something different. This is a comparison, not a file-integrity test: an already slowed export can advance its counter normally while the action still looks slow.
Keep the same comparison passage throughout troubleshooting. Changing the player, file, resolution and network together makes it difficult to identify what actually helped. If only one clip is affected, do not assume that the entire computer needs repair.
Part 2. Restore Normal Speed or Play Videos in Slow Motion
These controls address the intended rate of playback. VLC and YouTube can change how you watch a video; editing in Photos or iMovie can change a saved version. Decide whether you need temporary viewing or a shareable edited copy.
Method 1. Reset VLC Playback Speed or Slow It Deliberately
Use this method when a local file opens in VLC but plays at the wrong pace, or when you deliberately want VLC slow motion for a demonstration or detailed review. Do not start by converting the video.
Step 1. In VLC for Windows, open the video and choose Playback > Speed > Normal Speed. With the default desktop hotkeys, = also restores normal speed. Custom shortcuts can differ; VideoLAN lists the default controls in its VLC hotkey reference.
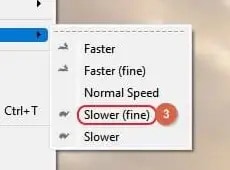
Step 2. To slow the video deliberately, select Slower or Slower (fine) from that menu. Check the displayed rate rather than repeatedly pressing a shortcut without watching the result. Return to Normal Speed when finished.
Step 3. For VLC on Android, open the playing video's More options menu, then Playback speed. Adjust the slider or arrows; use 1.00x to undo an accidental slowdown. This is an Android control, not a Windows menu; the official Android player guide documents it separately.
Replay the same passage and open a second clip. If both now run at the intended rate, stop troubleshooting. If VLC shows 1x but still struggles, move to the local-file comparison below. A playback-rate adjustment does not create a permanently retimed export.
Method 2. Choose Normal or a Slower Speed on YouTube
For a YouTube video, check the player's own speed setting before assuming your internet is slow. Use a regular recorded video for this comparison so that a live-stream interruption does not confuse the result.
Step 1. On a computer, move the pointer over the video and open Settings > Speed, sometimes labeled Playback speed. In the iPhone or Android app, tap the video to reveal its controls, then open the corresponding setting.
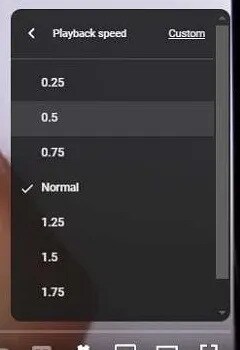
Step 2. Select Normal or 1x to remove unwanted slowdown. To play YouTube in slow motion, select an available lower rate, such as 0.5x. This changes your viewing session rather than editing the creator's uploaded file.
Step 3. Watch the same passage again, then test a different video. If the rate is correct but playback pauses to load, use the buffering checks in Part 3 rather than increasing the speed to compensate.
Google's playback-speed instructions also note that the feature is not available on every smart TV or streaming device. A missing television control alone does not establish a damaged video. Use a supported phone or computer to make the comparison.
Method 3. Adjust iPhone Slo-mo or Eligible Video Speed in Photos
Photos offers different controls for high-frame-rate video and recordings captured in Slo-mo mode. It is not a universal speed slider for every ordinary video already on your iPhone.
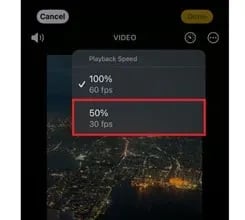
Step 1. For an eligible high-frame-rate recording, open it in Photos, tap Edit, select Video, then use the Playback Speed button. Choose from the rates offered for that clip. Availability depends on the captured format.
Step 2. For a recording made in Slo-mo, open its editing view and adjust the vertical Slo-mo boundary bars beneath the frame viewer. They define where the slow-motion section applies; they are different from the handles used to trim the clip.
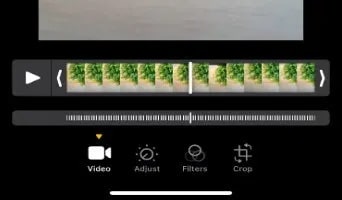
Step 3. Preview the transition into and out of that section before saving. Apple explains both controls in its Photos video-editing guide.
If the desired control is absent, do not reset the phone to force it to appear. Use the next method for a separate slow-motion edit. Preserve your original: not every exported or newly saved clip retains the original's reversible editing history.
Method 4. Create a Slow-Motion Copy with iMovie on iPhone
Use iMovie when you need a saved slow-motion version rather than merely slower viewing. Start with the original clip, not an already slowed export, so that you do not accidentally apply the effect twice.
Step 1. Open a Movie project containing the video in iMovie. Tap the clip in the timeline, then tap the Speed button.
Step 2. Select the intended range using the yellow handles. Drag the speed slider left to slow it; a reading of 1/2x means half speed. Check whether the selection covers the entire clip or only part of it.
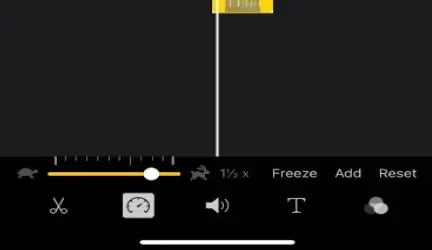
Step 3. Preview the sequence with audio. To remove this project's speed change, use Reset in the speed inspector. Apple documents the range controls and reset behavior in its iMovie speed guide.
Step 4. Return to the project overview, tap Share, then Share Video or Save or Share Video, depending on the version. Review Options, then choose Save Video for Photos or Save to Files for a separate file. Apple describes these destinations in its iMovie export guide. Open the saved copy and confirm that the intended range, duration and audio survived the export.
iMovie preserves audio pitch by default. Changing the speed of a Cinematic-mode clip also removes the ability to edit its Cinematic effects. Keep the original before committing to that workflow.
Check both the project preview and any exported copy. If the preview merely stutters, slowing the clip is not a performance repair; return it to the intended speed and investigate playback load instead.
Part 3. Fix Slow Video Playback That Continues at 1x
If the selected rate is already correct, isolate the file, app and delivery route. The following comparisons move from reversible checks to software and driver changes, without assuming that unsuccessful playback proves corruption.
Method 5. Compare a Complete Local Copy and Another Player
This test is useful when you cannot tell whether the slowdown belongs to the video or the way it is being opened. You need the affected file and a short video that you already know plays normally.
Step 1. Preserve the original. For a file you own or are authorized to download, finish the transfer to local storage before testing. Do not compare a cloud placeholder, incomplete download or network preview with a fully downloaded file.
Step 2. In VLC for Windows, select Media > Open File and choose that local copy. VideoLAN's file-opening documentation distinguishes file playback from network sources. Verify 1x and replay the selected passage.
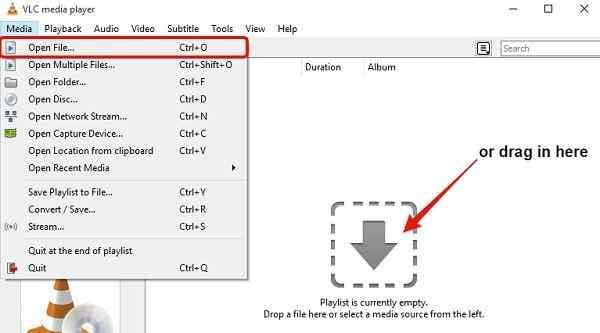
Step 3. Open the same copy in another suitable player, then test the known-good clip in both. On a Mac, an available compatible player such as QuickTime Player can provide the comparison.
If the problem occurs only in VLC, follow the more focused VLC playback troubleshooting path. If it follows one file across players, inspect that file's timing or export. If reading the source causes errors or the drive disconnects, stop repeated transfers and preserve the storage device.
Method 6. Reduce Competing Work and Check Resource Pressure
Use this comparison when several demanding videos stutter but a small control clip plays normally. High-resolution playback alone does not prove that you need more RAM.
Step 1. Save open work. In Windows, press Ctrl + Shift + Esc to open Task Manager. Review Processes and Performance for sustained CPU, memory, disk or GPU activity during the same problem passage.
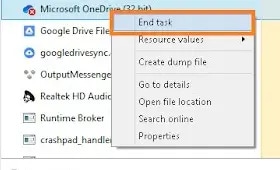
Step 2. Close an unnecessary export, game, recording session or other application you recognize. Prefer its normal Quit command; right-click an unneeded app and use End task only when appropriate because unsaved work may be lost. Do not terminate Windows system or security processes. Microsoft's performance guidance supports investigating resource-heavy apps rather than blindly closing everything.
Step 3. On a Mac, use Activity Monitor > Memory and review Memory Pressure, not just the amount of RAM marked used. Apple's memory-usage explanation describes why cached and compressed memory matter.
Replay the file after reducing the identified load. Improvement supports a workload explanation; no change does not justify a RAM purchase or a memory-cleaner download. On a hot iPhone, stop demanding activity and let the device return to a normal operating temperature before repeating the test: Apple notes that thermal management can reduce performance.
Method 7. Separate Buffering from Browser Trouble
Follow this route when online playback stalls, loads repeatedly or falls behind, especially if a complete local copy works. Leave the speed at Normal throughout the comparison.
Step 1. Open the streaming player's Quality setting and choose a lower resolution. On mobile YouTube, an Advanced quality menu may expose specific resolutions. Replay the same section rather than switching to an unrelated video immediately.
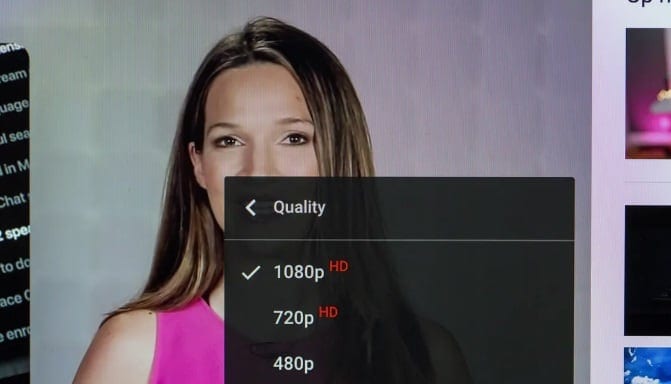
Step 2. Pause other large transfers and test another authorized connection when practical. A mobile-data test can incur charges. YouTube's video-error guidance includes connection, quality and app checks; a single universal bandwidth number is not appropriate for every resolution.
Step 3. If only one browser is affected, compare the same public video in a private window and with extensions disabled for the test. Private mode also changes cookies and sign-in state, so improvement does not identify a particular extension by itself. Update the affected browser and clear targeted cached data only if necessary.
If the connection works elsewhere but YouTube still fails specifically in Chrome, use the dedicated YouTube-on-Chrome troubleshooting route. If several devices fail on one service, check that service before changing the computer. Buffering is not evidence that a local recovery scan is needed.
Method 8. Compare Hardware and Software Decoding
Try this after the file and rate checks, particularly when the picture lags behind otherwise normal audio. Hardware acceleration can help demanding playback; disabling it is a comparison, not a universal upgrade.
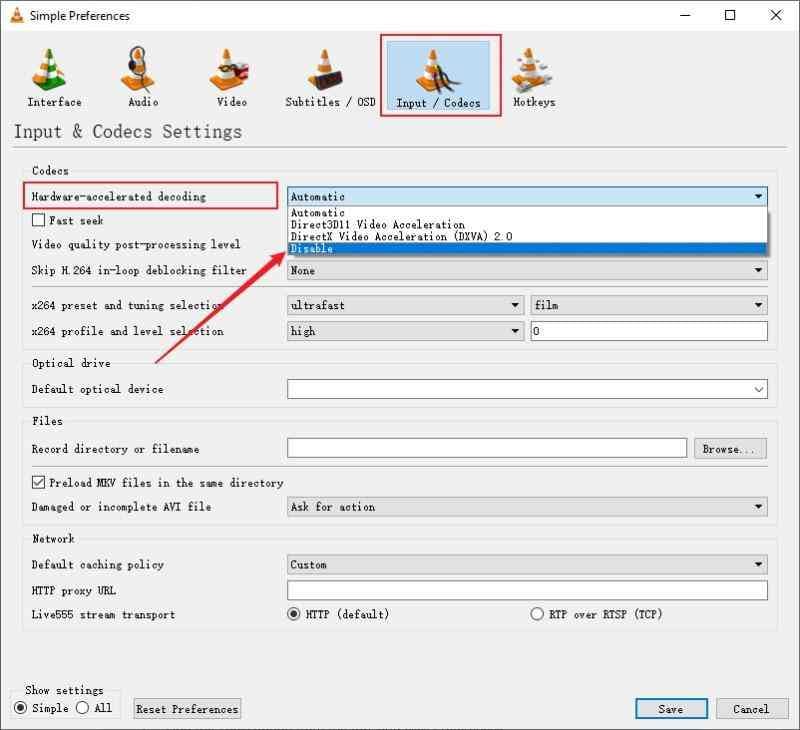
Step 1. In VLC for Windows, open Tools > Preferences > Input / Codecs. Note the current Hardware-accelerated decoding selection.
Step 2. Compare Automatic with Disable, saving and reopening VLC after the change. Replay the same local passage at 1x. VideoLAN's Windows FAQ describes testing GPU decoding for playback problems.
Step 3. For a Chrome-only problem on a computer, record the setting under Settings > System, compare the graphics-acceleration option and relaunch. Google documents that Chrome graphics-acceleration setting; using it here is a controlled diagnostic comparison, not evidence of a universal slow-playback fix.
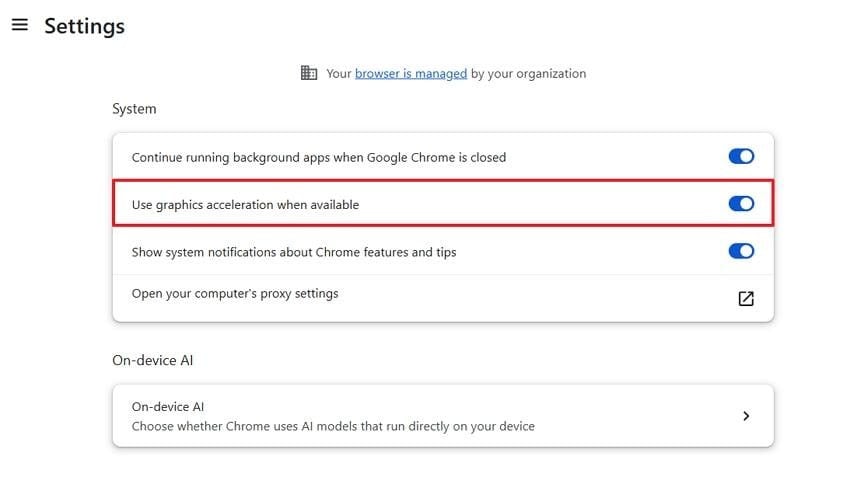
Restore the previous setting if playback becomes slower, CPU usage rises substantially or there is no improvement. Do not change experimental flags, system-wide acceleration and multiple player options together. Desktop controls also should not be presented as settings that necessarily exist in iPhone or Android browsers.
Method 9. Update the Affected App and Supported Graphics Driver
Software updates are most useful when the same device or app fails with several otherwise valid videos. Keep the playback setting unchanged so that you can evaluate the update rather than another speed adjustment.
Step 1. Update the player or browser through its official update mechanism. On iPhone and Android, use the appropriate app store and supported operating-system update. Do not install a codec or driver offered by a random video-page pop-up.
Step 2. On Windows, install applicable updates, then open Device Manager > Display adapters. Select the actual graphics adapter and choose Update driver. If necessary, use the computer or GPU manufacturer's official package for the exact model and Windows version.
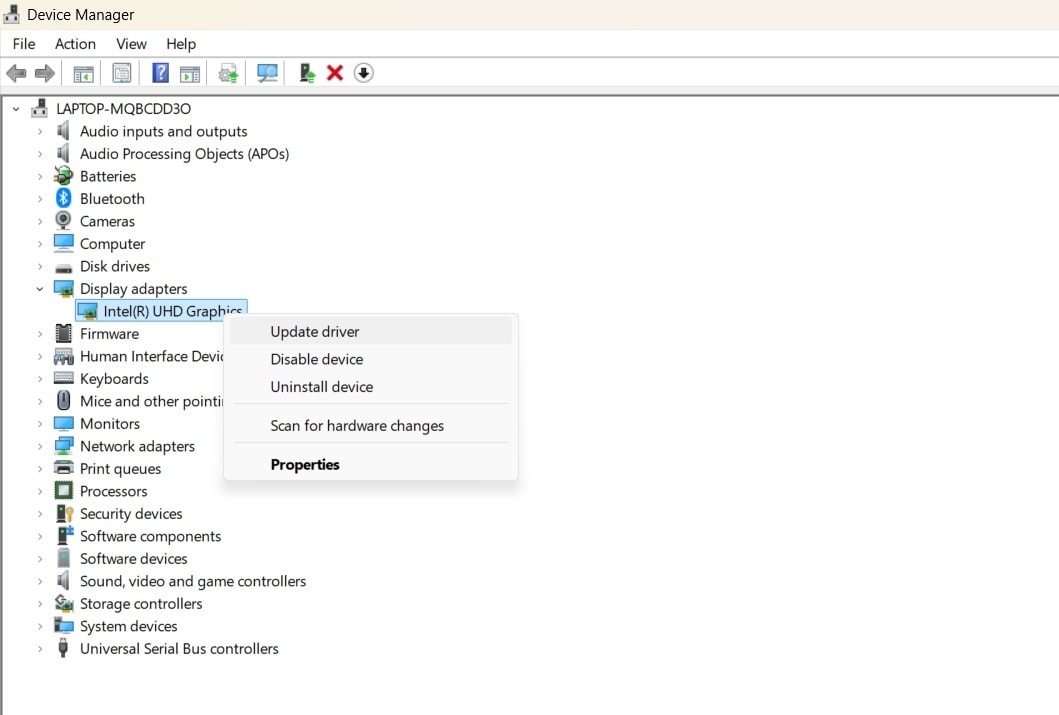
Step 3. Restart and compare the control clip with the affected video. If the trouble began immediately after a driver update, check whether Properties > Driver > Roll Back Driver is available; Microsoft's driver instructions cover supported update and rollback paths.
Do not follow the Windows Device Manager steps on a Mac. If no update changes the result, return to the evidence: a particular encoding may exceed the device's practical decoding ability, or the export may contain an intentional timing change.
Part 4. Check the Export or Find the Missing Original
When one version remains slow across players, focus on that version rather than repeatedly resetting the device. An incorrect edit, an incomplete copy and a deleted original are different problems.
Method 10. Compare File Timing and the Original Export Settings
This method fits a clip that looks slow everywhere, particularly after editing, transfer or conversion. Preserve both the original and the suspect export before making another version.
Step 1. Compare their duration, visible action and audio at 1x. In VLC for Windows, Tools > Codec Information can help identify the encoding and frame rate. A file extension such as MP4 does not reveal all of those properties.
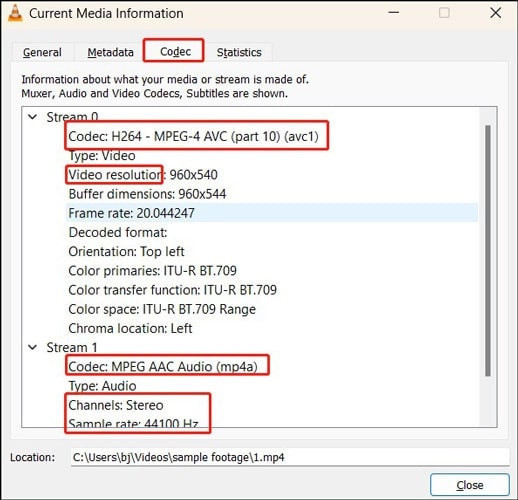
Step 2. Reopen the editing project and inspect the clip's speed, selected speed ranges and any frame-rate interpretation. Create a short corrected test export instead of repeatedly transcoding the full source. Use the editor's documented settings for that project.
Step 3. Test the new copy in another player and on the intended device, including the beginning, middle and end. Confirm both action duration and audio synchronization. For codec-specific rejection or decoder limitations, the unsupported-video-format guide addresses a different problem from a chosen slow-motion effect.
Frame-rate conversion and retiming are not interchangeable. For example, interpreting 120 recorded frames as 30 frames per second would spread those frames across four seconds; simply exporting a correctly timed clip at 30 fps does not necessarily quadruple its duration. FFmpeg's filter documentation treats frame-rate conversion and timestamp changes separately.
If the file is truncated or cannot be decoded, obtain a complete copy or a fresh export first. File repair may warrant evaluation for a genuinely damaged source, but an intentionally saved speed effect is not itself corruption. A missing original calls for the separate recovery path below.
Method 11. Recover a Deleted Original from Accessible Storage
Use this only when the original video was genuinely deleted from a computer drive, memory card or external storage device, leaving you with a slowed or otherwise unsuitable copy. First check the Recycle Bin or Trash and existing backups.
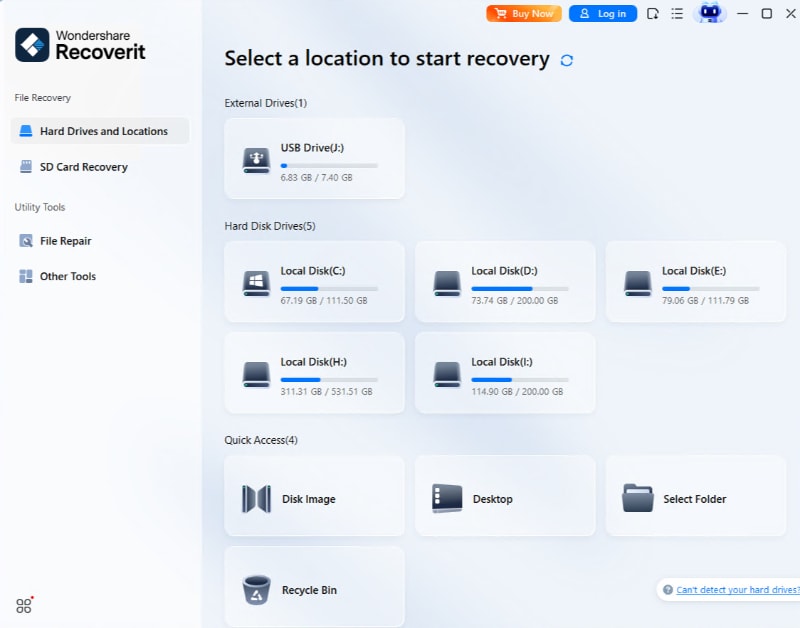
Step 1. Stop saving new files to the affected drive. Install recovery software elsewhere and prepare another destination for recovered files. Wondershare Recoverit Video Recovery is relevant to this missing-file situation, not to changing a working player's speed.
Step 2. In Recoverit, select the accessible storage location where the original was lost and start the scan.
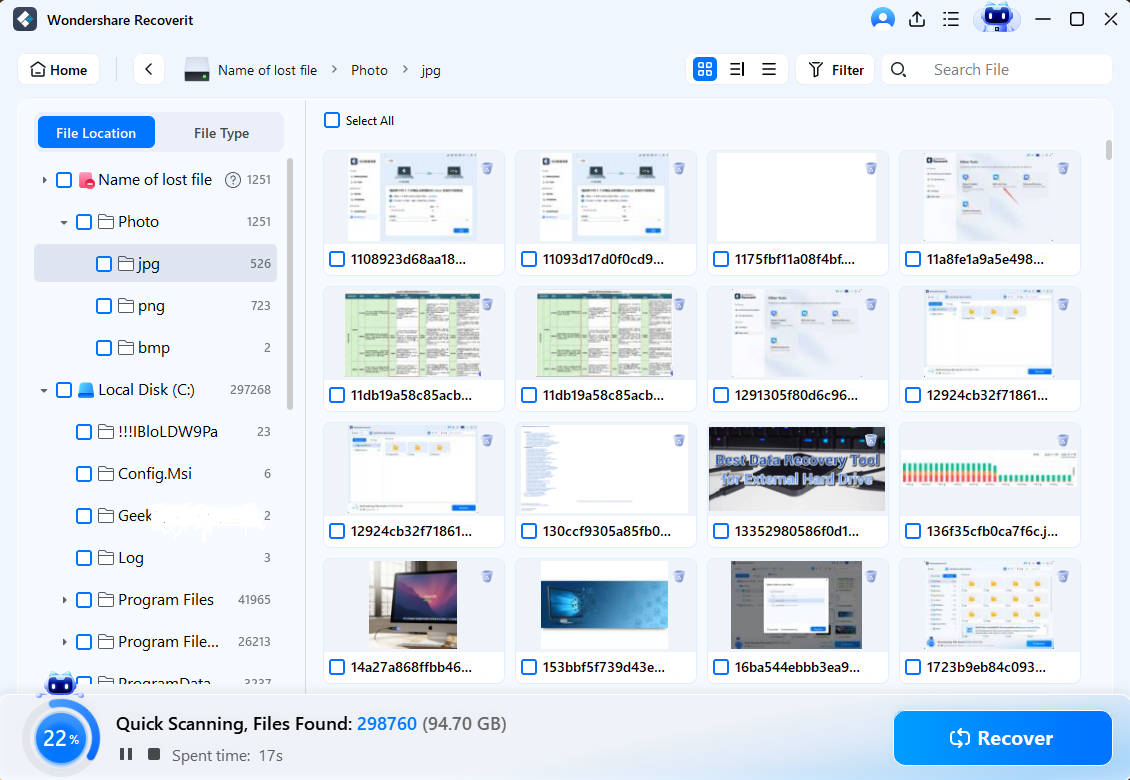
Step 3. Review the scan results and preview candidate files where supported. Check the actual content rather than relying on a familiar filename or thumbnail.
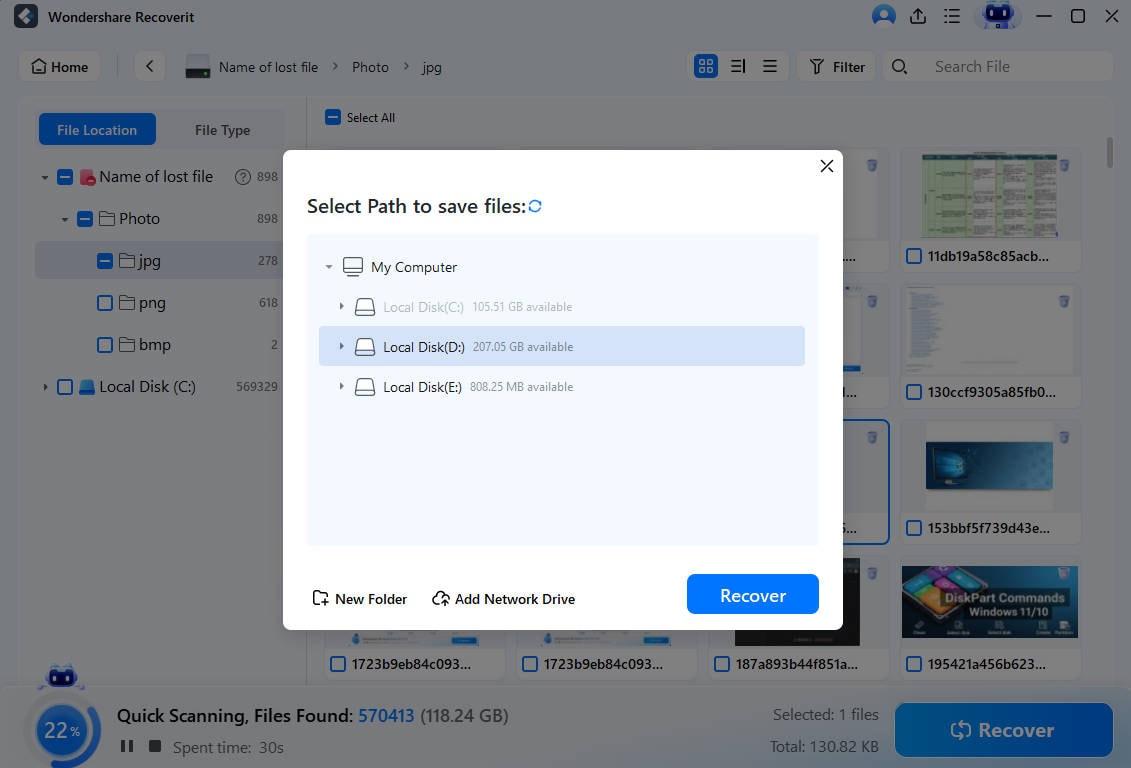
Step 4. Save the selected files to a different drive. Then open the recovered copy at normal speed and verify its timing and audio. The official Recoverit workflow describes location selection, scanning and saving.
Recovery depends on what remains readable and has not been overwritten. This is not a direct scan of an iPhone's internal storage through a USB cable, nor a way to recover a streaming provider's video. If the source device disconnects or makes abnormal mechanical noises, stop repeated scans and seek an appropriate storage assessment.
Conclusion
Start with the intended speed: reset a player to 1x to remove an accidental setting, or use its slow-playback control deliberately. When the video still looks wrong at Normal, compare a complete local copy, another player, system load and the export's timing. Preserve the original before edits; consider recovery only when that original is actually missing from accessible storage.
FAQ
-
Why are all my videos playing in slow motion?
Check the shared player's rate first. If it is already 1x, compare a small known-good local clip in another player. Multiple files failing in one app suggest a different route from one export looking slow everywhere. The symptom alone does not prove corruption or insufficient RAM. -
Can I play a video in slow motion without changing the file?
Yes. Use a player's temporary playback-rate control rather than exporting an edited copy. Restore Normal or 1x afterwards. Keep that distinction in mind when sharing: another person opening the original file will not necessarily inherit your viewing speed. -
Why is playback speed missing for my iPhone video?
Photos does not provide the same speed choices for every capture format. A Slo-mo recording, an eligible high-frame-rate video and an ordinary exported clip can expose different controls. Use an appropriate editor for a separate retimed copy rather than assuming the missing button indicates damage. -
Should I set 2x speed when a video is playing too slowly?
Not as a general repair. It can conceal an existing slowdown while leaving dropped frames, buffering or synchronization problems unresolved. Establish the intended timing first. A deliberately retimed export is a separate case from a player that cannot keep up. -
Will converting a video to 30 fps remove slow motion?
Not automatically. Changing output frame rate can alter which frames are retained without removing a timing effect. Review the original project's speed and interpretation settings, then check a short test export's duration and audio before processing the full video. -
Can Recoverit fix a VLC or YouTube speed setting?
No. Change playback speed in the relevant player. Recoverit is useful here only when you need to look for a deleted original on accessible computer or external storage. Finding a file does not guarantee that its original timing or complete contents can be recovered.


