
 TL;DR:
The Linux "Partition 1 does not start on physical sector boundary" error stems from incorrect disk mounting, unpowered drives, or missing file formats, requiring administrators to verify device recognition using the sudo fdisk -l command.
● When formatting the drive to an EXT4 file system, the system performs a lazy initialization that continuously writes data to clean disk inodes, meaning the server must remain powered on until this background process finishes.
● If resetting the partition causes data erasure, files can be restored using Wondershare Recoverit installed on a separate Windows or macOS computer by establishing a remote connection using the Linux system's IP, Port, Username, and Password.
Ask AI for a summary
 ChatGPT
 Perplexity
 Gemini
 Claude
 Grok
Grok
Every time you update your Linux system or create a backup partition, specific errors come into the light that many users seek solutions for. A notable example that you’ll encounter in most online forums is the partition 1 does not start on physical sector boundary error. You might encounter it when trying to create or delete primary partitions prior to recent updates.
While a daunting message in itself, it can lead to several hardware-destroying errors in the process. In light of that, here is your definitive guide on how to fix the “partition 1 does not start on physical sector boundary” error on Linux.
Part 1. Why Does This Error "Partition 1 does not start on physical sector boundary" Occur?
You can receive the “Partition 1 does not start on physical sector boundary” error for any of the following reasons.
Incorrect Disk Mounting
The volume designated as /dev/sdb6 is your partition that should be mounted on /home. Try to mount it somewhere temporarily. If it mounts, it is formatted. If it doesn't mount, it needs to be formatted.
Report on its format status, then we can set a proper course of action. You can then mount the disk correctly and create the partitions to your heart’s content.
Not Enough Disk Space
You might need to boot your Raspberry with the drive plugged in, or reboot after plugging it in, otherwise the device might not get recognized. Such a flaw may present itself while using an unpowered case. Alternatively, your SSH session might freeze.
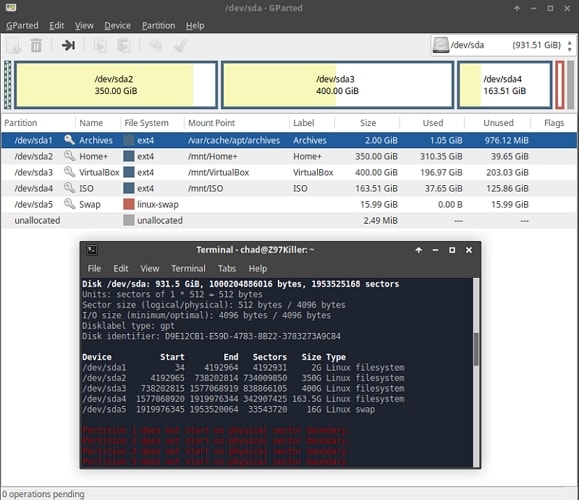
Plug your disk into your server and check if the device is being recognized with the following command.
sudo fdisk -l
At the bottom of a quite lengthy output, you should see an entry similar to the following.
Entry Disk /dev/sda shows the disk itself, the physical device. Partitions of that disk will be listed as /dev/sdaX where X is the number of a partition.
If you have only one partition on a given disk, you will see just /dev/sda1.
If you have more drives, the second will be shown as /dev/sdb with partitions starting from /dev/sdb1, third drive will be /dev/sdc etc.
fdisk -l shows an overview of drives available to you and will allow to identify partitions belonging to a particular drive. For convenience, partitions on a given drive are listed together.
In case you have trouble identifying disks you can google the Disk model to make sure which /dev/sdX is which disk. But you should be able to figure that out on your own.
No File Format Present on the Partition
An inexperienced user can easily initialize a partition without proper formatting. For instance, after formatting a drive to EXT4 file system, you will notice that the system is writing to disk periodically. This is normal and easily observable on an HDD when you hear the disk writing data.
In order to speed up the formatting process, disk inodes are not cleaned during the format. It is done afterwards so that the disk can be used right away.
Give the drive some time and do not power down your server. Just wait for it to finish. HDD drives will not go to sleep, nor will they spin down until the process is completed. The bigger the drive, the longer you will have to wait. During lazy initialization the disk is fully usable.
Part 2. How To Fix This Error "Partition 1 does not start on physical sector boundary"?
The video below shows you how to fix the error "Partition 1 does not start on physical sector boundary".
Part 3. How To Recover Data if You Experienced Data Loss When This Error Occurs?
Regardless of which method you choose, there is always a chance that resetting the disk can cause the partition to erase all data. While it is essential to create a cloud backup, you may need to rely on a third-party software if you didn’t secure your drive.
If you ever find yourself in such circumstances, don't worry, as all is not lost. You can still recover your lost data on Linux using Wondershare Recoverit data recovery software. It is a groundbreaking application that comes with a host of valuable features:

Wondershare Recoverit – Leader in Data Recovery
5,481,435 people have downloaded it.
Recover lost or deleted files, photos, videos, music, emails, and other 1000+ file types effectively, safely and completely.
Efficiently handle 500+ Linux data loss scenarios, including deleting, formatting, disk failure, lost partition, power failures, virus attacks, etc.
Support 600+ active Linux distros such as Ubuntu, Linux Mint, Debian, Fedora, etc.
The simple point-and-click interface allows you recover data from Linux hard drives in just a few clicks.
You can download Wondershare Recoverit for your preferred Windows or macOS computer. Once installed, follow the below-mentioned steps to get any essential data back from the disk of your choice.
Step 1. Choose Linux Recovery
Launch Recoverit Linux recovery software after the installation on your Windows or Mac computer. Choose the Linux Recovery under the NAS and Linux option.

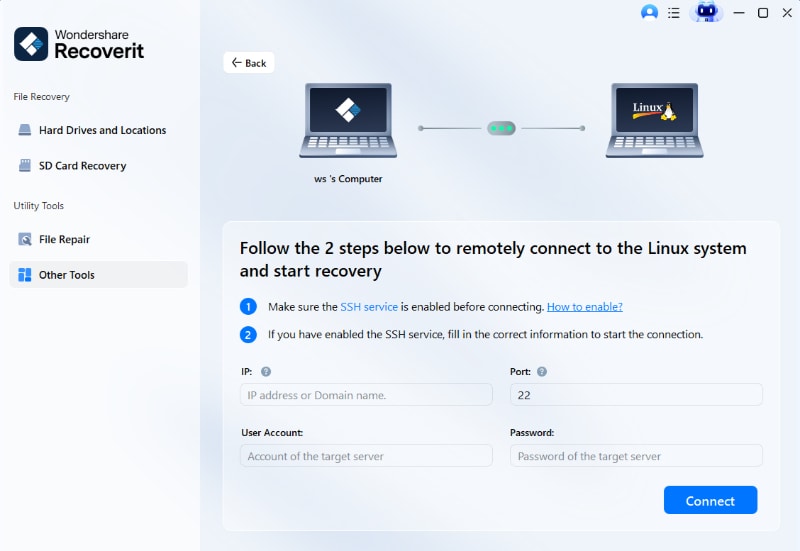
Step 2. Connect to Your Linux
Enter IP, Port, Username, and Password of your Linux to build a connection between the Linux computer and Recoverit. Then, click Connect to proceed.
Step 3. Scan for Lost Data
Recoverit will automatically start scanning for lost files on your Linux computer after the connection is successful.

Step 4 Preview and Recover
After or during the scanning process, you can preview the files listed on the screen to ensure you will recover the correct files. Finally, click the Recover button to save the files to a safe location.

For Windows Vista/7/8/10/11
For macOS X 10.10 or later
Summing Up
When observing the “partition 1 does not start on the physical sector boundary” error, it can be challenging to adopt the right method and get rid of it. We hope this guide helped you learn more about the issue and delivered viable solutions for data recovery. Feel free to browse any other useful guides on our official website or leave your thoughts in the comments below.


