BitLocker drive encryption has been around for a few years now, and more and more people are using it to protect their data. However, if you're unfamiliar with BitLocker, it's a built-in Windows feature that encrypts your hard drive, making it difficult for someone to access your data if they steal your computer. In this blog post, we'll show you how to turn on BitLocker and enable BitLocker on your Windows 10, Windows 11, Windows 10 Home, and Windows 11 Home. We will also discuss issues such as "BitLocker can't encrypt the drive."
In this article
Requirements for Turning on BitLocker
1.1 Supported operating systems
- Windows 11 - Education, Pro, or Enterprise edition
- Windows 10 - Education, Pro, or Enterprise edition
- Windows 8 — Professional or Enterprise edition
- Windows 7 — Enterprise or Ultimate edition
- For Windows 7, the Trusted Platform Module (TPM) version 1.2 or higher must be installed. It must also be enabled and activated (or turned on) - how to check your TPM status.
- Although BitLocker is not part of Windows 11 Home, you can still protect your computer and files using "device encryption." In the Home edition of Windows 11, device encryption is a light version of BitLocker.
1.2 Other requirements
- You must be logged in as an administrator
- You must have access to a printer to print the recovery key.
1.3 Should I enable BitLocker?
Yes, you should. BitLocker is a great way to protect your data if you're worried about losing physical access or transactions. You can turn it on now without any impact on performance, so I recommend considering this feature before deciding against encryption altogether.
BitLocker is an encryption program that protects all files on your operating system, including swap and hibernation information. It also checks the integrity of early boot components to ensure they haven't been tampered with during installation or after setup has been completed. There are also several ways to turn off BitLocker in case you need.
However, you must backup your Bitlocker recovery keys. These are necessary when updating your motherboard or firmware without suspension protection, so make sure you back them up.
Now, let's discuss how you can enable BitLocker encryption on Windows 10, 11, 10 Home, and 11 Home.
Enable BitLocker Encryption on Windows 10
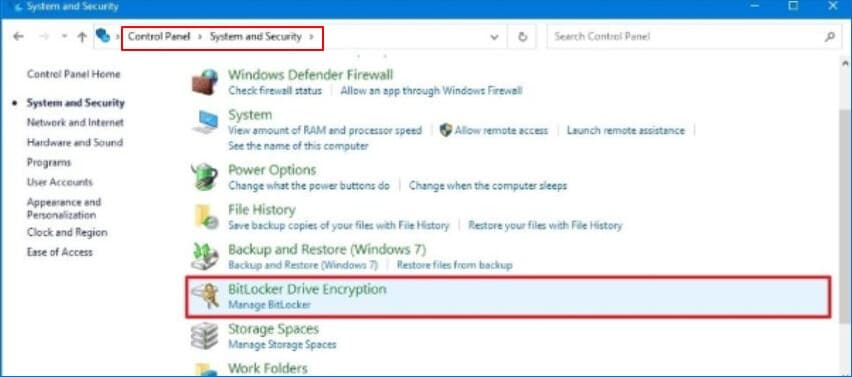
- Type Manage in the search box on your taskbar and then select BitLocker from all the available results. Or you can click on the Start menu and select "Control panel."
- Go into System and Security > BitLocker Drive Encryption.
- Click on Manage BitLocker
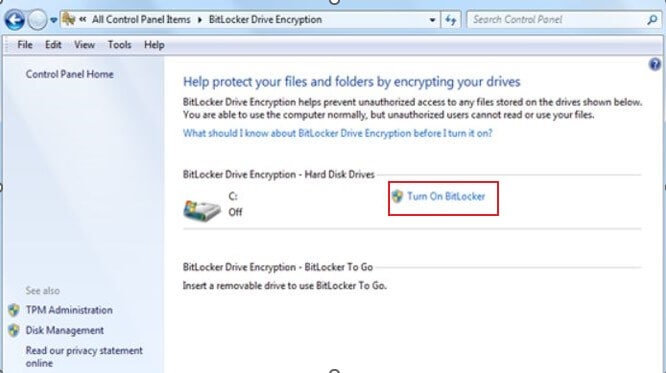
- Select Turn on BitLocker Encryption
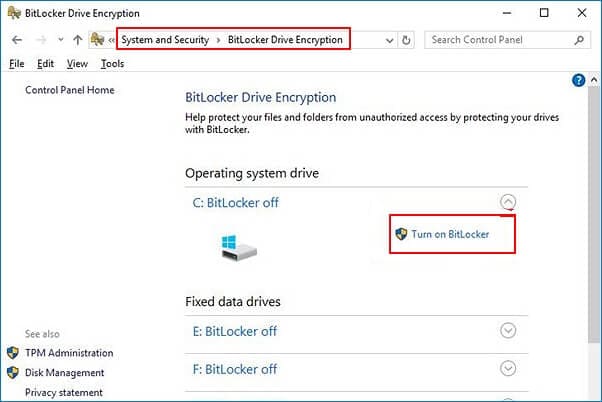
Follow the instructions that come forth.
Tip: if your device does not provide encryption, you can turn on Standard BitLocker encrypt
Enable Bitlocker Encryption on Windows 11
To enable BitLocker encryption on Windows 11, follow the steps as under
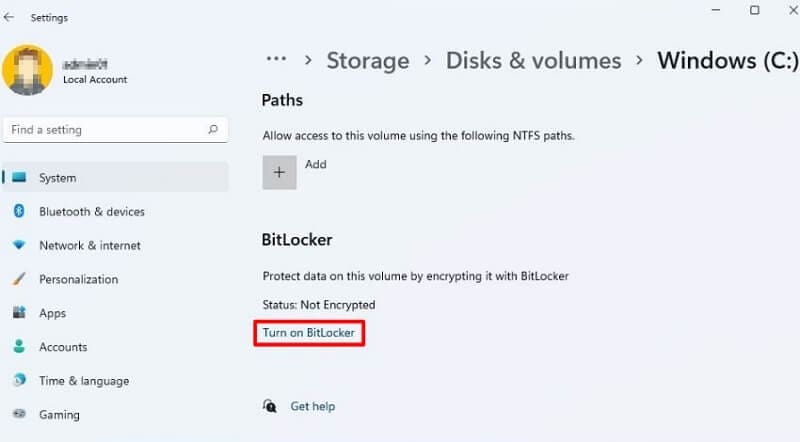
- Launch Settings from the Start menu and hit on Storage
- Under Storage management, look for Advanced storage settings and click on it.
- Hit Disks & volumes.
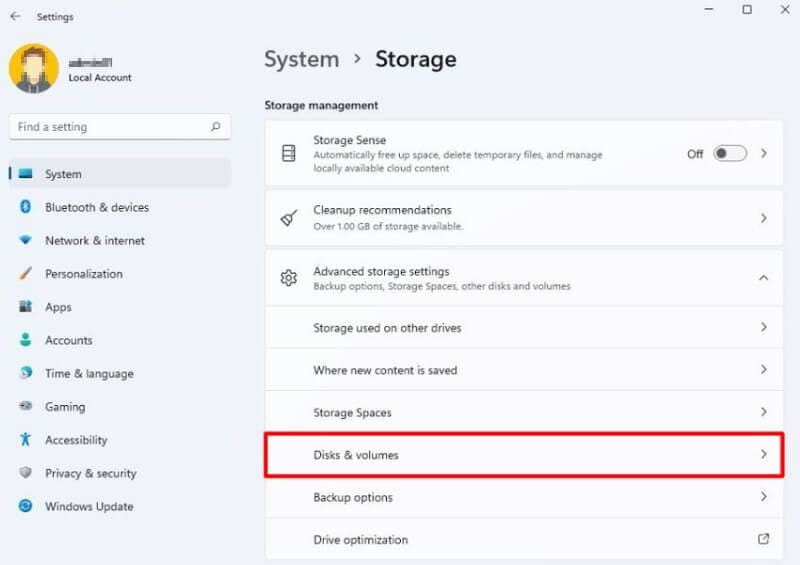
- Note the drive letter of your encrypted partition. Now choose the Partition you want to use for encryption and click on
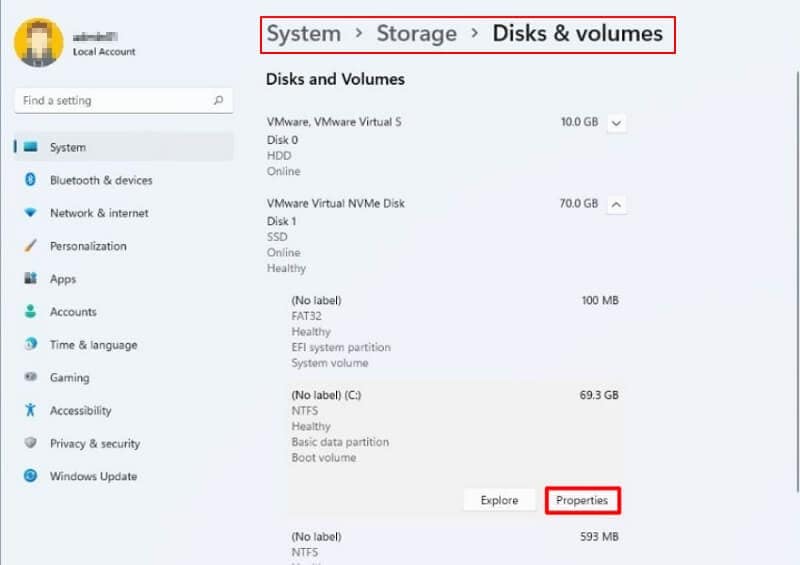
- Hit on Turn on BitLocker
Enable BitLocker Encryption on Windows 10 Home
Windows 10 Home doesn't provide the ability to encrypt your drives with BitLocker. Still, it can unlock and access encrypted drives that have already been protected by a previous version of Microsoft's encryption software.
To turn on BitLocker, you need to connect your drive to a Windows 11/10 Professional or Enterprise computer. You can then reconnect it and use the built-in encryption feature for Windows 10 Home edition computers as well!
However, to use the device encryption feature in Windows 10 Home, you need two things:
- Trusted Platform Module (TPM) that is enabled.
- A system with firmware such as Unified Extensible Firmware Interface (UEFI).
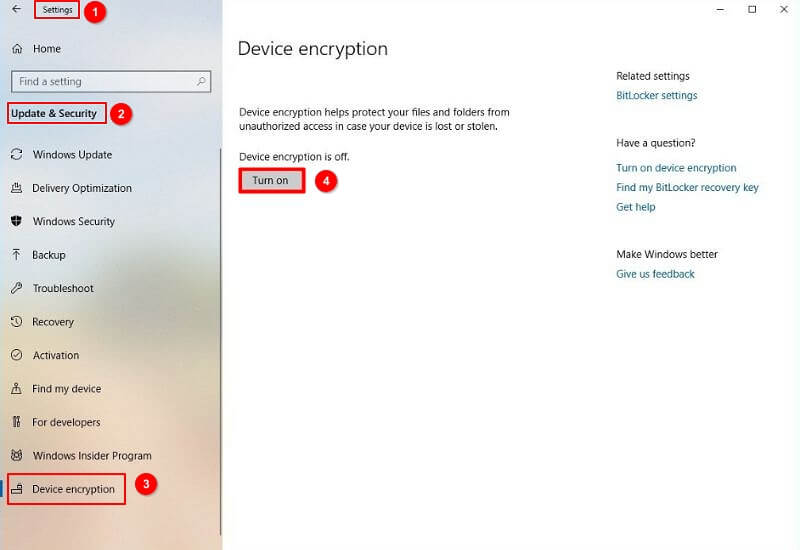
To turn on device encryption on your Windows 10 Home
- Go to Settings in Windows
- Tap on Update & Security
- Tap on the Device encryption
- Click "Turn on" to start encryption.
Enable BitLocker Encryption on Windows 11 Home
The easiest way to turn on BitLocker for your Windows 11 Home computer is by following these steps:
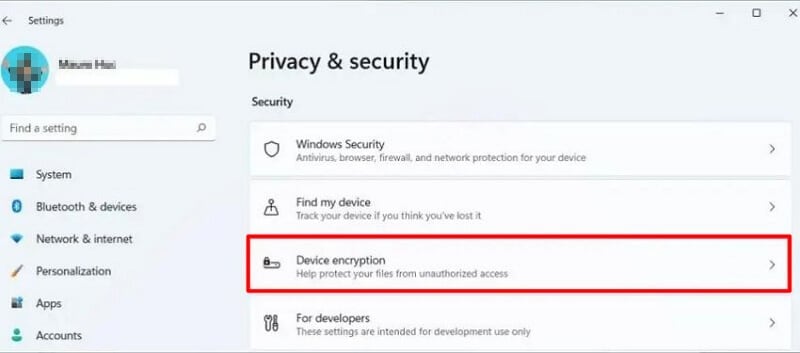
- Go to Settings.
- Tap on Privacy & Security.
- Below the "Security" section, hit on the Device encryption
- On the toggle switch, turn on-device encryption to enable BitLocker encryption on Windows 11.
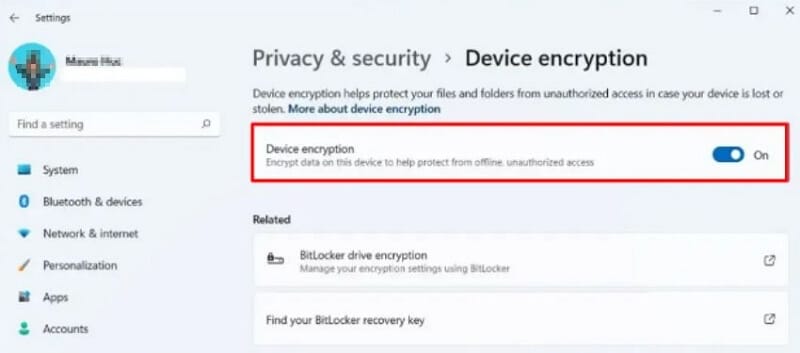
Now that you've completed these steps, your system drive is beginning to encryption.
Enable BitLocker to Go for Removable Drives on Windows 10
- Launch Control Panel and open it to view your options
- Move to System and Security
- Tap on BitLocker Drive Encryption
- Click on "Turn on BitLocker" lying opposite the removable USB drive you wish to encrypt.
Enable Bitlocker to Go for Removable Drives on Windows 11
BitLocker to Go allows you to safeguard your data with an AES encryption key, so it's only accessible when both the password and recovery code are entered.
Steps:
- Go to Settings
- Tap on System > Storage.
- As the menu expands, click on Disks & volumes.

- Choose Properties

- Scroll and select Turn on BitLocker
- Under the "Operating system drive" section, tap on Turn on BitLocker

- Select Save to Microsoft account. Hit Next
- Select Encrypt used disk space only. Hit Next
- Select New encryption mode. Hit Next
- Tick Run BitLocker system check. Hit continue
- Tap Restart
BitLocker is now enabled on your computer! The system needs a few minutes to finish signing in and formatting, but once it's done, you'll have access through Bitlocker with any removable drives.
BitLocker Can't Encrypt the Drive? How to Fix
Sometimes, BitLocker may not function as intended. Let's see what may cause this BitLocker encryption failure on your system.
Some of the most common reasons for "BitLocker Failed to Encrypt" include the following:
- The ability to on a drive is only possible if the computer meets certain specifications. First, you must make sure that compression has been enabled and there cannot be any file systems with clusters smaller than 4 KB in size since these would pose obstacles to the encryption process.
- The BitLocker wizard might be missing from the context menu of your drive, or you may not have access to it because it's buried under System and Security > BitLocker drives encryption.
If BitLocker fails to encrypt the drive, you can use the following simple solutions to fix this "BitLocker cannot encrypt the drive" issue.
Solution 1. Clean the disk and recreate the partition
a. Use a Third-party Tool to Clear Partition
There are some amazing tools available to help you fix the "BitLocker can't encrypt the drive” issue, such as AOMEI Partition Assistant. They can manage, partition, and even optimize your hard drive.
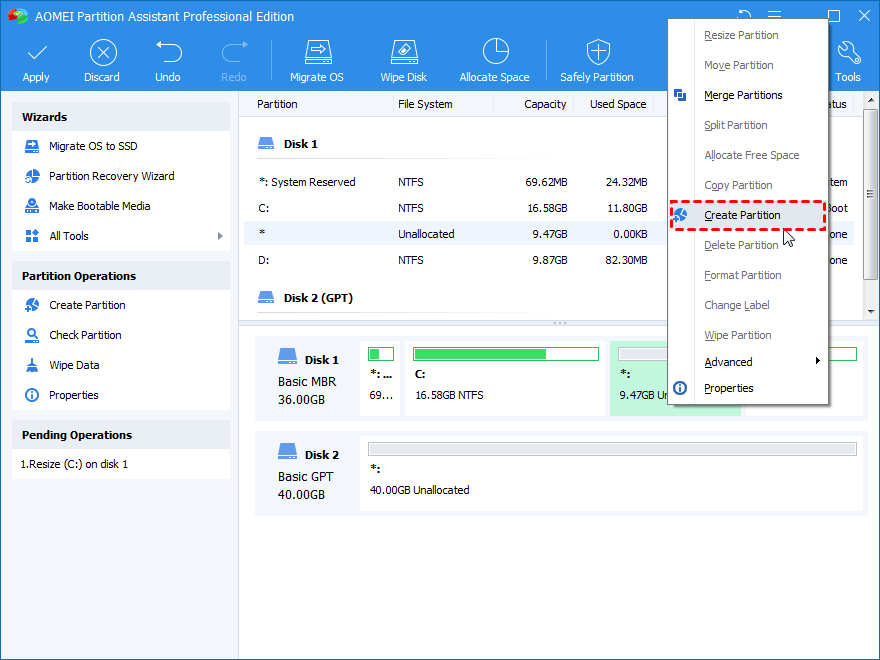
Using a third-party tool means it will delete all data on your disk. So, create a backup outside the drive just in case you lose any files or folders during erasure.
However, if you still lose your data, you can use Wondershare Recoverit.to retore your files.

For Windows XP/Vista/7/8/10/11
For macOS X 10.10 or later
b. Manual Partition Using Command Prompt
- Type cmd in the search bar at the top right corner of the screen to launch Windows' built-in Command Prompt and click on Run as Administrator.
- Type "diskpart" then press Enter.
- The list disk command displays all drives in a system.
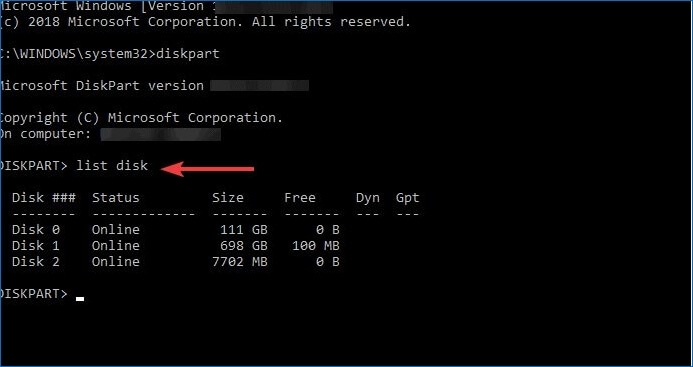
- To fix the errors on your hard drive, select disk # and enter.
- Type clean and press Enter to complete the task.
- To create a new partition, wait until the drive has been cleaned.
- Create a primary partition and press Enter.
- Type in assign letter "#"
- To format your hard drive, go into the formatting options and select format fs=ntfs.
With the manual process, proceed with extreme care and follow it to the letter.
Solution 2. Change the Security Chip settings
- You need first to start your machine and open the BIOS
- Next, head to the Security tab and select your security chip settings.
- When you're ready, select the Discrete TPM option.
- Once you've made your changes, click on the Clear Security Chip button to finalize them.
- Restart your computer and try again. If the problem persists, call an expert.
Solution 3. Enable BitLocker without a Compatible TPM
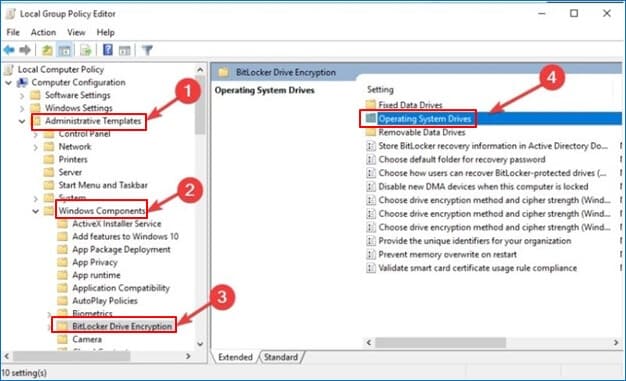
- Go to Start and open Run
- Type gpedit.msc, then hit OK once you're there.
- Tap on Administrative Templates from Computer Configuration followed by Windows Components.
- Choose BitLocker Drive.
- Browse to Encryption and then Operating System Drives
- Double-click on the tab Require additional authentication at startup
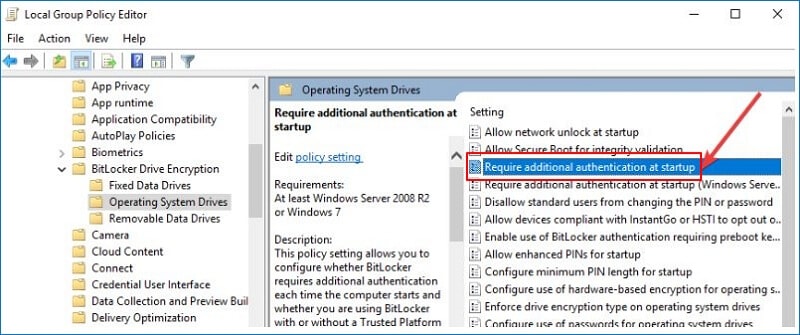
- A new window opens up. Choose Enabled.
- Click on Apply to save all the changes
Now go ahead and try encrypting your drive using BitLocker.
Conclusion
While BitLocker is a powerful tool, it's not always easy. In this blog post, we walked you through how to enable BitLocker on Windows 10 and 11. We also discussed some of the most common problems users experience when trying to encrypt their drives with BitLocker. If you have queries or run into issues while trying to turn on BitLocker, refer to our article or reach out for help.

 ChatGPT
 Perplexity
 Google AI Mode
 Grok
Grok


