
You may need to repartition an old hard disk if you change your mind about what you want to do with it. If you decide to repartition a hard drive, you will need to reallocate the partition size, the drive letter, and the file system.
Part 1. What Does Hard Drive Repartition Mean?
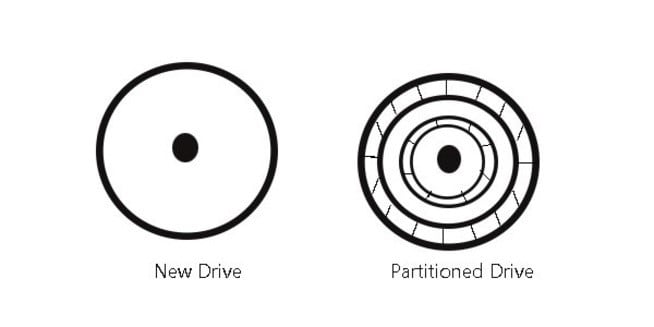
Repartitioning a hard drive means reallocating hard disk space to hard disk partitions. It will change the hard disk layout according to the number and location of partitions. When repartitioning, you also need to set the specifications of the partitions involved, including partition size, drive letter, partition type (primary, logical, or extended), file system (such as exFAT, FAT32, NTFS, etc.), cluster size, and label.
The repartitioning process is typical; however, it is simple to make mistakes. The amount of time needed to complete this task is directly proportional to the disk partition size. You may make your computer useless if you do not know the process.
2026 Technical Update: GPT vs. MBR Limitations Before you begin, check your disk style (Right-click Disk > Properties > Volumes). Windows 11 requires the GPT (GUID Partition Table) style for its system drive to support UEFI security features. If your disk is still using the legacy MBR (Master Boot Record), you are limited to four primary partitions and a 2TB maximum size. Repartitioning an MBR disk beyond these limits without converting to GPT first can cause the drive to become "Unallocated" or invisible to the BIOS.
Feature |
Disk Management |
DiskPart (CLI) |
AOMEI Assistant |
| Ease of Use | Visual / Basic | Command-based / High Risk | Visual / Guided |
| Move Partition | No | No | Yes |
| Non-Contiguous Extend | No (Greyed out) | No | Yes (Merge) |
| BitLocker Support | Limited | Basic | Advanced |
File System |
Best Use Case |
Max File Size |
| NTFS | Internal Windows Drives (System & Data) | 16 TB+ |
| exFAT | External Drives (Windows & Mac Sharing) | 128 PB |
| FAT32 | Legacy Devices / BIOS Flash Drives | 4 GB |
Part 2. How To Repartition a Hard Drive on Windows 10/11
The followings are some of the different ways to repartition a Hard Drive on Windows 10/11:
Way 1. Repartition a Hard Drive on Windows Disk Management
Since the introduction of Windows, it has always been possible to divide the hard drive into many partitions. In most cases, this can be accomplished without losing any data; nevertheless, there is no assurance that the data will be preserved in every instance. Therefore, if you want to format a hard drive that currently stores crucial data, it is critical that you first generate a backup of the data on the hard drive.
To launch the Disk Management console, pick Manage from the context menu when you right-click My Computer, Computer, or This PC. You'll be able to see the partition status, drive letter, the amount of space occupied by the file system, and any other relevant information right there.
1. To expand a partition, you may do so provided that there is unallocated space close to the partition that you wish to extend and that you have permission to use that space. Select "Extend Volume" from the context menu after right-clicking on the partition. To do the extension, follow the wizard's instructions.
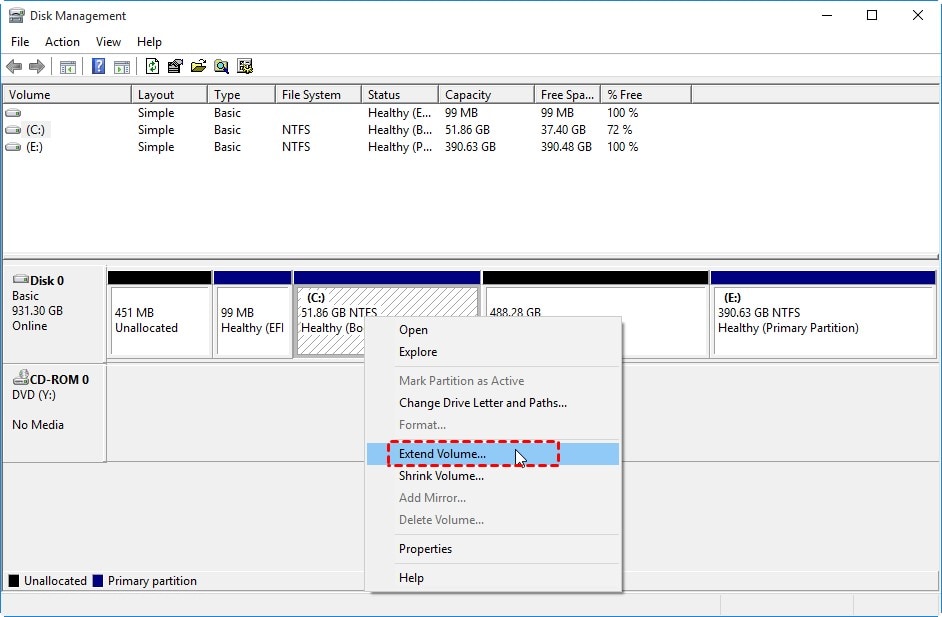
The option to extend the volume will be grayed out if there is no contiguous space adjacent to the partition in question or if there is no unallocated space anywhere else on the drive.
Pro Tip: Why is "Extend Volume" Greyed Out? Windows Disk Management can only extend a partition if the Unallocated Space is immediately to the right of the target volume. If there is a "Recovery Partition" or another data drive (D:) sitting between your C: drive and the empty space, the option will be disabled. To fix this without deleting data, you must use a tool like AOMEI Partition Assistant to "Move" the partition or use the Merge Partitions feature to bypass the contiguous space requirement.
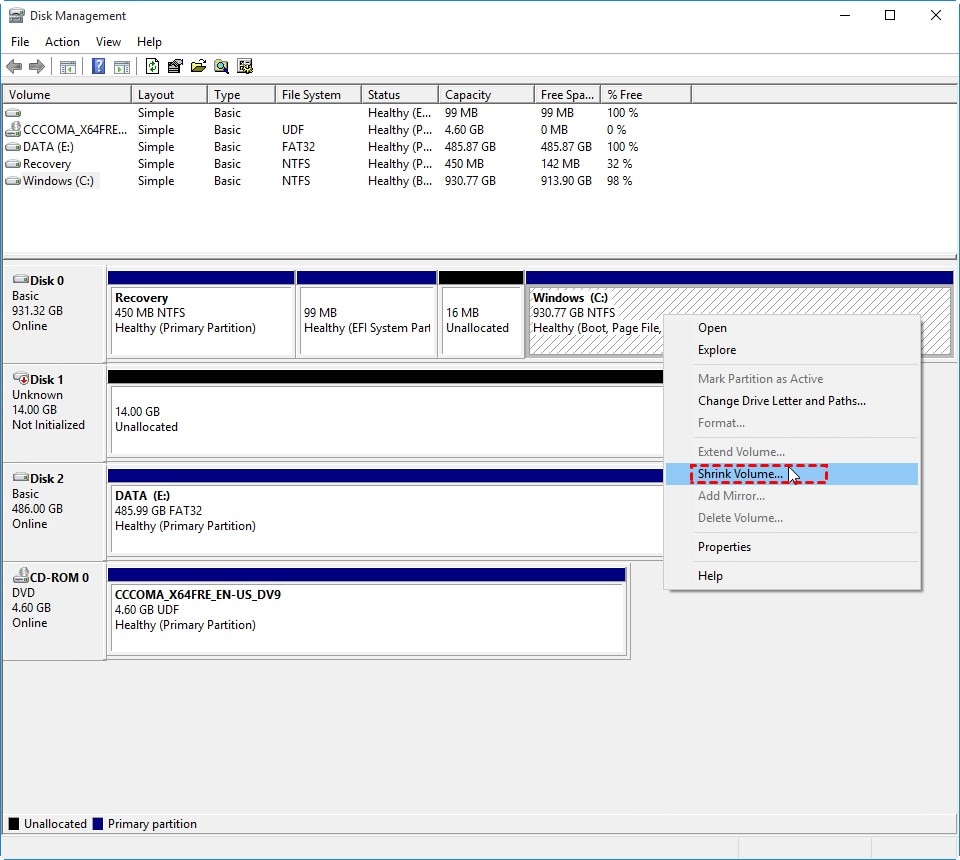
2. To reduce the partition size, right-click it and then pick the Shrink Volume option. You should be able to reduce the size of the divider to one-half of its previous dimensions. You will need to use third-party software to reduce the partition size by more than half if you choose.
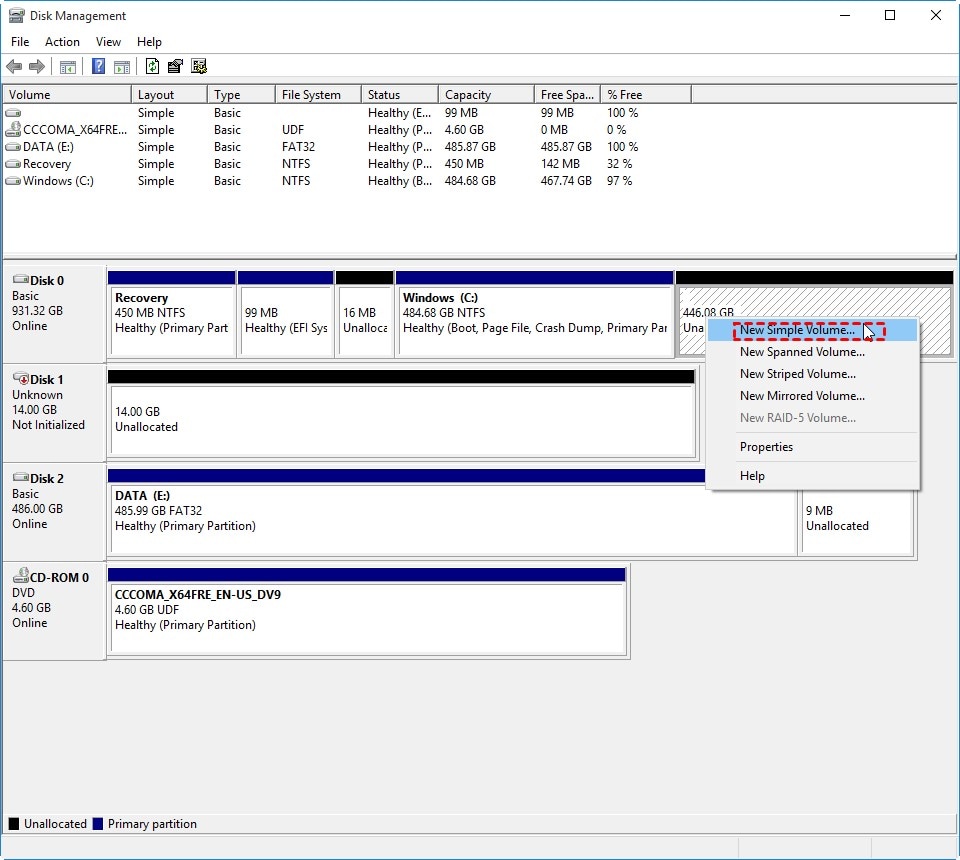
3. To create a new partition, right-click an area of the disk not being used and pick New Simple Volume from the context menu. To finish the project, follow the wizard's instructions. It is possible to get space that has yet to be allotted by erasing existing partitions; however, before you do this, you should ensure that all of your vital data has been backed up.
If you want to entirely change the partitioning scheme of a hard drive, you can do it by deleting all of the current partitions and consolidating the free space into a single one. After that, go to the process of splitting and creating. Despite this, it is only possible to do this task on the external hard drive since the Windows operating system does not let users erase system partitions from inside the Windows environment. In addition, it pertains to formatting a partition using a different file system.
Way 2. Repartition a Hard Drive Using DiskPart Commands
DiskPart is another helpful tool integrated into Windows to help you repartition a hard drive. It is used in the Command Prompt to create partitions, format partitions, remove partitions, wipe hard disks, resize partitions, and so on.
Please be aware that users need to be conversant with the DiskPart commands to use this approach. This is because the erroneous execution of an incorrect command will almost certainly result in data loss.
Extend Partition
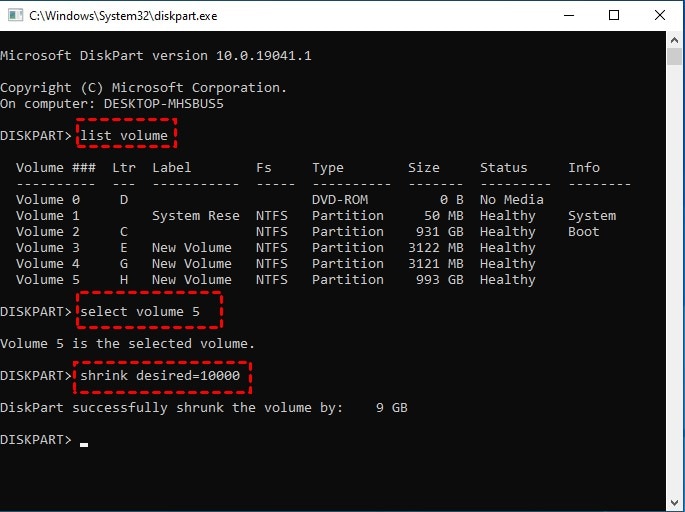
Step 1. To launch DiskPart, press the Windows + R combination, type diskpart, and press the Enter key.
Step 2: Type list volume in the command prompt and press Enter.
Step 3: Next, type select volume x and press Enter. Replace "x" with the number of the partition you want to pick as the target.
Step 4: Finally, type extend size=xxxx (where "xxxx" refers to the additional storage space to be added).

Shrink Partition
Step 1. Launch DiskPart on your Windows 10 or 11 computer by pressing the Windows + R combination, typing diskpart, and pressing the Enter key.
Step 2: Type list volume in the DiskPart command-line tool and press Enter.
Step 3: Then, type select volume x. Replace x with the number of the partition you want to pick as the target.
Step 4: To shrink the storage space, type shrink desired=XXXX and then press the Enter button. "XXXX" denotes the total amount of space that has to be reduced.
Way 3. Repartition a Hard Drive Without Losing Data Using Free Partition Manager Software
As you can see, both the Disk Management console and the Diskpart command line utility may assist with repartitioning hard drives. Nevertheless, each of these programs has a few restrictions. Thus, you will need to consult a reputable tool that a third party provides if you are serious about avoiding these issues.
You can repartition a hard drive on Windows with AOMEI Partition Assistant Standard, a market-leading software application for disk partition administration. It is also capable of resizing BitLocker partitions. And this partition wizardry is the ideal match for the shortcomings in Disk Management and Diskpart regarding expanding and contracting volume sizes. Moreover, since it is entirely risk-free, you are able to repartition a hard drive without losing data.
In addition to allowing users to repartition a hard drive, it also enables users to duplicate, remove, format, and delete partitions.
Extend the partition in two different methods
1. This technique is successful when there is contiguous unallocated space next to the partition that is the target of the operation.
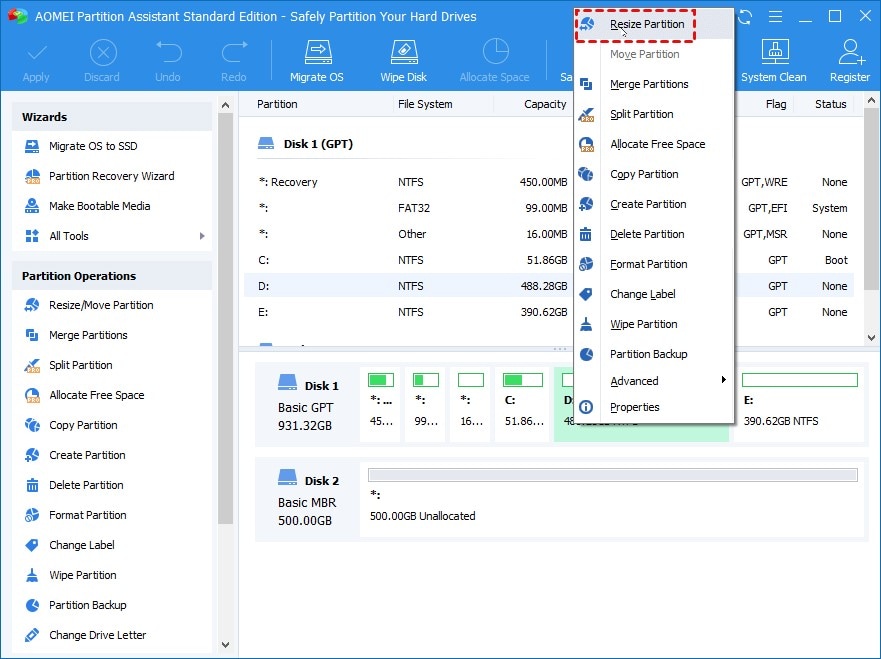
Step 1: Installing and launching AOMEI Partition Assistant Standard. Select Resize Partition from the context menu when right-clicking the target partition.
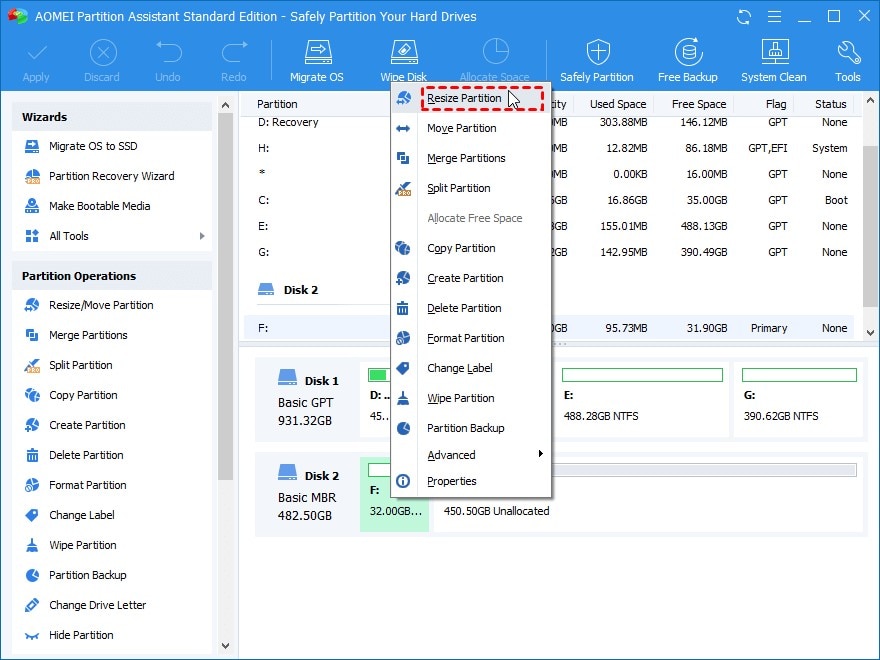
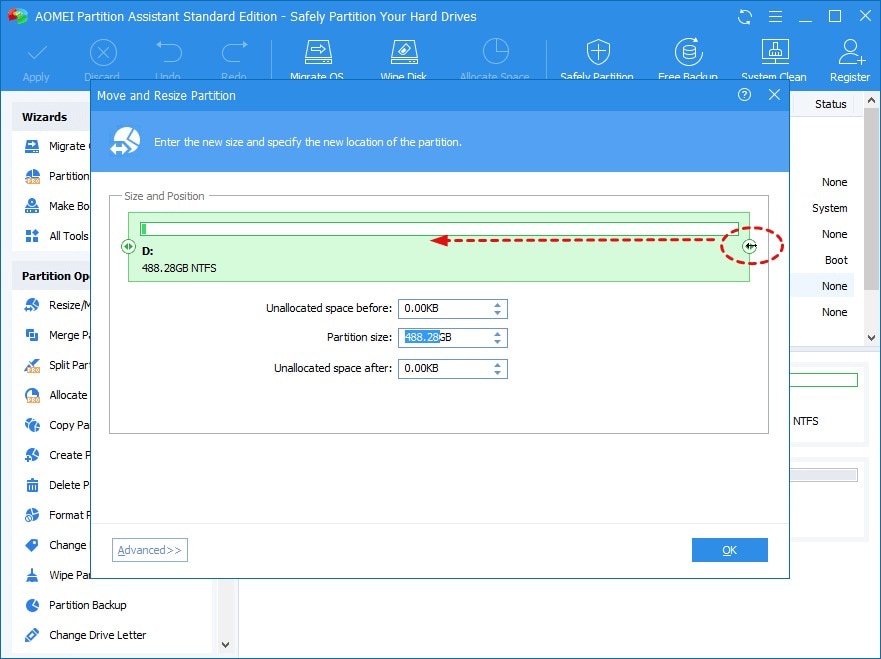
Step 2: At this point, you have seen that there is a section of the white bar located just next to the section of the green bar. The area that has not been used is represented by the white bar. You must drag the ring to the right to complete the white bar. When you are done, click the OK button.

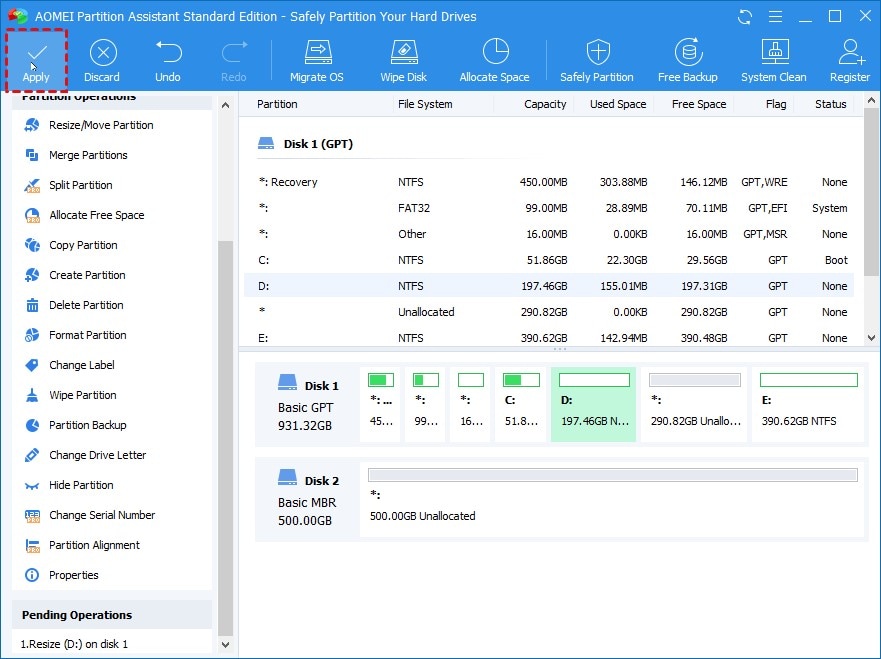
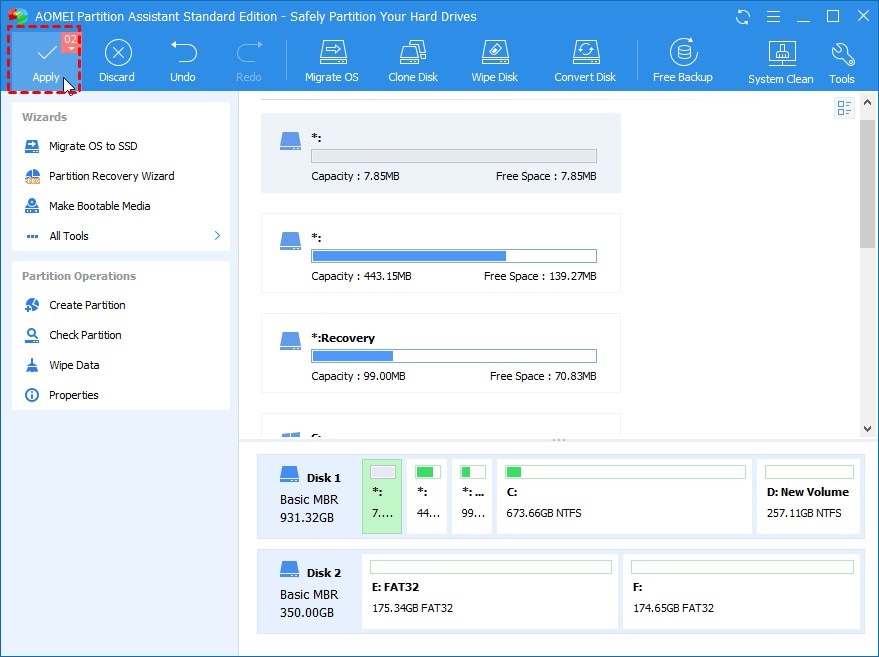
Step 3: Click the Apply button to finish the hard drive repartitioning procedure.
2. The partition may be enlarged via merging even if the unallocated space and the target partition are not next to one another.
Step 1: Right-click the partition you want to expand, and then pick Merge Partitions from the context menu.
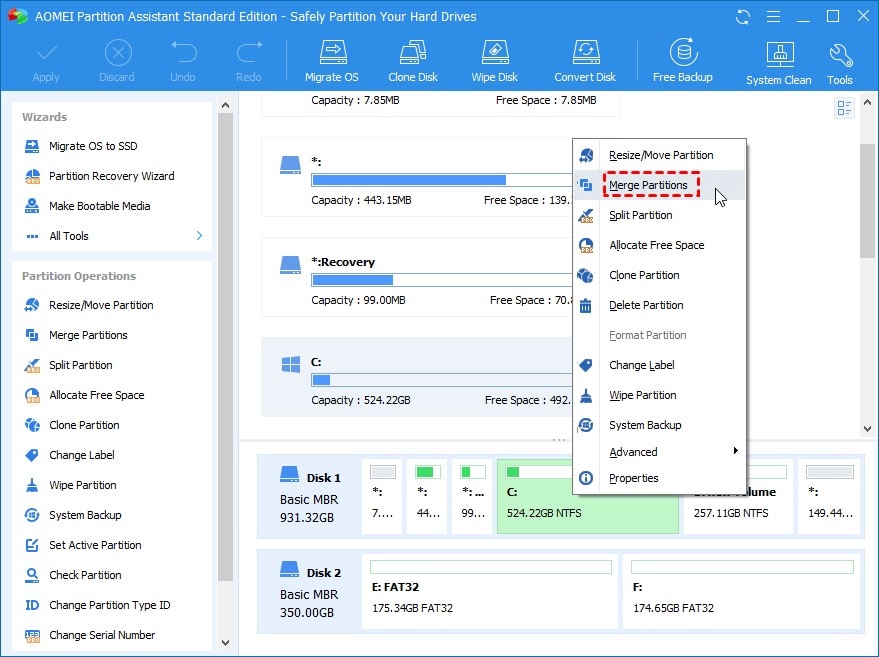
Step 2: Tick the Unallocated space checkbox, then click the OK button.
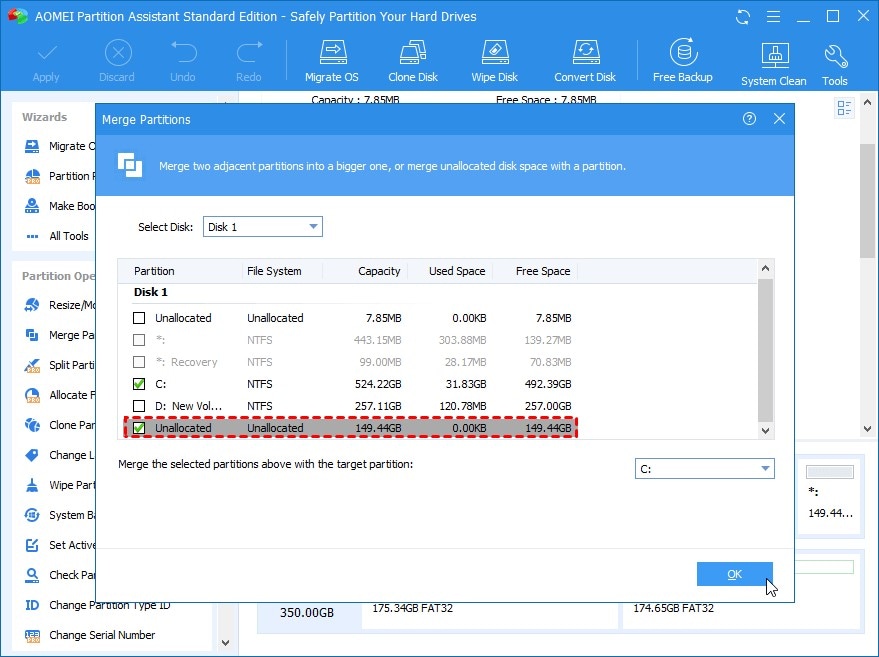
Step 3: Click the Apply button to complete the repartitioning procedure.
Shrink Partition
Step 1: Right-click the hard drive that you want to repartition, and then pick Resize Partitions from the context menu.
Step 2: In the next window, slide the arrow to the right to determine the size of the object whose dimensions you wish to change. After you have finished, click the OK button.
Step 3: When you have returned to the main interface, begin the process of downsizing by clicking the Apply > Continue button.

Part 3. How To Recover Lost Data if You Encounter Data Loss After Repartitioning
When you use disk management or diskpart to reorganize the partitioning of a hard drive, one of the options available is to format or delete the partition, either of which puts the data on the drive in jeopardy. What steps should be taken if you discover that you have lost some critical data after repartitioning your hard drive without creating a backup? Using Wondershare Recoverit, you can tackle this problem.

Wondershare Recoverit – Leader in Data Recovery
5,481,435 people have downloaded it.
Retrieves data from all possible data loss scenarios, such as deleting, formatting, lost partition, computer crash, virus attack, disk damage, etc.
Recovers 1000+ file types, including documents, graphic files, Ultra 4K/8K videos, audio files, and emails.
Recovers data from 2000+ storage devices like SSDs, HDDs, NASes, USB flash drives, SD memory cards, CF cards, etc.
Offers preview before recovery. No payment is required if the files are unrecoverable.
Follow the 3 simple steps below to recover lost Data after repartitioning your hard drives.
Step 1: Select the Repartitioned Hard Drive
After starting the Recoverit Data Recovery program, choose the hard drive where you have lost data to begin the scan process.

Step 2: Scan for Lost Data
After that, the data recovery program will begin searching for the missing files or partitions to retrieve your data.

Step 3: Preview and Recover
After the scan is completed, you can see all the recoverable documents, images, videos, audio files, and many other files. Simply choose the files you need and then click the Recover button to retrieve them.

For Windows XP/Vista/7/8/10/11
For macOS X 10.10 or later
Part 4. Reasons to Repartition a Hard Drive
If the following circumstances apply to you, consider repartitioning your hard disk.
Resize partition
A generic repartition could consist of resizing the existing partitions to meet the requirements of the new layout. Simply resizing the partition will free up previously allotted space, which may subsequently be used to establish a new partition or added to an existing partition that is short on storage.
Hard disk partitioning for Dual Boot
You must first conduct some hard drive repartitioning to install two operating systems on the same computer. To store the operating system, you will require at least two major partitions that are both big enough and formatted with different file systems. Except for Mac and Windows, most users tend to dual-boot Windows 7 and Windows 10 or dual-boot Linux and Windows.
Before installing Windows, you must partition the hard drive
Before installing a new operating system, check whether the hard drive can be repartitioned first. When this happens, it usually means that the problem with the hard drive not being detected while installing Windows has been fixed.
Summing Up
You just learned how to increase or decrease the size of a disk partition on Windows. This article showed you how to repartition a hard drive using the Disk Management and Diskpart programs. In addition to that, AOMEI Partition Assistant Standard, a sophisticated third-party tool, is listed. In the author's opinion, there is always someone who can assist you in finding a solution to every situation that comes your way!
1. Will repartitioning wipe my SSD?
Shrinking or extending is usually non-destructive, but deleting a partition to create a new one will wipe all data in that specific volume. Always back up critical data before making structural changes to your SSD.
2. Can I repartition while Windows is running?
Yes, for data partitions. However, some system-level changes may require a Pre-OS mode reboot, which tools like AOMEI handle automatically to ensure system stability during the process.
3. What if I accidentally deleted a partition?
Stop using the drive immediately. Use Wondershare Recoverit to scan the "Lost Partition" area before new data overwrites the sectors. This is the most effective way to restore your original file structure.


