


 TL;DR:
A black video screen with sound usually points to an incompatible player setting, graphics decoding failure, or capture restriction rather than a corrupted file, meaning you should isolate the issue by testing a copy in an alternative player or browser before altering system drivers or using recovery tools.
● For local MP4, MOV, or MKV files failing in VLC, temporarily disable hardware-accelerated decoding under Input / Codecs or switch the Video Output setting to Automatic or OpenGL to bypass display path conflicts.
● For browser playback failures in Chrome or Firefox, isolate extension conflicts using a private window, clear only the cached images and files, and reversibly toggle hardware graphics acceleration to test decoding stability.
● Screen recordings captured via OBS showing only a black screen are often caused by macOS permission restrictions or DRM-protected apps, and unrecorded visual data cannot be generated by software like Wondershare Recoverit, which is strictly for retrieving deleted originals from accessible storage media.
Ask AI for a summary
 ChatGPT
 Perplexity
 Gemini
 Claude
 Grok
A video can keep playing sound while its picture stays black, or show nothing while the progress bar moves. That does not automatically mean the file is damaged. A player setting, an incompatible decoder, a browser extension or a recording that never captured the picture can produce similar symptoms.
Start by identifying where the image disappears. The checks below separate local videos from online playback and screen recordings, so you can try the relevant fix without deleting a working original or changing unrelated settings.
In This Article
-
- Method 5. Reload and Compare Network or Video Quality
- Method 6. Compare a Private Window and Disable Suspect Extensions
- Method 7. Clear Cached Files Without Erasing Unrelated Data
- Method 8. Update the Browser and Compare a Supported Alternative
- Method 9. Test Browser Graphics Acceleration Reversibly
Part 1. Identify What the Black Screen Actually Means
The quickest useful comparison is one video in two players, followed by two videos in the same player. Keep the account, network and file unchanged where possible; changing everything at once makes the result difficult to interpret.
| What you observe | What to check first | What the result does not prove |
| One downloaded video is black in several players. | Complete transfer, supported video codec, original recording or export. | Sound or a normal file size does not prove the picture track is intact. |
| Several videos are black in one local player. | Video output and hardware decoding settings. | The files are not necessarily corrupted. |
| Videos work in another browser or app. | Extensions, cached files, updates and graphics processing. | A private-window comparison alone does not identify a specific extension. |
| The recording preview is black before recording starts. | Selected capture source, its visibility and screen-capture permission. | A recovery tool cannot supply images that were never recorded. |
| A clip was deliberately made entirely black. | The title, description and intended use of the clip. | A black image can be the correct video content, not an error. |
This article concerns a black video picture while the device remains usable. When the whole desktop disappears, including menus and the pointer, follow the separate Windows black-screen troubleshooting path instead. Avoid repeatedly forcing shutdowns just because one player has no picture.
Before working on a local file, keep the original unchanged and use a copy. If a drive disconnects repeatedly, becomes unreadable or makes unusual mechanical sounds, stop repeated copying and scanning and seek storage-specific help.
Part 2. Fix Local Video Black Screens on Windows or Mac
A local MP4, MOV or MKV file should be investigated separately from a website. First establish whether another maintained player can decode the same complete file; only then change rendering settings or consider the source damaged.
Method 1. Compare the Same Video in Another Player
Use this comparison when one saved video has sound but no picture. Opening a second player is a diagnostic check, not a conversion or a repair, and it should not replace your source file.
Step 1. Confirm that the transfer or download finished. For your own camera or phone footage, compare the copy with the original on the recording device. Do not delete either copy.
Step 2. Open the complete file in an updated alternative player. In VLC on Windows, choose Media > Open File; on macOS, use File > Open File. Select your test copy, not a partial download.
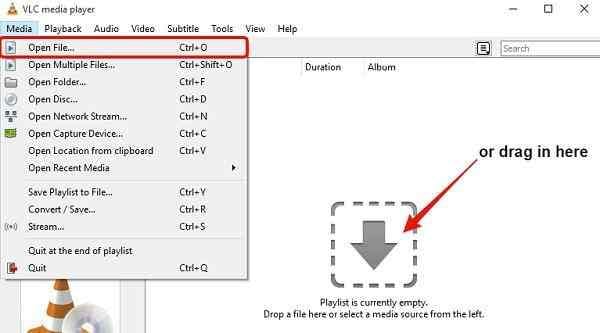
Step 3. Compare the beginning, middle and end in both players. If the file opens, check its codec information as well. In VLC for Windows this is under Tools > Codec Information.
If the picture works elsewhere, investigate the first player's compatibility and settings. MP4 is a container, so the extension alone does not identify the video codec. If neither player works, obtain a fresh copy from the original source or inspect the export before treating the problem as corruption. VideoLAN's file-opening documentation describes the supported opening routes.
Method 2. Restore VLC Video Output
When several files play audio but display no picture only in VLC, its output configuration is worth checking. This Windows desktop procedure changes how VLC displays video; it does not change the file's contents.
Step 1. Open Tools > Preferences > Video. Under the simple settings view, make sure Enable video is checked.
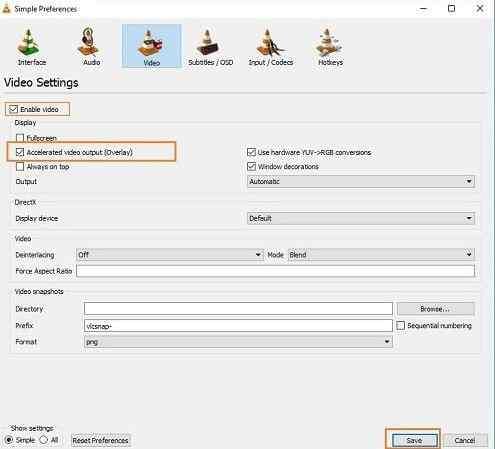
Step 2. Note the current Output setting. If a particular renderer was forced, try Automatic, save the setting and fully reopen VLC.
Step 3. Replay the same file. If Automatic remains black, test one alternative output listed for your system, such as OpenGL, then save and reopen again. Do not change several options together.
A repeatable picture after one output change points toward a display path problem. Restore the original setting if the alternative does not help. The VideoLAN Windows FAQ connects black or garbled output with display drivers and output modules; its Windows XP-specific overlay advice is not a required step for modern Windows.
Method 3. Test VLC Without Hardware Decoding
Hardware decoding and video output are separate settings. A file may contain a valid picture track yet fail when a particular graphics device handles decoding. A temporary software-decoding test helps distinguish that situation.
Step 1. In VLC for Windows, open Tools > Preferences > Input / Codecs. Record the existing Hardware-accelerated decoding selection.
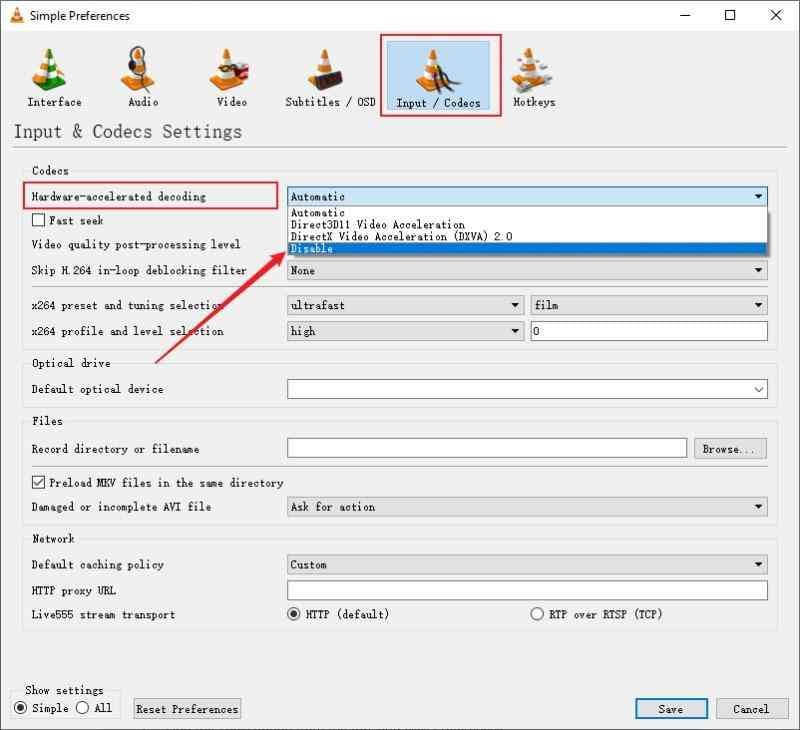
Step 2. Choose Disable, click Save, close VLC completely and reopen the same test video. Compare the exact segment that previously stayed black.
Step 3. Check both image stability and playback speed. Software decoding can use more CPU, so a restored picture with stuttering is not a complete performance fix.
If there is no improvement, restore the previous setting. If this test helps, a supported player or graphics-driver update is a better long-term investigation than installing a random codec pack. More detailed player-specific branches belong in the VLC playback troubleshooting guide.
Method 4. Check the Graphics Driver After a System-Wide Playback Failure
A graphics-driver check is more relevant when several known-good videos fail across applications than when one isolated file is black. Save your work before updating drivers, and use Windows Update or the device manufacturer's supported package.
Step 1. On Windows, right-click Start, open Device Manager and expand Display adapters. Identify your adapter rather than copying the model name from a screenshot.
Step 2. Right-click the adapter, choose Update driver and use the automatic search. If no suitable update is offered, check Windows Update or the computer manufacturer's support page for that exact model.
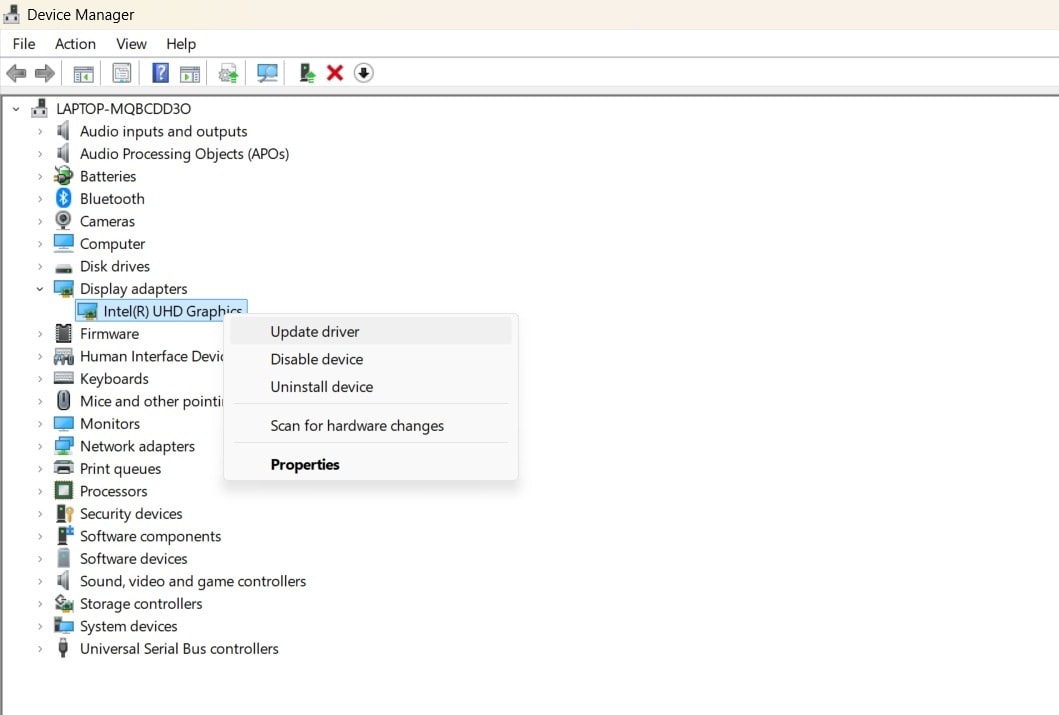
Step 3. Restart when requested, then replay the same known-good clips. If the failure began immediately after a driver update, inspect Properties > Driver > Roll Back Driver; use it only when available and appropriate.
Microsoft documents both driver updates and rollback. Do not uninstall every display adapter as a first test. On a Mac, use Apple's normal macOS update process rather than Windows driver packages. If only one file still fails, return to the file-level investigation.
Part 3. Fix Black Videos in Chrome or Another Browser
Browser troubleshooting is appropriate when the same permitted video works in another app or when multiple online videos fail in one browser. An explicit private, unavailable or region-restricted message is an access problem, not proof of a damaged video file.
Method 5. Reload and Compare Network or Video Quality
A stalled stream and a black decoded picture can look similar. Use a small controlled test before clearing browser data, and keep any unsaved work safe before closing tabs or restarting the browser.
Step 1. Reload the video page once, then test another video you are allowed to watch. Check whether the player controls and timeline respond rather than repeatedly pressing Play.
Step 2. If the player offers settings, open Quality and choose a lower available resolution. On YouTube's desktop player, Quality is inside the gear menu.
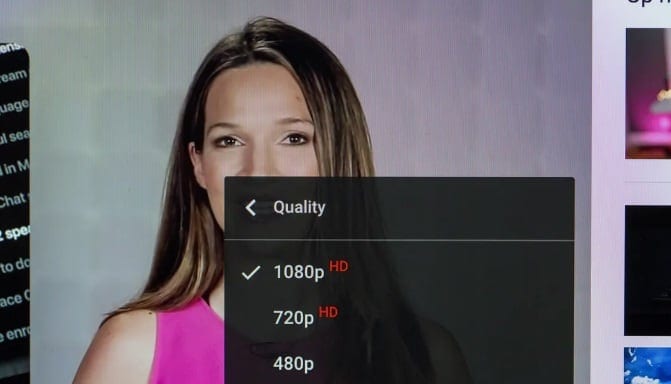
Step 3. Pause large downloads and compare playback on another trusted connection when practical. Do not disable a firewall or use an unfamiliar proxy just to test a video.
If lower quality works, investigate bandwidth or decoding load; resolution alone does not identify a particular codec. If only one website fails, check that service's support information. Google's browser video troubleshooting covers these broader checks, while YouTube-specific black-screen cases have a separate troubleshooting path.
If a paid stream works on the built-in screen but goes black on an external display, investigate the service's supported connection and display requirements rather than treating the stream as a damaged file. Netflix's black-screen-with-sound guidance is a service-specific example; its requirements should not be generalized to every player.
Method 6. Compare a Private Window and Disable Suspect Extensions
A clean browsing session helps test profile-specific behavior without deleting data. It is not conclusive by itself: cookies, sign-in state and extension availability can all differ from your normal session.
Step 1. Open Chrome's menu and choose New Incognito window. Test a public video that does not require a subscription, age verification or an invitation.
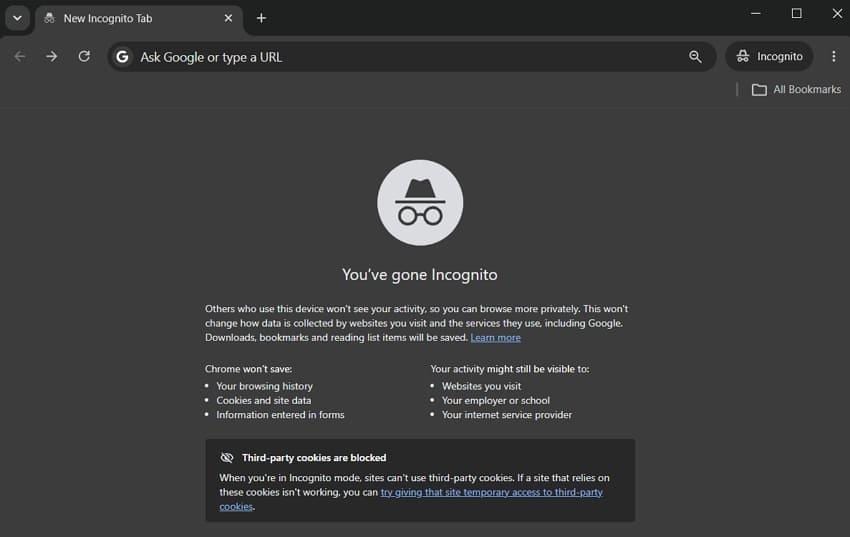
Step 2. If that works, return to the normal profile and open Extensions > Manage Extensions. Temporarily turn off an ad blocker or video-related extension, then reload the same video.
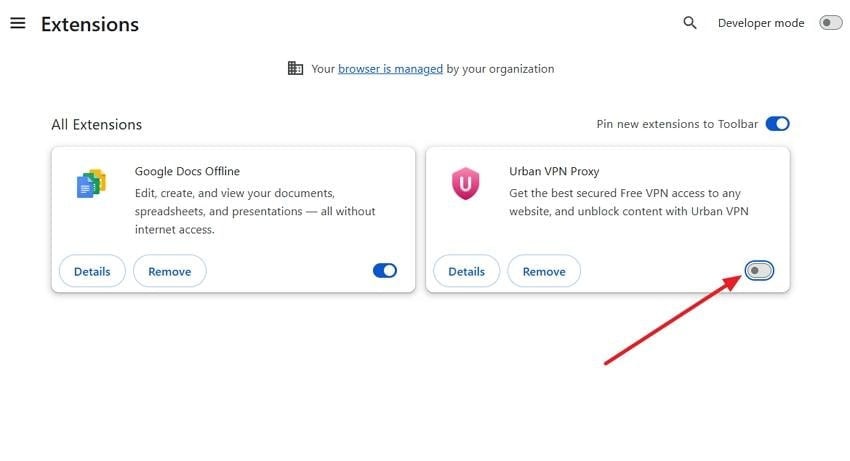
Step 3. Test extensions individually and restore those that make no difference. A managed school or work browser may require an administrator to approve changes.
A working normal-session test with one extension disabled is more informative than Incognito alone. If neither session works, move on rather than deleting extensions indiscriminately. Google's extension controls explain how to enable and disable them. Do not sign out of an account required to access the actual video.
Method 7. Clear Cached Files Without Erasing Unrelated Data
Try this when a browser-specific problem survives a reload and extension test. Clearing cached files is different from removing passwords, browser history or all site sessions, so review the selected categories before confirming.
Step 1. Open Chrome Settings > Privacy and security > Delete browsing data. The address chrome://settings/clearBrowserData also opens the dialog. Older releases may call it Clear browsing data.
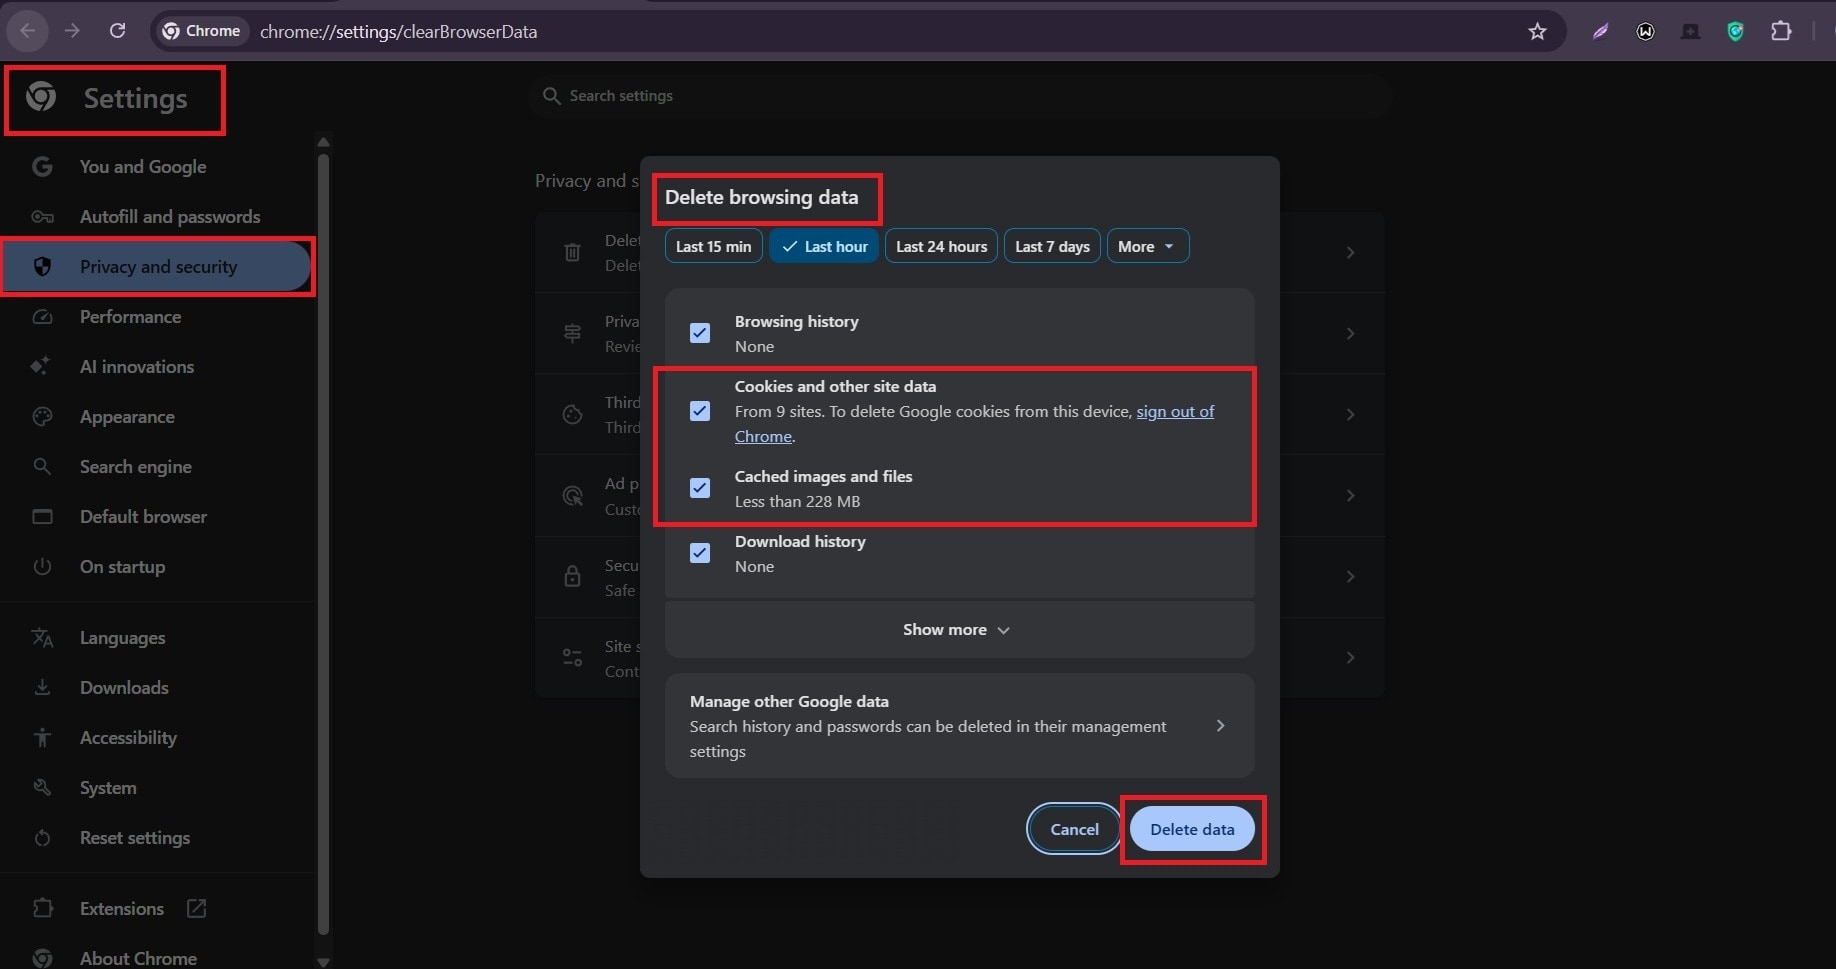
Step 2. Deselect unrelated categories and select Cached images and files. Start with a time range covering the failure. Do not copy every checked box shown in an example dialog.
Step 3. Confirm the deletion, reopen the video and test it. If a site-session problem remains, consider clearing that site's cookies separately, knowing that you may need to sign in again.
Google distinguishes the effects of clearing cache and cookies. If the picture stays black, avoid repeatedly clearing more categories. A completed local MP4 outside the browser is not repaired by deleting browser cache.
Method 8. Update the Browser and Compare a Supported Alternative
An outdated browser may behave differently from the version supported by a streaming service. Updating is a better first response than uninstalling a profile containing bookmarks, saved sessions or unsynced information.
Step 1. In Chrome, choose Help > About Google Chrome. Allow its update check to finish. The installed version number will differ between devices and from older screenshots.
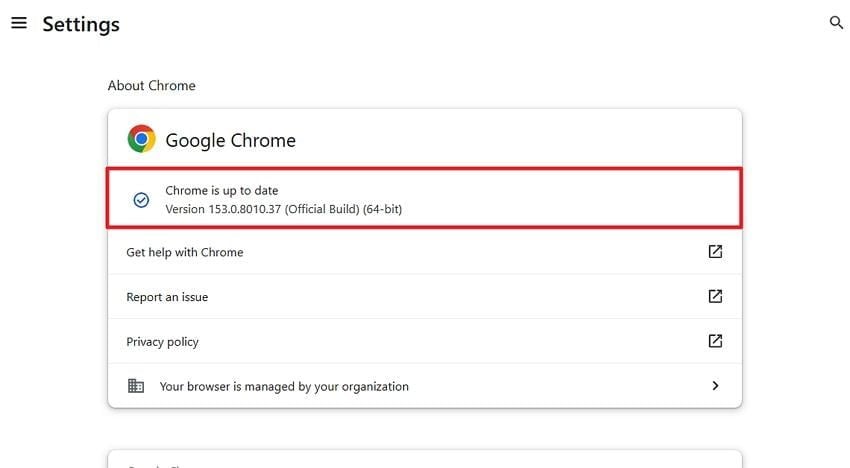
Step 2. If an update is available, install it and use Relaunch when requested. Save forms and other unfinished work first.
Step 3. Replay the original video. If it is still black, compare a browser that the service supports, using the same authorized account and network.
Google's Chrome update instructions describe this process. If the alternative works, keep investigating the original browser profile rather than treating the online video as corrupt. Reinstallation is a later maintenance option, not a way to restore missing footage.
Method 9. Test Browser Graphics Acceleration Reversibly
Use a graphics-processing test after updates, extensions and cache have been checked. Switching acceleration can change both performance and stability; leaving it off permanently is not automatically the best outcome.
Step 1. In Chrome, open Settings > System, or type chrome://settings/system. Find Use graphics acceleration when available. Older versions use the word hardware instead of graphics.
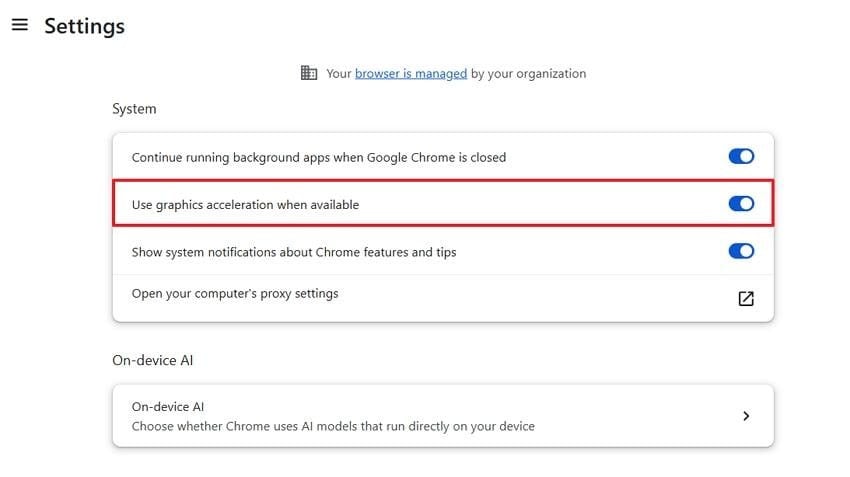
Step 2. Record its current state, turn it off for one test and relaunch Chrome. Replay the same segment rather than switching to a different video.
Step 3. Compare picture, smoothness and CPU load. Restore the earlier setting if playback is worse or unchanged. Firefox exposes its equivalent controls under Settings > General > Performance; deselect Use recommended performance settings to reveal them, as described in Mozilla's performance settings.
If this resolves the picture only temporarily, investigate browser and graphics-driver compatibility. For Chrome-specific failures beyond these cross-browser checks, the Chrome video playback guide keeps those additional settings separate.
Part 4. Handle Phone Playback and Black Screen Recordings
A phone app and a screen recorder introduce different failure points. First distinguish playback of an existing video from capturing a new one; an empty capture preview needs attention before another recording is made.
Method 10. Restart and Update the Mobile App Before Removing Its Data
Use this method when a video is black in a phone app but the phone itself remains responsive. Keep locally recorded clips and app-only material safe before considering any reinstall.
Step 1. Close and reopen the affected app, restart the phone if needed, and install an available app update from its official store. Compare another permitted video and, where supported, the service's website.
Step 2. On Android, open Settings > Apps > the affected app > Storage or Storage & cache, then choose Clear cache. Menu names vary by manufacturer; older App info screens may show the cache control directly.
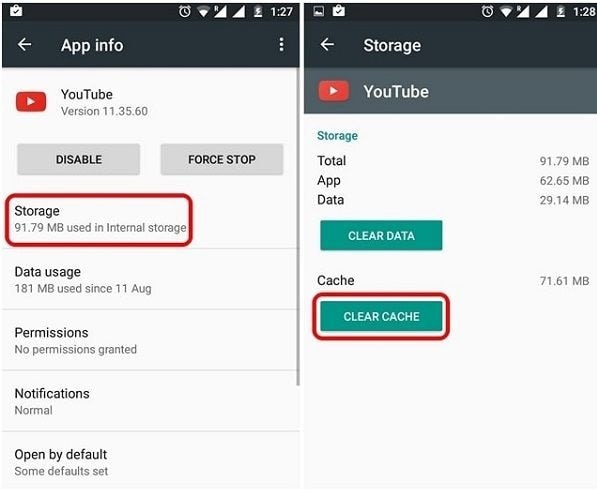
Step 3. Test again before using Clear storage or Clear data, which is a different operation. On iPhone or iPad, there is no equivalent universal Android-style Clear cache button; follow the app's controls and Apple's app troubleshooting sequence.
If web playback works but the app stays black, report the app version and device to its developer. Google's Android storage guidance distinguishes temporary cache from app data. Never delete an app merely to test playback when it contains the only copy of your footage.
Method 11. Check the Capture Source Before Recording Again
A black screen recording is not necessarily an encoder fault. The recorder may be pointed at the wrong display, a hidden source or an application that prevents capture. Test with your own ordinary, unprotected content.
Step 1. In OBS on Windows, select the intended scene and its Display Capture source. Open the source's Properties and check the selected Display. Confirm that the source is visible and not covered by another source.
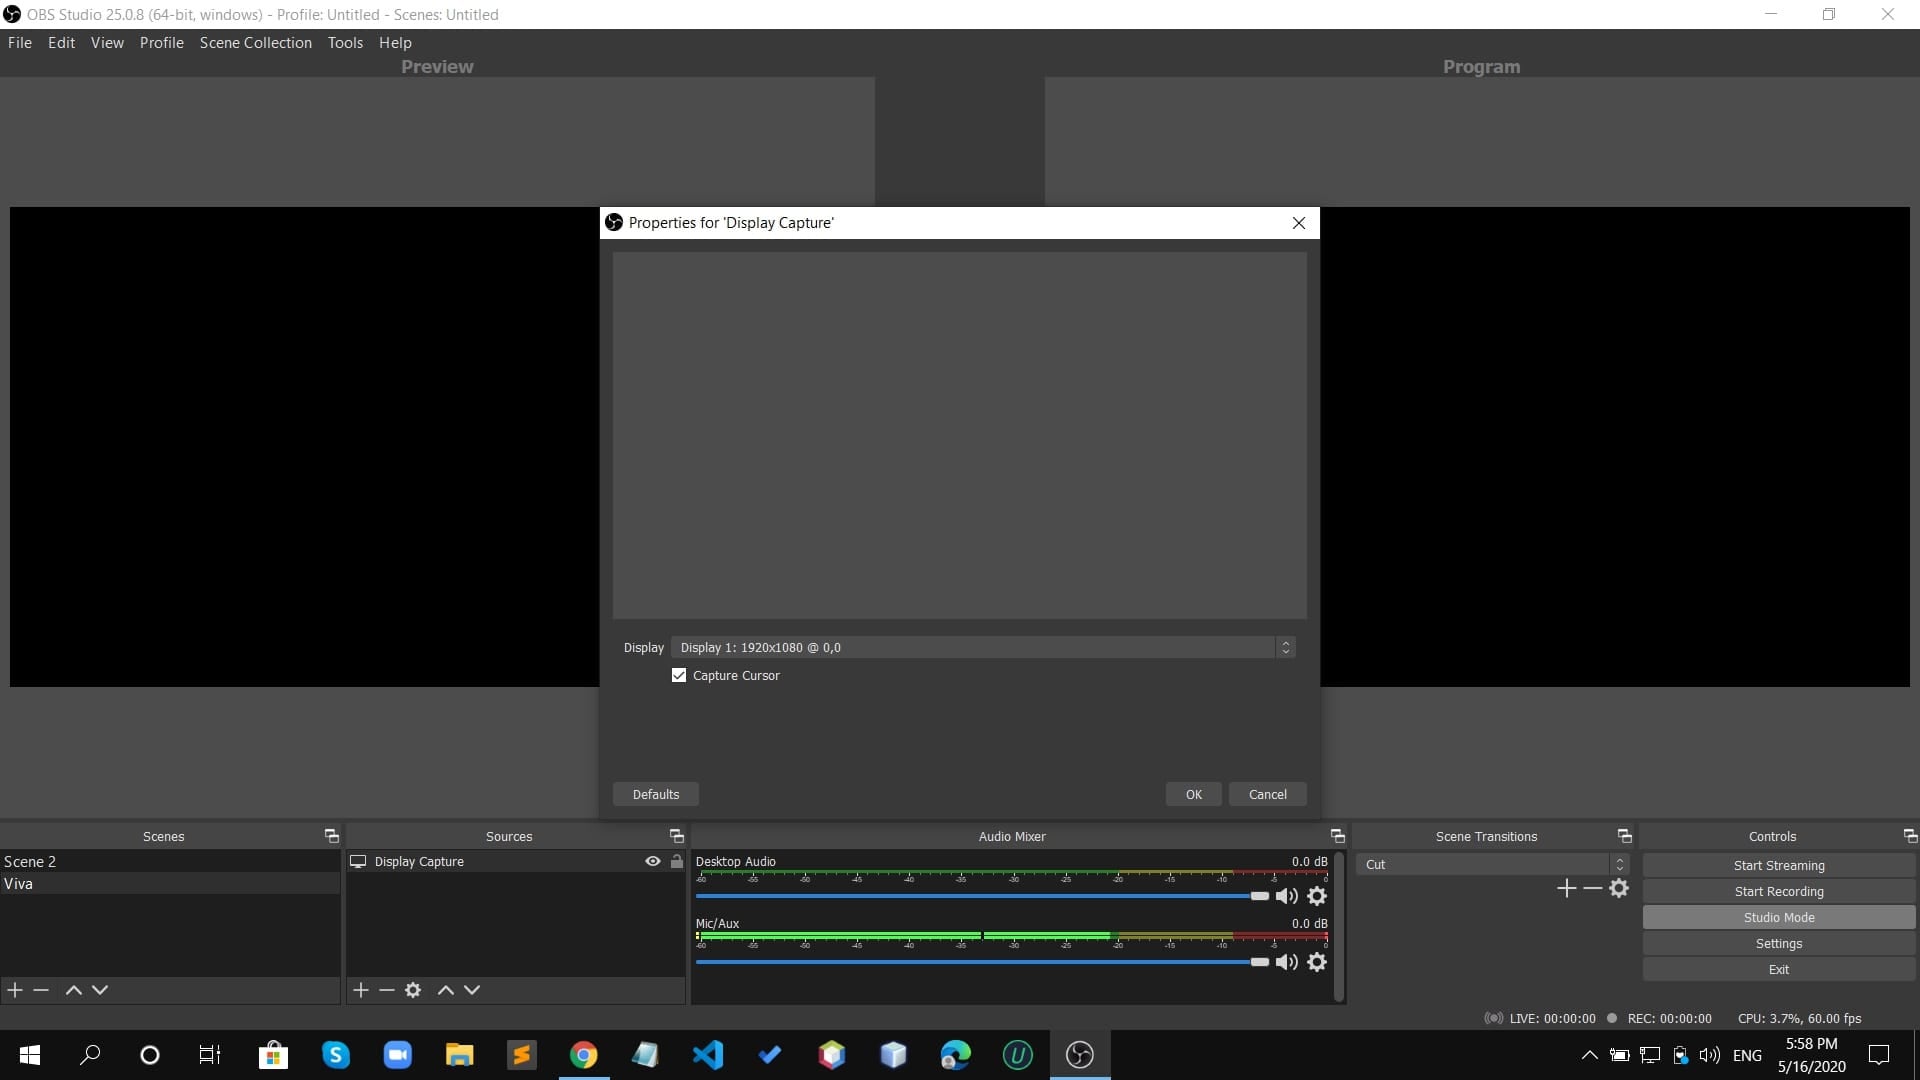
Step 2. Move a normal window on the selected display and watch the preview. For a single application, use the appropriate Window Capture source and select the actual window. OBS explains the different source types in its sources guide.
Step 3. Once the preview is correct, record a short test, stop it normally and play the saved file. In Studio Mode, also make sure the intended scene reaches Program output. On a Mac, verify screen-recording permission and use the capture source supported by your macOS version.
If a protected app stays black while ordinary windows record normally, stop trying to bypass that restriction. Apple notes that some apps do not permit screen recording. If the saved file contains only black frames, repair or recovery cannot recreate a picture that was never captured.
Part 5. Separate a Damaged Copy From a Missing Original
After the playback checks, compare the saved file with its original recording or editing project. If the source plays but a transfer or export does not, a fresh copy or new export is usually the next useful test. Export to a different filename so you do not overwrite your evidence.
An existing file that fails at the same point in several compatible players may need specialist video repair. That is different from recovering an original that has been deleted. Renaming a file extension does not repair its video stream, and improving brightness cannot restore absent frames.
Method 12. Recover a Deleted Original With Wondershare Recoverit

This method is only for a genuinely missing local original, such as a camera clip deleted from an accessible SD card or drive. It does not fix an online player, unlock a private video, or convert a streaming app's protected offline download into a normal MP4.
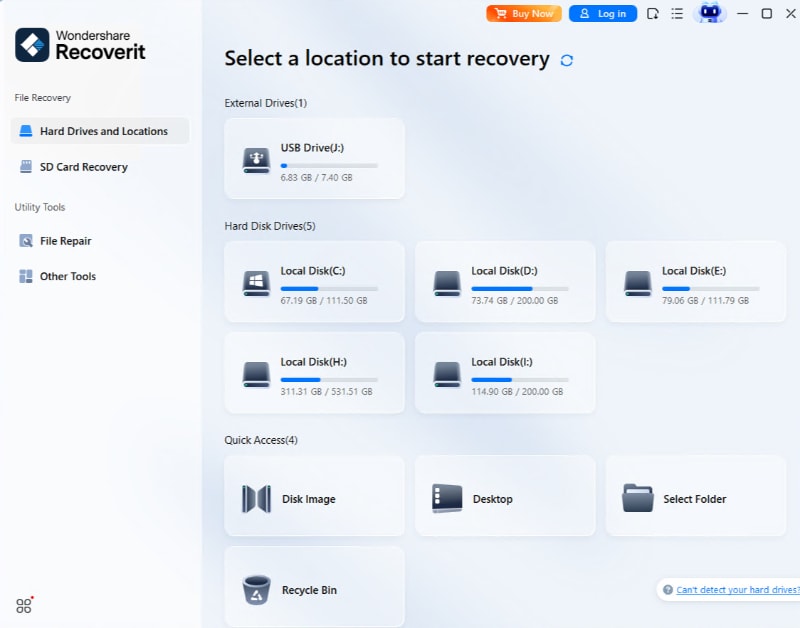
Step 1. Stop saving new files to the affected storage. Check the Recycle Bin or Trash and available backups first. If the original is still missing, install Recoverit on a different drive and select the storage location where the video was lost.
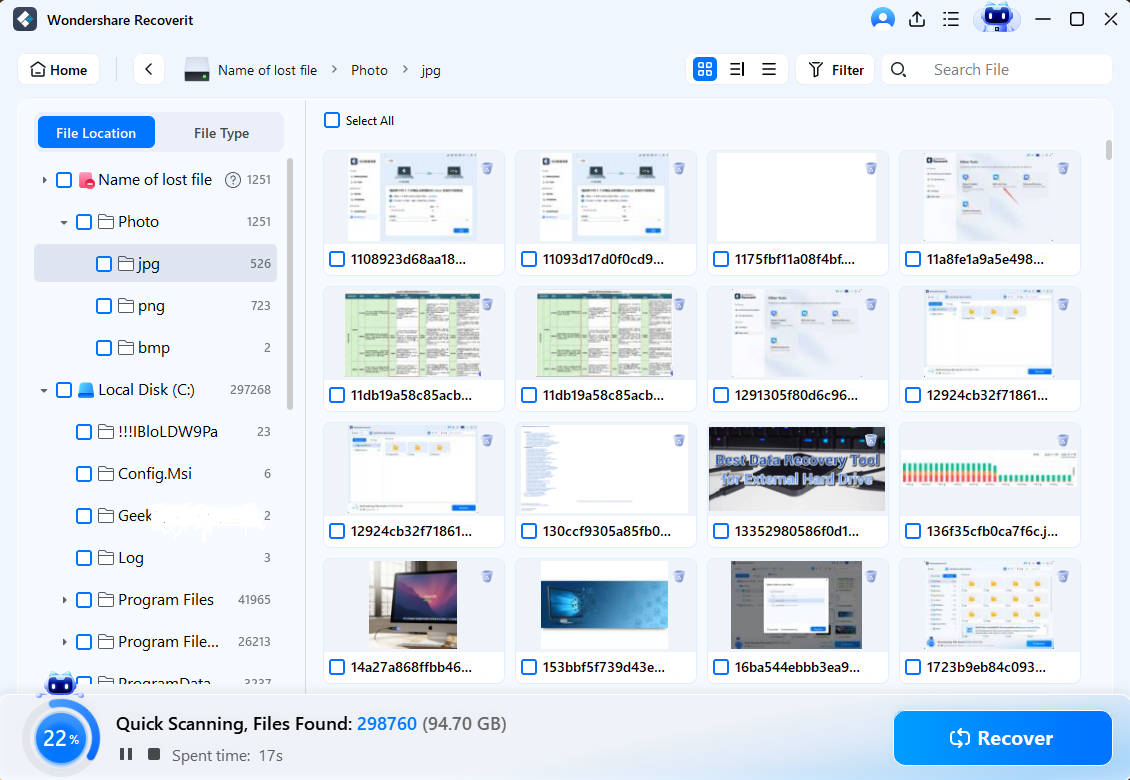
Step 2. Scan that location and inspect the results. Use file type, name or date filters where available, then preview promising video results rather than trusting a filename or thumbnail alone.
Step 3. Save a recoverable result to another drive, not the source being scanned. Open the recovered file in a player and check several timestamps, audio and duration before relying on it.
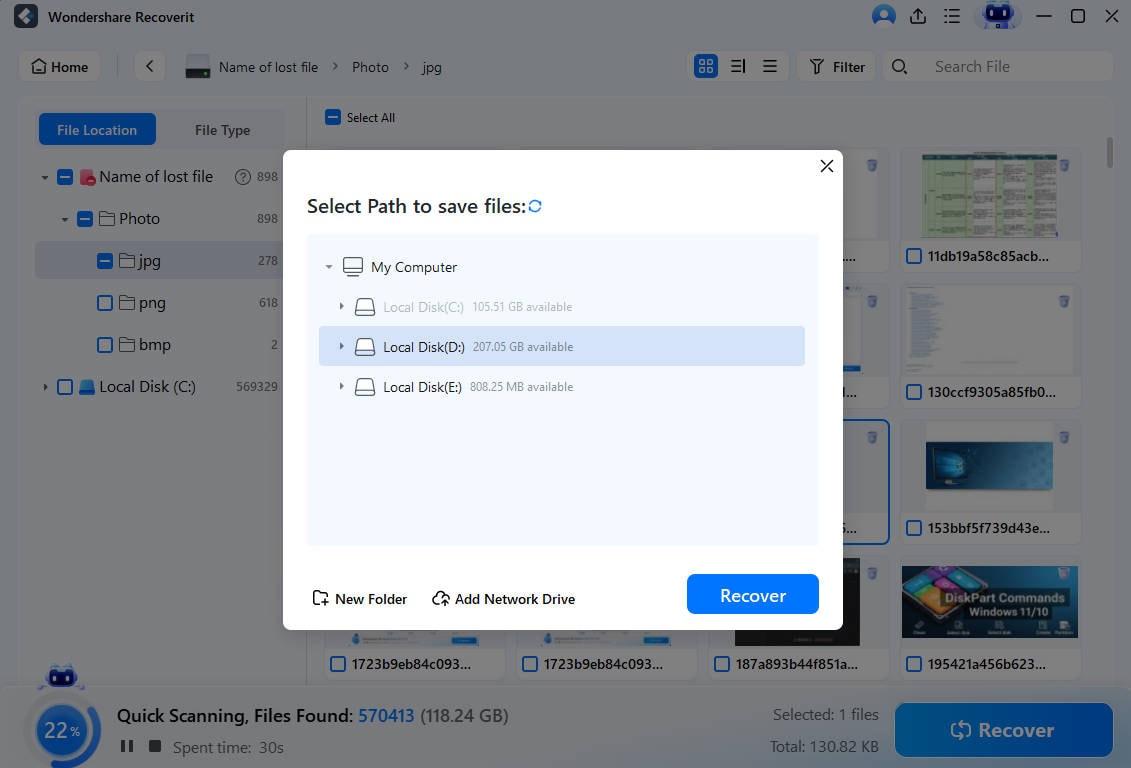
The official Recoverit Windows Guide documents location selection, scanning and saving. Recovery depends on what data remains; an overwritten original or unreadable failing device may not produce a usable result. A recovered file that is still black needs the same source-versus-player checks as any other file.
For a missing original on readable storage, review Wondershare Recoverit Video Recovery and its supported recovery options before proceeding. Scanning for deleted footage is not necessary when your existing video already plays correctly in another application.
Conclusion
The most useful fix depends on where the picture fails. Compare local players before assuming corruption, use reversible browser and app checks for streaming problems, and confirm a recorder's source before capturing again. Keep a working original whenever possible.
Use recovery only when that original is actually missing. A successful outcome may be restored playback, a fresh export or a clear explanation that the requested picture was never present; it is not always another software installation.
FAQ
-
Why does a video have sound but a black screen?
The audio and picture can follow different decoding paths. A video-output setting, unsupported video codec, graphics issue or damaged picture stream can leave audio working. Compare the same complete file in another maintained player before concluding that it is corrupt. -
Does a black thumbnail mean the video is damaged?
No. A thumbnail may come from a deliberately black opening frame or fail to generate even when playback works. Conversely, a normal thumbnail does not prove that the rest of a video is intact. Check actual playback at several timestamps. -
Will clearing browser cache delete my saved videos?
Clearing the browser's cached images and files is different from deleting ordinary video files in a folder. However, clearing app storage or removing an app can affect app-managed material. Read the selected categories and preserve originals before deleting anything. -
Why is only my screen recording black?
Check the selected source, its visibility, capture permission and whether the app permits recording. If ordinary windows record correctly but protected content does not, that is not evidence of a damaged recorder. Frames never captured cannot be recovered from the black recording. -
Can Recoverit fix every black-screen video?
No. Data recovery is relevant when an original file is deleted or missing from readable storage. It does not fix browser permissions, GPU decoding, server availability or capture restrictions. An existing corrupted file requires a separate repair assessment, and success is not guaranteed. -
What does a video of black screen mean?
It can mean an unwanted playback failure, but it can also describe an intentionally black clip for editing, timing or background listening. Check the clip's description and another known-good video. A deliberately black clip does not need to be repaired.


