
Part 1. What Are Logical and Primary Partitions?
Logical and primary partitions are pretty similar to each other, as both are used to store data on the disk. However, there can be only a maximum of four primary partitions on a disk, whereas the number of logical partitions can be unlimited.
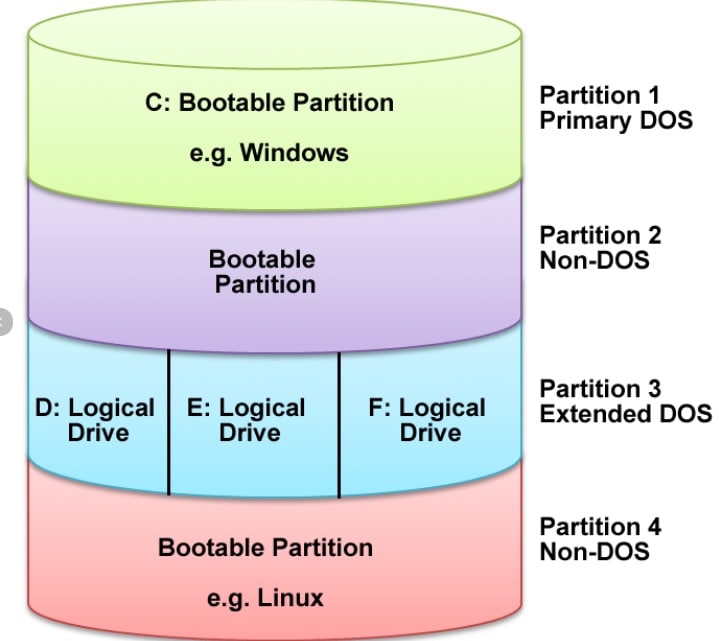
There is a distinction in data storage, as you can observe from the image above. Only the primary partitions are capable of storing the OS boot data. Thus, you can have four primary partitions with four separate bootable OS. On the other hand, logical partitions store data like multimedia files and applications.
Regardless of what kind of system you operate, you must have at least one primary partition to run an OS.
Disk Type |
Primary Partition Limit |
Logical Drive Support |
| MBR (Legacy) | Max 4 (or 3 + 1 Extended) | Supported (Unlimited) |
| GPT (Modern UEFI) | Max 128 | Not Applicable (All are Primary) |
| Dynamic Disk | Not Applicable | Volumes (Simple/Spanned) |
Part 2. Why May You Need to Convert Logical to Primary Partition?
Several scenarios require you to convert logical partition to primary. Some of the most prominent ones include:
- Making more space for multiple bootable operating systems
- Using virtual machines on your computer
- Setting up test servers for games or other high-density programs
- Upgrading the service packs of older operating systems that may not receive online updates
2026 Technical Update: Why Converting to GPT is Better
If you are converting a logical drive to primary because you hit the "4-partition limit," you are likely using an older MBR (Master Boot Record) disk. In 2026, the industry standard is GPT (GUID Partition Table). GPT does away with the "Logical vs. Primary" distinction entirely, allowing up to 128 primary partitions. Instead of manually converting one partition, consider converting the entire disk from MBR to GPT using Windows built-in mbr2gpt tool. This will automatically turn all your logical drives into primary partitions and enable support for drives larger than 2TB.
Part 3. How To Change Logical Drive to Primary Partition
You can convert a logical drive to a primary partition in several ways. If you have a Windows PC, you can either use DiskPart through Command Prompt or third-party software. You can understand more about those methods below.
Method 1: Convert Logical Drive to Primary Partition Using DiskPart (Data Loss)
DiskPart is a built-in utility feature of every Windows version that you can use for the logical to primary partition conversion in a command-based interface. You can follow the below-mentioned procedure for the same.
Note: Using DiskPart to change the logical drive to the primary partition requires deleting all files on the target partition. So, you should back up all the data before proceeding with the conversion.
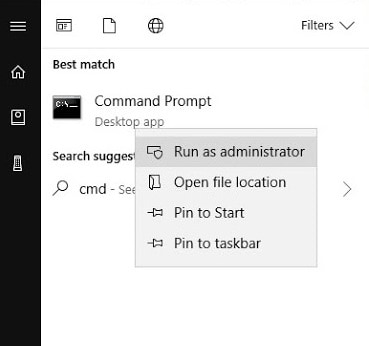
Step 1. Click the "Search" button and input the command prompt. Next, right-click "Command Prompt" and choose "Run as Administrator."
Step 2. Type diskpart and press Enter button.
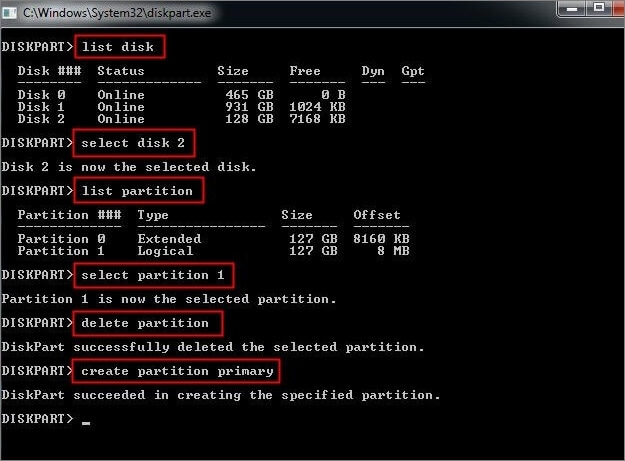
Step 3. Type the following commands in order and hit Enter after each command.
list disk
select disk n (Replace ‘n’ with the number of the disk that contains the logical partition you need to convert to primary partition)
list partition
select partition x (Replace ‘x’ with the number of the logical partition you want to convert)
delete partition (this command will delete all the data saved on the selected logical partition and make it unallocated space)
You can then verify the partitions by using the list disk command. Finally, if all is according to your requirements, you can type in exit and press Enter to quit DiskPart and finish the logical to primary partition conversion process.
Method 2: Convert Logical Drive to Primary Partition Without Data Loss
DiskPart is an easily available tool, but the command-line interface can prove troublesome for several users. Moreover, if you have a single typo, it can crash the entire drive with no chance of recovery. That's why you might require a third-party assistant.
One reliable software you can utilize is AOMEI Partition Assistant Standard. It has a graphical interface that can make you do in a few clicks the same function that requires multiple commands on DiskPart. The best advantage you gain is that you can choose to retain all your data post the logical to primary conversion. Still, you should prepare your system for a lengthier process.
You can follow the steps mentioned below to utilize AOMEI Partition Assistant Standard to convert a logical drive to primary partition on your PC.
Step 1. Download and install the AOMEI Partition Assistant Standard version suitable for your OS.
Step 2. Launch the program. The opening dialog box shall display all the available drives on your system.
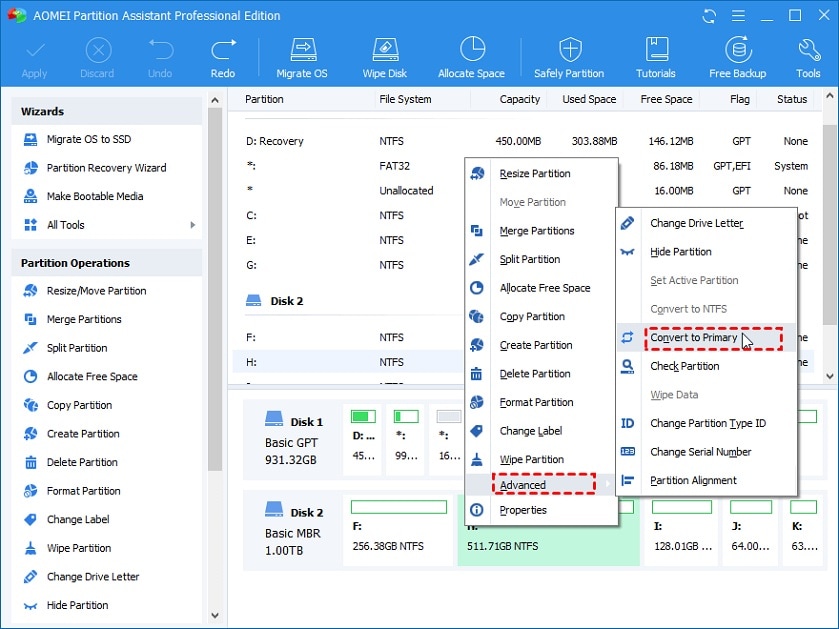
Step 3. Right-click on the drive you want to convert from logical to primary and drag the pointer to 'Advanced.’
Step 4. That will open a drop-down menu next to the drive. Next, click on 'Convert to Primary.’
Step 5. Next, another box will pop up, letting you decide whether to retain or wipe all the data. Choose the preferred action from the dialog box and select OK.
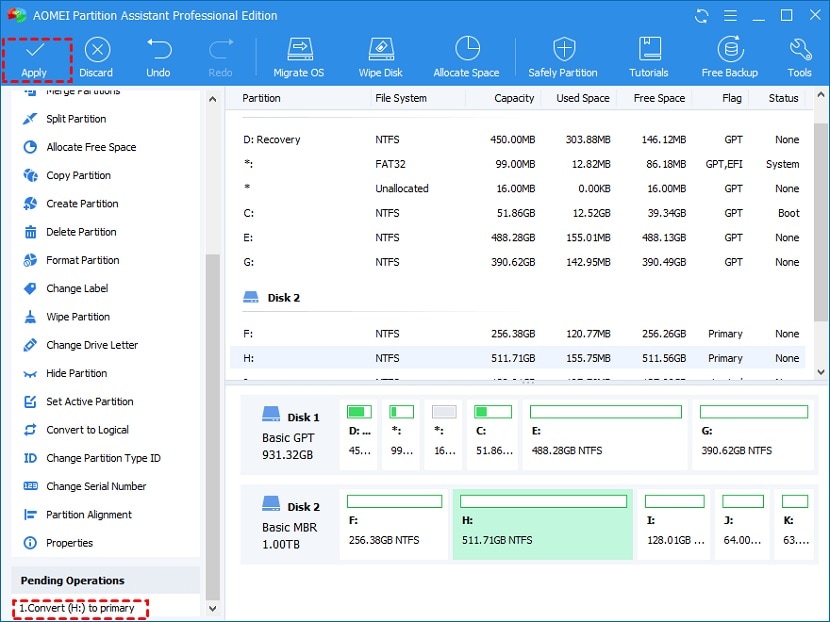
Step 6. Click on Apply in the top pane and wait for the process to conclude.
Typically, AOMEI Partition Assistant is swift with its operation. However, should you run into any issues, you can contact the 24/7 available customer support or any helpful forums to tackle them.
You can even use the software to convert a primary partition to a logical partition. Here are a few conditions that may tempt you to do that.
- When you have operating systems that you no longer use on your PC
- You wish to have multiple partitions on your system, each for a separate file type.
Feature |
DiskPart (CMD) |
AOMEI Assistant |
| Data Safety | ⚠️ High Risk (Deletes Data) | ✅ Safe (Retains Data) |
| Difficulty | Advanced (Command Line) | Beginner (Visual GUI) |
| Cost | Free (Built-in) | Freemium (Third-party) |
| Reliability | 100% Native | 99% (Requires Installation) |
Part 4. How To Recover Lost Data if You Encounter Data Loss After the Conversion
It helps to ensure that you back up all the data on the drive before you convert the logical drive to the primary partition. Nevertheless, if you fail to do it, there are methods you can utilize to retrieve all the essential data. There is several third-party software available online, but you can surely rely on Wondershare Recoverit to maximize your chances for recovery, as it has been selected as the Leader in data recovery by G2 users.

Wondershare Recoverit – Expert in Data Recovery
5,481,435 people have downloaded it.
Ability to recover more than 1000 file types from almost any storage media, such as SSDs, HDDs, USB flash drives, SD cards, external hard disks, digital cameras, etc.
Efficiently handle various data loss scenarios, including accidental deletion, empty recycle bins or trash, formatting, lost partition, virus attack, RAW, and RAID.
An intuitive interface that lets you preview the files before recovery. No payment is required if the files are unrecoverable.
To recover any data lost in the partition conversions, follow the process mentioned below.
Step 1. Select the Data Loss Location
Open the program and select the drive which you want to recover the data from. Then, click Start to begin the scanning of the selected drive.

Step 2. Scan for Lost Data
Recoverit will search for the deleted or lost data in the selected drive. Once the scan concludes, you can preview the files you want to retrieve.

Step 3. Recover Your Desired Files
Click the Recover button at the bottom. You can also choose the location where to retrieve the files.

Wait for the process to finish. Once complete, you can view the recovered files in your designated location.
For Windows XP/Vista/7/8/10/11
For macOS X 10.10 or later
Summing Up
Depending on your needs, there are several methods to change the logical partition to primary. We hope this guide provides you with new insights and troubleshooting solutions that prove effective. You can leave your thoughts in the comments below for any burning queries.
1. Can I convert a logical drive while the PC is running?
Yes, as long as the logical drive is not a 'System' or 'Boot' partition currently in use by an active background process. For system partitions, the conversion may require a reboot into Pre-OS mode.
2. Why is 'Convert to Primary' greyed out?
This happens if your MBR disk already contains 4 primary partitions (the maximum limit). You must delete or convert at least one existing primary partition to an 'Extended' partition before you can add or convert another.
3. What happens to the 'Extended' partition?
When the last logical drive within an extended partition is converted or deleted, the empty 'Extended' container should be manually removed or merged to reclaim that unallocated space for Primary partition use.


