
 TL;DR:
Windows users with Administrator privileges can secure physical storage directly via the Control Panel or use the Disk Management Utility to generate and encrypt Virtual Hard Drives (VHD/VHDX) for portable usage.
● Standard BitLocker activates on internal partitions through System and Security settings, while BitLocker to Go encrypts external portable drives directly from the right-click menu.
● VHD and VHDX container files require manual creation and initialization as either MBR for older hardware compatibility or GPT before applying full-drive BitLocker encryption.
● Encrypted virtual drives can be detached via File Explorer or Disk Management to function as secure, mountable files transferable across different Windows PCs.
Ask AI for a summary
 ChatGPT
 Perplexity
 Gemini
 Claude
 Grok
Grok
Data security is the need of the hour. Online security protocols get constant updates for fear of cyber threats. However, the same cannot be said for offline storage. Most hard drives and memory cards never see anything approximating secure encryptions during their usage cycles. With so much recent focus on internet security, it is about time we started securing our physical devices, too. BitLocker has been the default encryption program for Windows since 2009. While you can encrypt storage devices post-installation, it is best to create BitLocker drive that has it from the get-go. This piece will help you learn all about the process.
How to Create a BitLocker Drive
With BitLocker, you can create secure encryptions for data drives right out of the box. Whenever you connect a new hard drive, either internal or external, you can use BitLocker on it right away. Before you create a BitLocker drive, it is essential to activate it from the Control Panel. You can do it with the method described below. Just make sure you do it all as an Administrator.
- Launch the Control Panel from the Start menu. You can use the Search function to locate the application if it is unavailable by default.
- Go to the System and Security tab.
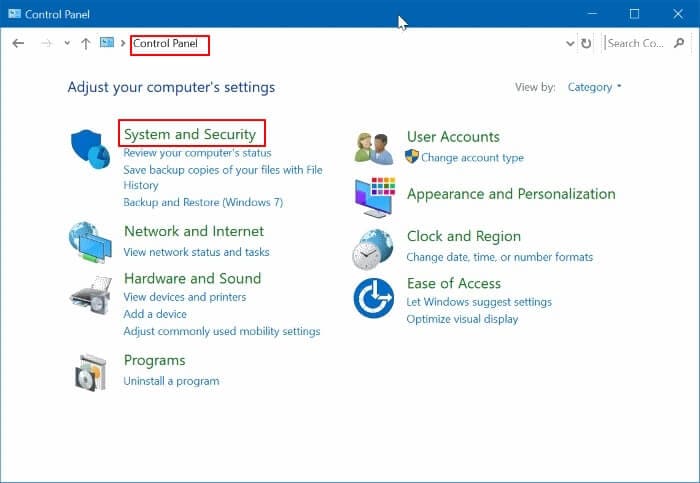
- Browse through the page until you find the BitLocker Drive Encryption icon. Click on it to proceed further.
- Once you’ve accessed the main menu, you can observe the drives that can have BitLocker enabled on them. Choose the Turn on BitLocker button next to the drive you want.
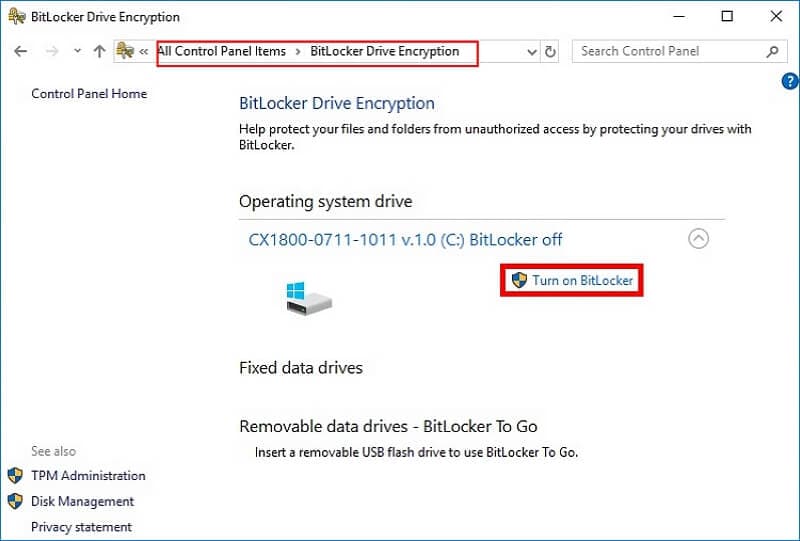
- Follow the on-screen prompts to set a password for the encryption and confirm your settings.
BitLocker provides you with a set of recovery keys that you can utilize if you forget your PIN or password. You can store them on the system, upload them to your Microsoft account, or print them on a piece of paper to store in a secure location.
Furthermore, you can use BitLocker to Go for securing data in portable devices like pen drives. It works similarly to the regular BitLocker, the only difference being how you activate it. To apply BitLocker to Go for any external storage drive, you need to browse to its location and select the Encrypt option from the right-click menu.
How to Create an Encrypted Container File with BitLocker
Generally, you use BitLocker to encrypt entire drives and partitions, but you can also create BitLocker encrypted container file which includes VHD (Virtual Hard Drives) and VHDX file.
What Are Virtual Hard Drives (VHD) Files
The thing with hard drive partitions is that they can only be created locally and waste some hard disk memory upon creation. They are also less secure since they link directly to the hard drive. For more peace of mind, it is better to create Virtual Hard Drives (VHD) instead. These are storage files that increase the security of your data and help save disk space even with multiple partitions. They use the storage available on your hard disk without linking directly to it.
A container file allows you to mount/dismount the VHD to your system without affecting the storage allocation on your physical hard drive. Think of it as virtually ejecting/inserting the disk into your system. But before you can do that, you should know how to create a VHD/VHDX file and encrypt it with BitLocker.
How to Create BitLocker Encrypted Virtual Hard Drives (VHD)
Step1Create a VHD/VHDX File
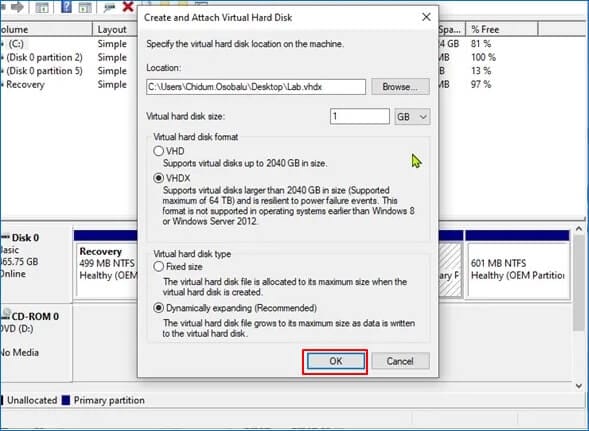
You can use Windows Disk Management Utility to create a VHD/VHDX storage path.
- Launch Disk Management from either the Start menu or type ‘diskmgmt.msc’ in the Run window.
- Choose the Create VHD option from the Actions tab.
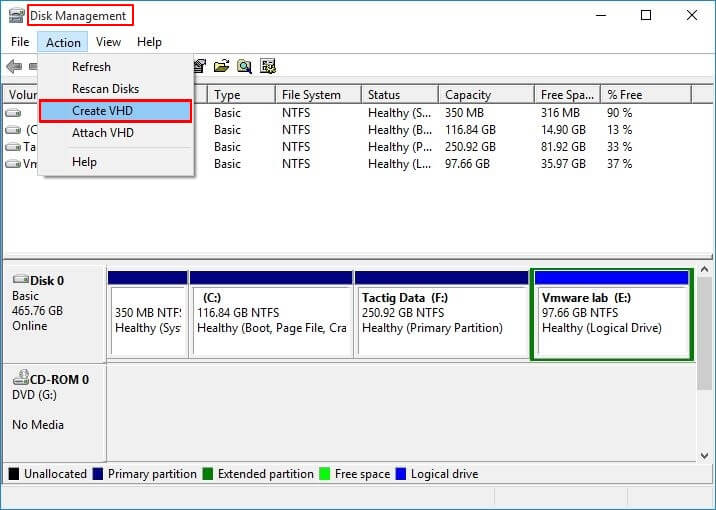
- The following dialogue box allows you to set various parameters for your new virtual drive. For example, you can choose the name, location, type of VHD, and maximum permitted storage. Click on OK once you’re comfortable with all the settings.
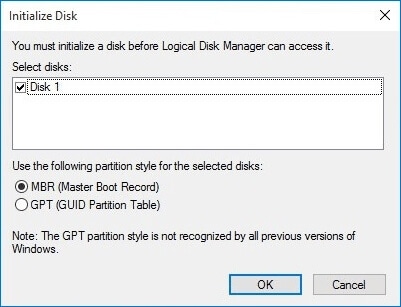
- To mount the drive onto your computer, go back to the Disk Management Utility and right-click on the virtual drive you just created.
- Select the Initialize Disk option from the drop-down menu. Depending on your preference, you can initialize the disk as MBR or GPT, but remember that GPT shall not be compatible with the older hardware and the previous versions of Windows.
The drive shall now display as unallocated storage in Disk Management. You can allocate it as a new partition using the same partition creation method mentioned above.
Step2Encrypt Container File with BitLocker
Once you’ve concluded the creation of your new virtual hard drive, you can now encrypt it using Windows BitLocker. It is like any other drive you would connect to your computer.
- Browse to the VHD you just created.
- Right-click on it and select the Turn on BitLocker option from the menu. If you already have BitLocker active on other drives, choose the Encrypt option.

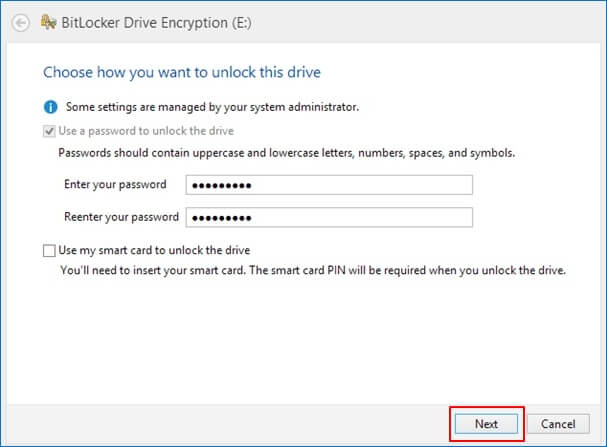
- Type in a suitable password/PIN for your virtual drive.
- If you didn't have BitLocker turned on, the setup would prompt you to save the recovery keys via a file, printout, or your Microsoft account. Click Next to progress with the setup.
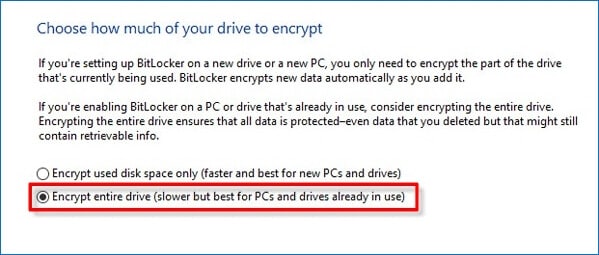
- From the following dialogue box, choose the Encrypt entire drive option. It ensures no backdoors are present in your virtual drive from any unencrypted sectors. Click Next when you want to move ahead.
- Now, you must choose between the New encryption and Compatible modes. The former is much more secure, but the latter is compatible with older versions of Windows. Click Next when you’re done.
- The setup will now confirm if you want to start the encryption process. Select Start encrypting when you’re ready. It will take some time, so it is better to do your dishes or walk the dog until the encryption is complete.
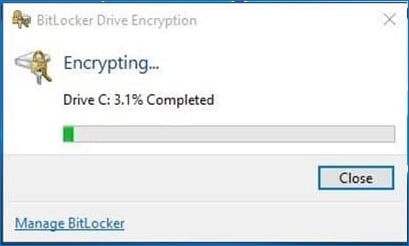
- Once the encryption concludes, click on Close to finish the setup.
Step3Detach BitLocker Encrypted Drive
Now that your VHD is encrypted, you can securely access it from any Windows 10 PC. But, if you want to remove it from your computer, you must unmount it first. You can do it through the method described below.
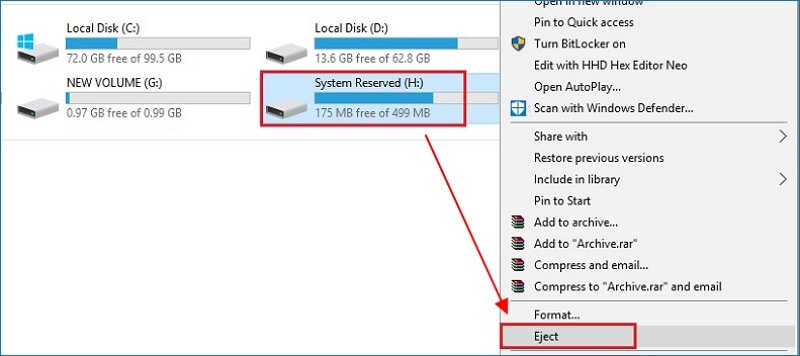
- Locate the VHD from the File Explorer.
- Right-click on the VHD and select the Eject option.
- Confirm your choice.
Alternatively, you can use the Disk Management Utility to unmount the drive. Then, simply right-click on the VHD and select the Detach VHD option.
You can now transfer it to a portable storage device and operate it by mounting it on another computer. Of course, it requires the same login credentials to access the data, so you can rest easy knowing only you can access the drive.
Conclusion
Creating virtual drives not only helps manage your data more effectively but also helps increase security. Combined with BitLocker encryption, it is next to impossible for someone to access your drive who doesn’t know the password/PIN or has access to your Microsoft account. We hope this guide gives you new insights on how to create a BitLocker drive.


