
Quick Answer: How to Recover Android Data on Linux
The Core Mechanism: Modern Android devices do not expose their internal storage as raw Mass Storage (UMS) blocks over USB; instead, they use MTP (Media Transfer Protocol). To run deeper sector recovery, you must bridge the connection using the Android Debug Bridge (ADB) to dump the raw disk partition directly to your Linux system as an image.
The Golden Rule: Your Android device must be rooted, and USB Debugging must be enabled under Developer Options. Without root permissions, the Linux terminal cannot access structural blocks like /dev/block/mmcblk0.
The Recovery Process:
1. Stream the raw storage disk onto your Linux machine using the terminal pipe command:./adb shell su -c "cat /dev/block/mmcblk0" | pv > mmcblk0.raw
2. Process the resulting .raw binary dump safely on your Linux environment using sector-carving tools such as TestDisk, PhotoRec, or extundelete.
When you think about Linux, you likely envision a computer operating system. Data recovery is just one of the many uses for Linux, a very adaptable operating system. Therefore, with the use of Linux, it is possible to recover lost data from an Android device. This article will discuss performing Android data recovery using Linux in internal and external memory. Furthermore, with the help of the Android data recovery software for Linux listed here, you can also recover your important files easily.
Can You Recover Deleted Files From Android Phone Using Linux?
Yes, users can recover deleted files from an Android phone using Linux. There are two kinds of recovery case scenarios:
- Recovering from Android internal and external memory: Users can use "adb," a component of the Android SDK, or the "fastboot" tool, which is used to unlock the bootloader on Android phones to access the Android file system from a Linux computer to recover deleted files.
- Recovering from Android phone external memory (SD card): For external memory like an SD card, any Linux-compatible data recovery software should work. Examples include TestDisk for Linux and other Linux data recovery tools.
This second scenario is easy to do by connecting the SD card to a Linux computer, and you can already run the data recovery tool. So, this article will concentrate on the first option (recovering from Android internal and external memory).
System Environment Prerequisite Mapping
Before connecting your hardware, verify that your terminal environment has the correct tools and libraries initialized:
Layer |
Component Name |
Required State / Package Name |
Technical Purpose |
| Android Device | Developer Mode | Enabled via Build Number Tap | Allows the host Linux OS to execute remote shell operations. |
| Android Device | Root Access (SU) | Fully Rooted (Magisk / KernelSU) | Grants read permissions to bypass MTP and view physical storage paths. |
| Linux Host | Android Tools Platform | android-tools-adb | Interfaces with the phone’s subsystem daemon over a secure USB tunnel. |
| Linux Host | Data Processing Utilities | pv (Pipe Viewer) | Monitors data stream transfer throughput speeds during storage imaging. |
| Linux Host | Forensic Carving Engine | testdisk / extundelete | Parses partition maps (GPT/MBR) and untangles unlinked sector inodes. |
How To Recover Data From the Android Internal and External Memory on Linux?
The Android Debug Bridge (ADB) command-line tool is useful for communicating with Android devices. You may carry out many tasks on the target device via the ADB.
ADB consists of two components: the desktop client and the one that ships with Android. We may use the desktop ADB client to send the Android device various commands when it is connected, and USB debugging is enabled. The Android SDK, accessible on Windows, Linux, macOS, and other platforms, includes ADB.
Prerequisites
- Agnostic Linux-based operating system
- Rooted Android phone
- Installed BusyBox on the Android device
- To obtain “adb,” install the Android SDK. Download the (large) SDK, unpack it, and launch adb from within.
- TestDisk, Pipe Viewer (PV), and, if necessary, extundelete (to recover files from ext3/4 filesystems). If you're using Debian, run the following:
# apt-get install testdisk pv extundelete
Step 1: Access the Android File System
- Enable USB Debug on your device to connect with adb. Connect the Android device to the Linux computer using a USB cable. Then, open a terminal on your Linux computer and navigate to the
sdk/platform-toolsin the Android SDK directory where adb is located.
- Use
adb shellto connect to your phone:
$ ./adb shell
Note: If the command above fails, you may need to call adb start-server as root first.
We can now use the mount command to determine which partition contains the SD Card data and dump the partition or dump out the entire memory content to avoid failure.
- Look for a block tool called
/dev/block/mmcblk0.We can see multiple partitions withinmmcblk0, but we will leave the partition management to TestDisk later. Exit the shell to return to your computer's Android SDK directory sdk/platform-tool. - Let us now dump the contents of
/dev/block/mmcblk0. Useadb shellto elevate to superuser and runcatto dump the content, as shown below:
$ ./adb shell su -c "cat /dev/block/mmcblk0" | pv > mmcblk0.raw
Pro Tip 2026: Navigating Ext4/F2FS File Systems on Modern Android Enclaves
Modern devices use advanced layouts like F2FS (Flash-Friendly File System) or strict Ext4 schemas with file-based metadata encryption. When pushing a raw block dump through an ADB shell tunnel, your target destination folder on your Linux PC must have ample storage space equivalent to or larger than your phone's total storage capacity (e.g., a $256\text{ GB}$ smartphone requires a minimum of $256\text{ GB}$ available space on your Linux drive). If TestDisk encounters difficulty reading an encrypted raw dump from an updated Android OS, bypass structural partition scanning by parsing the target file direct via PhotoRec or using command-line signatures:photorec /cmd mmcblk0.raw searchThis instructs the software to ignore corrupt partition headers and harvest raw file signatures (like .jpg, .mp4, or .pdf) directly from memory clusters.
We can now let TestDisk handle the rest.
Learn more tools to access Android on Linux with video tutorials:
Step 2: Android Data Recovery on Linux
After accessing the Android device on Linux, you can now use any Linux data recovery tools to recover data from it, for example, TestDisk.
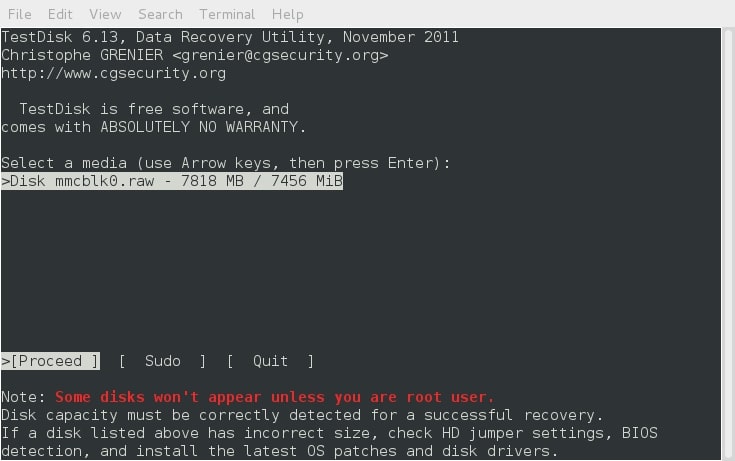
- To begin, restore the GPT partition table. Choose
mmcblk0.rawin the TestDisk interface, and press Proceed.
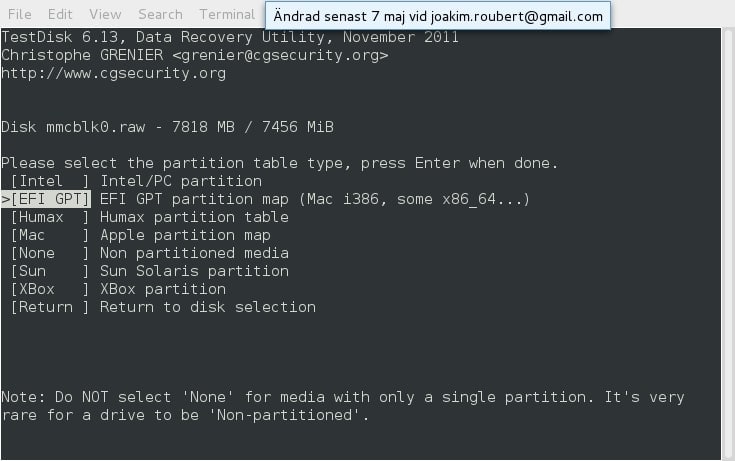
- Select the EFI GPT partition map.
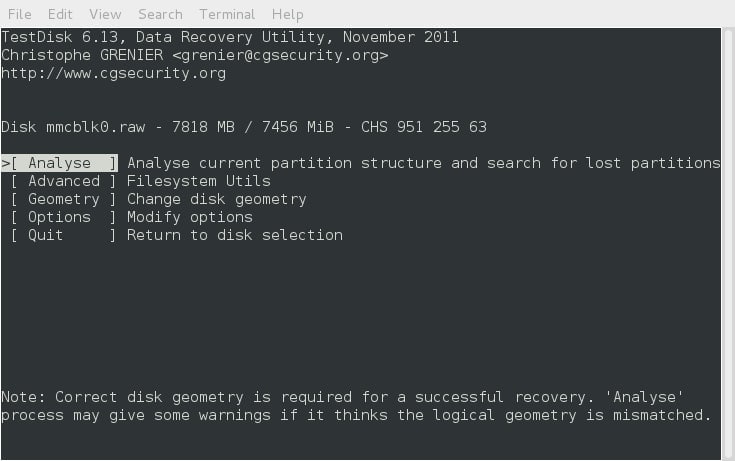
- Then, for TestDisk to find the partitions, select Analyse.
- Select Quick Search.
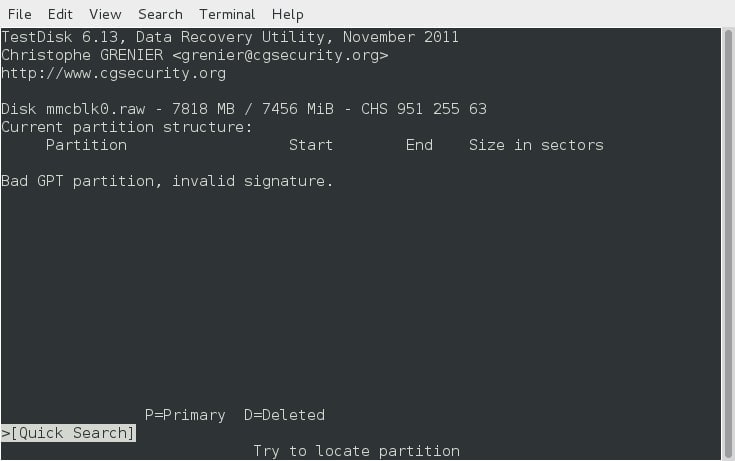
- The search will yield a table like this:

- Then press Enter to proceed.
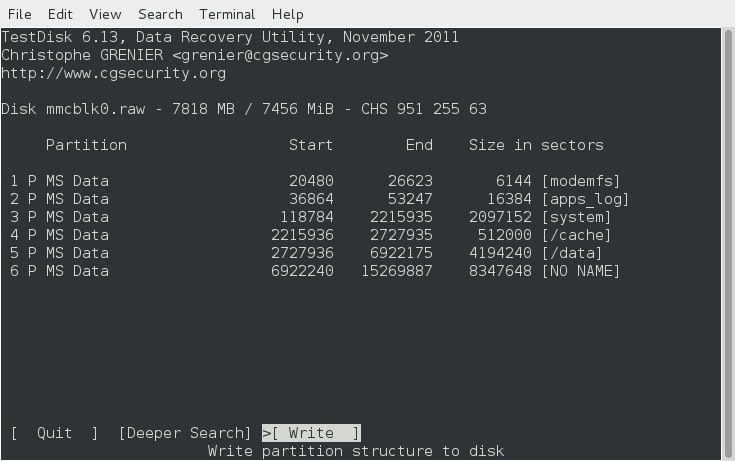
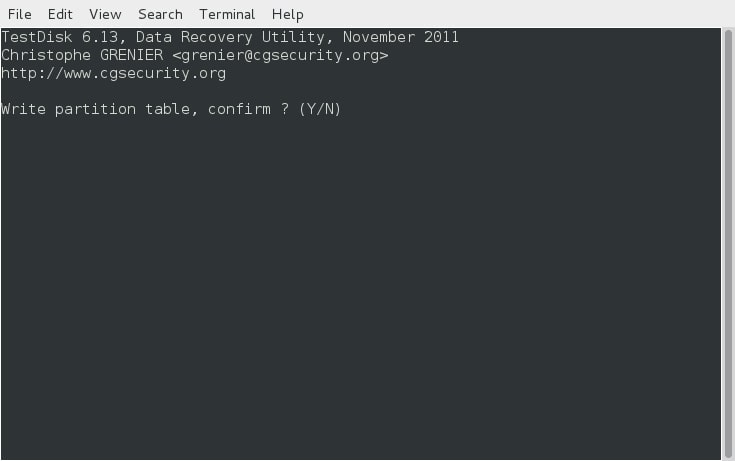
- Choose the Write option to save this new (recovered) partition table. Then, tap
Yto confirm the selection.
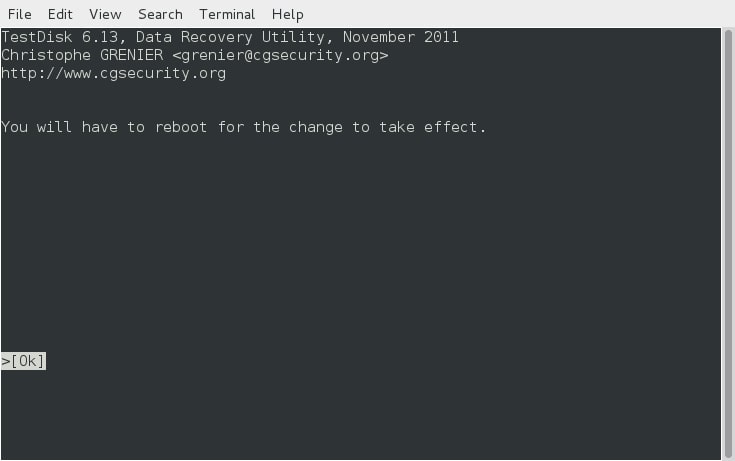
- You will then be notified that you must reboot. However, there is no such demand in this situation. Press Enter to continue. Now that the partition table has been restored, we can try recovering the files.
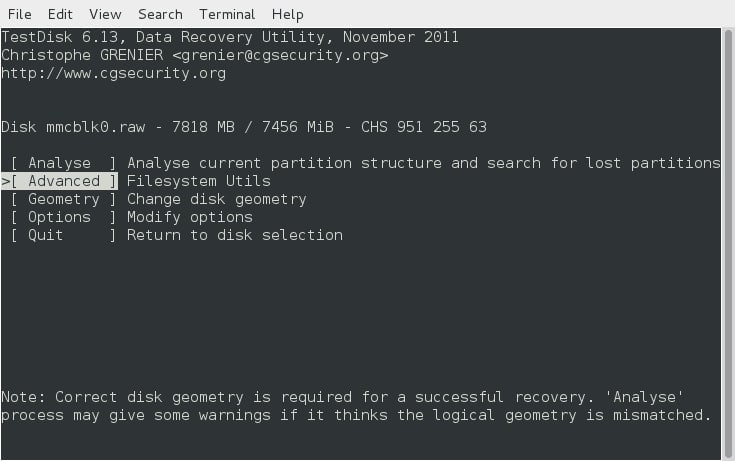
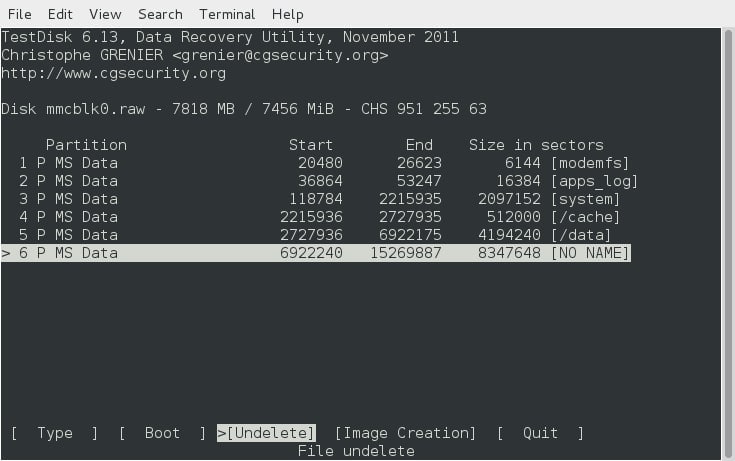
- To use TestDisk's Filesystem Utilities section, select Advanced.
- Choose the partition for which you want to perform the recovery. In this example, we'll use the Undelete option to recover photos from the FAT32 SD Card partition:
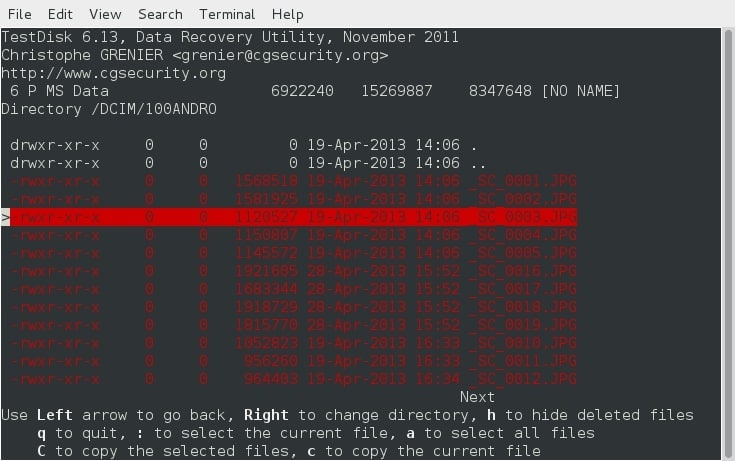
- Now we can search the filesystem for recoverable files:
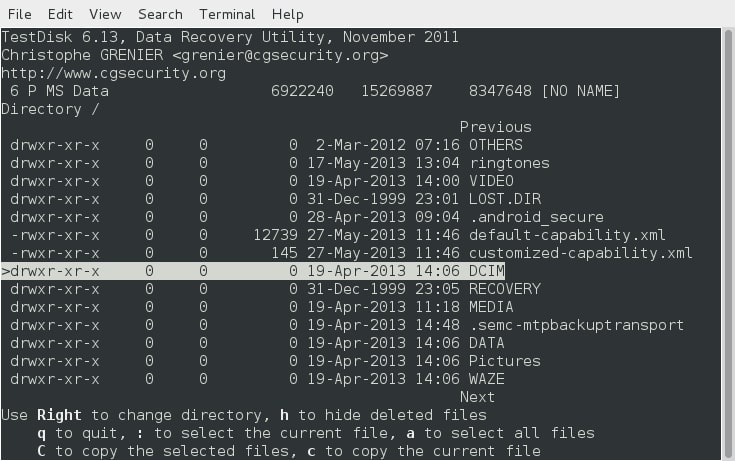
- There are many recoverable files in the /DCIM/100ANDRO directory, where the Android device stores the photos. Choose it, then use
Corcto recover them to one of the Linux computer's file systems.
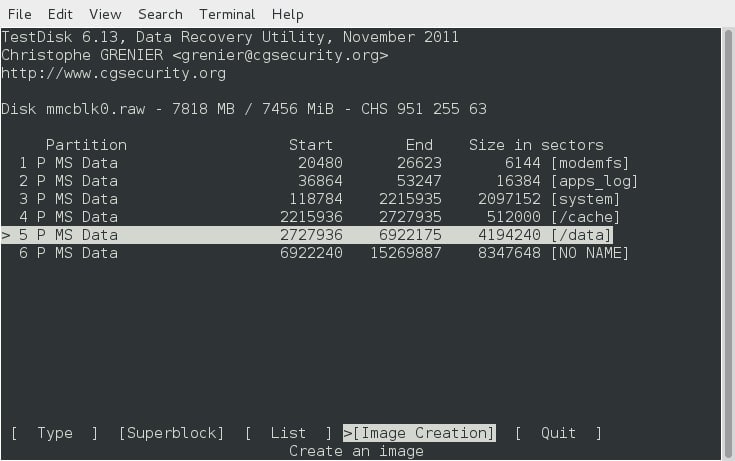
- Optional: To recover files from an ext3/ext4 partition, TestDisk has an Image Creation option that will write an image of that partition called image.dd to a file on the Linux computer's file system.
Then, in your terminal window, use extundelete to recover files from the image:
$ extundelete --restore-all image.dd
Aside from TestDisk, many free and open-source Linux data recovery tools are available in the market. Here are a few examples:
Linux Data Carving Utility Comparison Blueprint
Depending on the file type loss scenario and system format structure, choose your terminal recovery module based on this architectural breakdown table:
Software Tool |
Optimal Use Case Scenario |
Supported Target File Systems |
Recovery Methodology |
| TestDisk | Restoring completely deleted partitions or damaged partition tables. | FAT32, exFAT, NTFS, Ext2/3/4 | Rebuilds original allocation tables and updates directories. |
| PhotoRec | Pulling media assets (Photos/Videos) from deeply fragmented memory. | Filesystem Agnostic (Raw Blocks) | Signature-based data carving that ignores directory paths. |
| Extundelete | Restoring documents directly from internal Ext3 or Ext4 storage. | Ext3 & Ext4 exclusively | References partition journals to reverse unlinked block events. |
| Ddrescue | Cloning disks from old, physically failing hardware or bad storage blocks. | Filesystem Agnostic | Advanced algorithmic sector copying that skips corrupted cells. |
| Foremost / Scalpel | Targeted forensic recovery of specific headers and file extensions. | Filesystem Agnostic | Fast, high-speed configuration-file header and footer matching lookups. |
Each tool may have different capabilities and limitations. It is always recommended to try more than one tool to increase the chances of successful recovery.
Summing Up
In this article, we listed the 2 major steps to recover data from an Android device using Linux. First, you must access the Android file system and then recover your lost or deleted data on your Android device by a Linux device. However, we listed the best Linux data recovery software if you want a more convenient way of recovering files. Check them out now!
Final Technical Checklist: Risk-Free Android Linux Recovery
- Maintain Constant Power Feed: Ensure your Android phone has at least 80% battery capacity or is connected to a powered USB hub to prevent a sudden power outage midway through a raw disk dump cycle.
- Enforce Write-Protection Integrity: Never point your recovery extraction destination back onto the active phone memory partition. Always dump files directly to a local home directory on your Linux host environment (~/StorageRecovery).
- Verify Daemon Authority Execution: If your ADB terminal session hangs indefinitely or fails with an "unauthorized" flag, refresh your credentials via the terminal by inputting adb kill-server followed immediately by sudo adb start-server.
- Audit Storage Encryption Tiers: Be aware that data deleted from factory-encrypted devices after a total data wipe may be unrecoverable via traditional carving if the encryption key has been discarded by the hardware keystore module. Use these procedures immediately following file deletion for optimal retrieval probabilities.


