Do you have a similar question? Know that you can clone dynamic disk in Windows to improve its performance, have an extra backup source, and more. The benefits of cloning the dynamic disk in Windows are numerous, as it provides the extra advantage of seamless performance.
You must consider increasing the efficiency of your system by cloning the dynamic disk. You will need software through which you can clone the dynamic disk. However, make sure that this cloning method does not put your device data at risk.
Let's explore all the potential ways to clone dynamic disk into Windows.
Try Wondershare Recoverit to Perform Data Recovery

In this article
What is a Dynamic Disk in Windows?
Windows contains two types of disks- dynamic and basic. These disks are known for supporting MBR and GPT partition styles. However, both of them are different in numerous aspects. Dynamic disk refers to a physical disk that is meant for dynamic storage. The dynamic disk will contain all information like spanned volumes, simple volumes, mirrored volumes, RAID-5 volumes and also striped volumes.

Basic disks usually cannot handle these volume types. On the other hand, the dynamic disks contain all the features that can be useful for handling these volumes. As a result, dynamic disks, through these volumes, help improve data efficiency for the read-write part of the system, thereby creating new volumes.
These new volumes span across multiple risks and can create volumes that can tolerate fault and so on. Therefore, the dynamic disk assists in creating volumes, which can help in data management, thereby improving the performance of your system.
What’s the Difference Between Basic Disk and Dynamic Disk?
A dynamic disk is very different from basic disk, even though they share some similarities. Some of the key differences between basic disk and dynamic disk are as follows:
| Basic Disk | Dynamic Disk |
| Uses primary partitions and logical drives. | Uses volumes that span multiple disks. |
| Supports MBR (Master Boot Record) and GPT (GUID Partition Table). | Also supports MBR and GPT. |
| - MBR: Up to 4 primary partitions, or 3 primary + 1 extended partition. - GPT: Virtually unlimited partitions. |
Unlimited volumes (dependent on available disk space). |
| Fixed partitions and structure. | Offers more flexibility with dynamic volumes. |
| - Simple volumes. | - Simple, spanned, striped, mirrored, and RAID-5 volumes. |
| No data redundancy. | Supports mirrored and RAID-5 volumes for redundancy. |
| Compatible with all operating systems. | Limited to modern Windows OS (Windows 2000 and later). |
| Can be converted to Dynamic Disk without data loss. | Requires partition deletion or third-party tools to convert back to Basic Disk. |
| Easier to repair; widely supported. | Complex to repair; requires specialized tools. |
| Adequate for standard use. | Improved performance with striped volumes. |
| Ideal for personal or simple use cases. | Best suited for advanced configurations, like servers. |
Why Do You Need To Clone A Dynamic Disk?
Your dynamic disk contains a wide range of data. Therefore, it is advisable to be mindful while using these. Now that these are home to vast data, you can't lose it. Thus, some of the key reasons why you will need to clone dynamic disk are as follows:
- When your dynamic disk runs out of space, it will start affecting the performance of your computer. Therefore, you must replace your dynamic disk with one with more space. However, you will definitely want to keep the data from your old dynamic disk into the new one. As a result, copying the data from a dynamic disk can bring about the change without the risk of data loss.
- Also, consider cloning the dynamic disk if you want to take a backup. If the dynamic disk breaks down or anything happens, it can be a total disappointment. Therefore, cloning can help you prevent the risk of unwanted data loss as you will still have one extra space for retrieving the data.

- The dynamic disk can become old after a certain point in time. Therefore, you will want to consider a brand-new disk. Cloning the dynamic disk can be a key way to keep the old data on the hard drive.
When you clone dynamic disk to SSD, you get a wide range of benefits. Understanding how cloning can assist you in the long run and offer maximum advantages is advisable. A major reason to clone dynamic disk is to ensure that there's no risk of data loss.
How to Clone Dynamic Disk in Windows 11/10/8/7?
Now that you know why to clone a dynamic disk, you must also understand how to clone a dynamic disk. You can use your Windows PC's built-in tools or third-party software. All these steps are equally helpful and can be highly beneficial in cloning dynamic disk.
Below are some of the prominent methods using which you can understand how clone to dynamic disk in Windows 11/ 10/ 8/ 7:
Step 1. Convert Dynamic Disk to Basic Disk Without Partition Deletion
To convert a dynamic disk to a basic disk without partition deletion, you must use third-party software like Wondershare UBackit. This is mostly because the in-built tools of Windows cannot support this method. If you try to convert dynamic disk to basic disk without partition deletion with the help of in-built Windows tools, there will be a significant loss of data.
Wondershare UBackit will help in cloning the disk without much interruption. This disk cloning software supports GPT and MBR partition schemes. As a result, disk cloning becomes very easy. The only condition for operating Wondershare UBackit to enhance this process is to ensure that the target drive size should be the same as that of your source drive. In some cases, it is advisable that the target drive size be higher than the source drive. This provides flexibility and ensures that the disk cloning process becomes easier without the requirement to delete any partition from your software.

Wondershare UBackit is available for download from the website. The free version comes with a one month trial feature which is enough to clone the disk one time. For the disk cloning feature, Wondershare UBackit can close hard drive to SSD and other HDD. Apart from that, it also supports cloning for different disk types like NAS Drives, SD cards, USB drives, NVMe SSDs and SATA/M.2 SSDs.
You can download Wondershare UBackit in your system and then install the same. After that, you can begin the disk cloning feature to ensure that the cloning is successfully done without the risk of any data loss.
You may follow the steps given below to convert the dynamic disk to basic disk without any partition deletion using Wondershare UBackIt:
Step 1: Launch the installed Wondershare UBackit software in your system. On the left side of your screen, you will have different options. Click on the Clone option. \
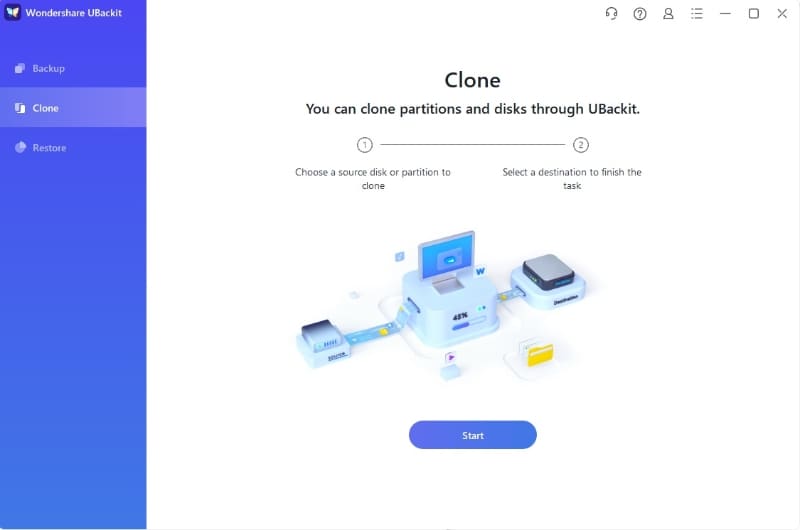
Step 2: Since you are cloning, you will first have to select the hard drive. Click on Choose Backup source and select the hard drive that you want to clone. Tap on the Next button available on the bottom right corner of the screen.
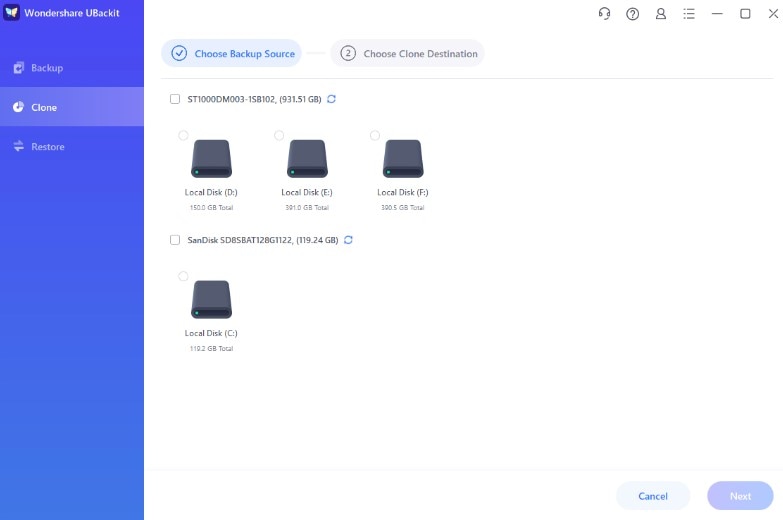
Step 3: Here, you will have to choose the Clone destination. This is the source where you will clone the source drive. Now, tap on the Clone button.
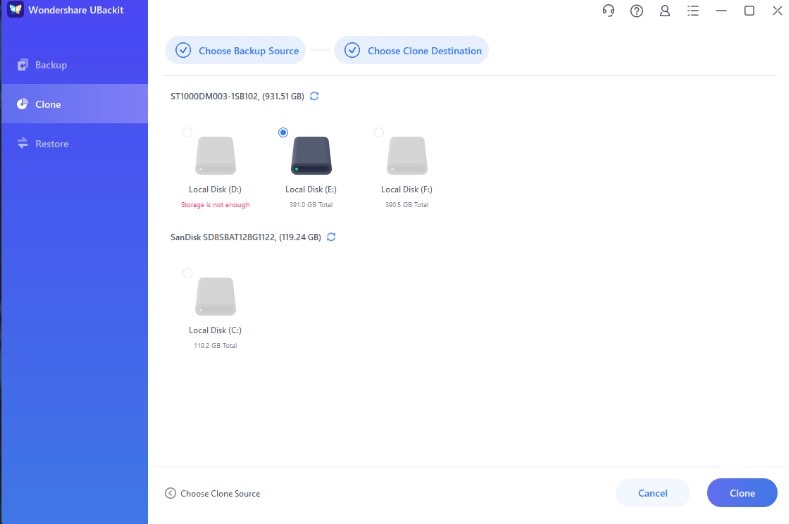
Step 4: You will receive a warning message stating whether you want to clone the hard or not. Click on the Continue button to confirm the hard drive cloning operation.
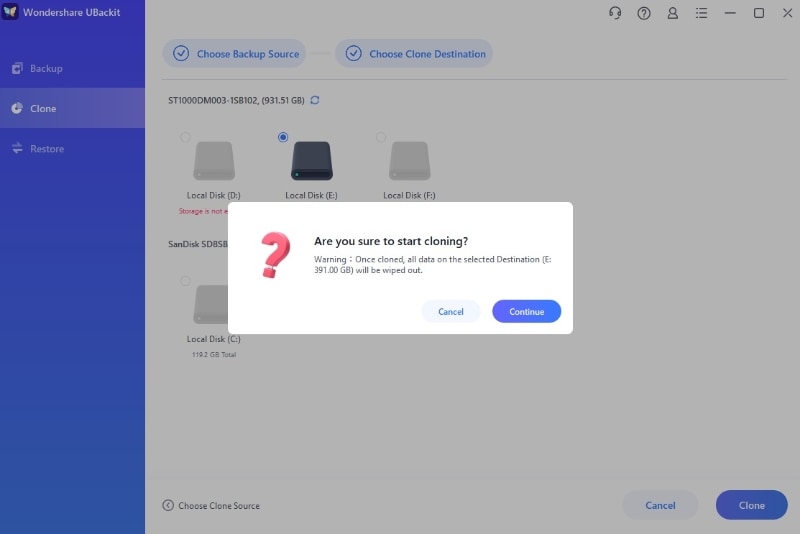
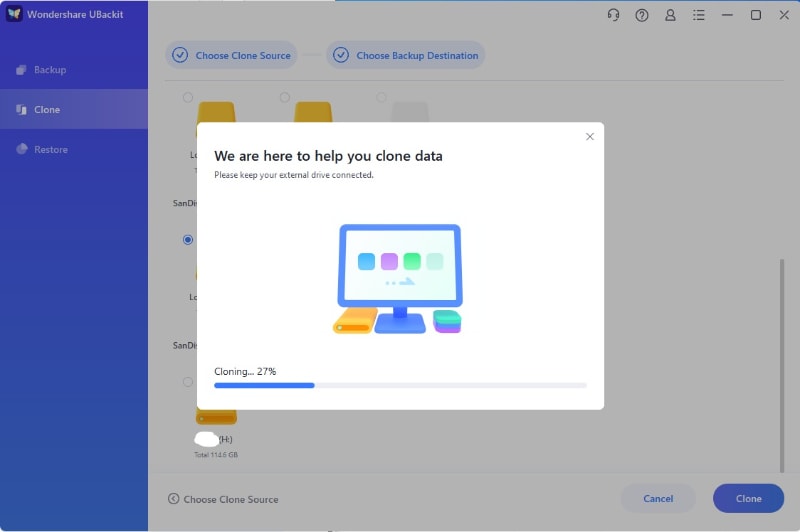
Step 5: Wondershare UBackit will take a few minutes to complete the cloning process. The time taken to complete the drive cloning process will completely depend on the size of the drive that you want to clone.
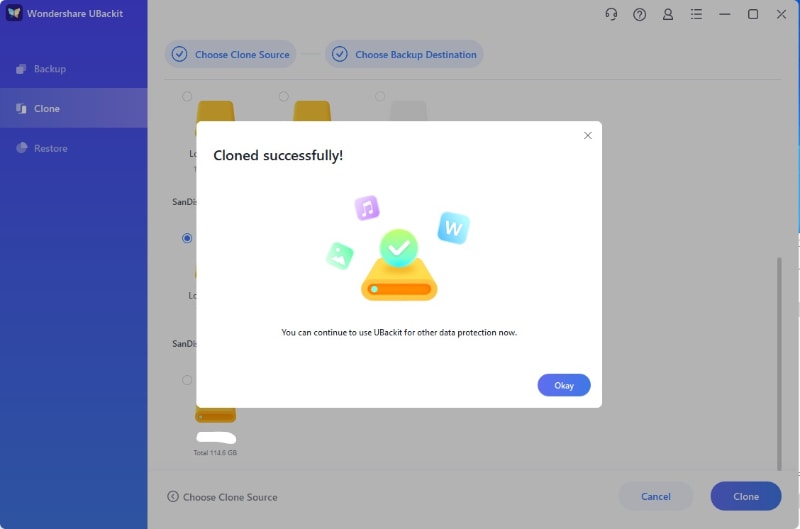
Step 6: Once the hard drive cloning operation is complete, the confirmation message will appear on the screen.
Step 2. Convert the Cloned Basic Disk to a Dynamic Disk
But, now what if you want to convert the same cloned disk to a dynamic disk? In this case, you will have to use the software's built-in tools. If you want to convert dynamic disk to SSD, you can use the Windows Disk Management feature.
Below are the steps that you will have to follow to convert the clone disk to a dynamic disk using the Windows Disk Management feature:
Step 1: Press the Windows + R keys on your keyboard to open the Run dialog box.

Step 2: Once the Run dialog box opens in your computer, type dskmgmt.msc to launch the Windows Disk Management feature.

Step 3: Right-click on the unallocated space and go through the hard drive that you will have to clone. From the available options for the disk, click on Convert to Dynamic disk option.

This process will convert the disk to a dynamic disk and you can carry on with your regular functions. Windows Disk Management is a built-in Windows tool. Therefore, you will not have to worry about downloading the software. You can launch Disk Management using the run dialog box. As a result, you'll be able to ensure a faster conversion process.
How to Prevent Data Loss When Cloning a Dynamic Disk with Wondershare Recoverit?
Have you accidentally lost data while cloning a dynamic disk? That can seem like a lot to handle. However, the good thing is you can fix it. You can use a data recovery software like Wondershare Recoverit to prevent the data loss. Wondershare Recoverit allows you to retrieve the lost data.
Wondershare Recoverit is available for Mac OS and Windows OS. The free version of Wondershare Recoverit is equipped with all the features that can help you recover data easily. You must download and install Wondershare Recoverit in your system to initiate the process of recovering the lost data.
Wondershare Recoverit can recover a wide range of files in different formats, so you can easily access them.
Some of the key steps through which you can prevent data loss while cloning the dynamic disk with Wondershare Recoverit are mentioned below:
Step 1: Choose the Drive
You must download and install Wondershare Recoverit in your system. Once that is done, you must launch it. Select the hard drive under the Hard Disk Drives section that you want to recover. Click on the Start button.

Step 2: Scan the Drive
The drive scanning procedure will begin. Wondershare Recoverit will initiate the scan which will provide information about the features. This helps streamline the entire process so you can recover the data accordingly. You can also filter the scanning process. Therefore, you have the flexibility to choose the type of files you want to recover.

Step 3: Preview the Files and Save
Once the files have been scanned, all the deleted files will be presented to you on the screen. Now, you can preview all the files and check which ones you should recover and which ones you should not. While previewing, you can click on the Recover option for the files you want to recover. Click on Save to select the location in which you want to save the file. The files will be recovered.

How to Create a Volume on a Dynamic Disk?
If you want to create volume on a dynamic disk, you must use your Windows PC's Disk Management feature. Since this is an in-built feature, you won't have to worry about driving extra information.
You can follow the steps given below for creating volume on the dynamic disk using the Windows Disk Management feature:
Step 1: Launch the Run dialog box in your system by pressing the Windows + R keys simultaneously on your keyboard. Once the dialog box appears, type diskmgmt.msc and hit Enter to open Disk Management.

Step 2: Navigate to the unallocated space and right-click. Choose the New Simple Volume option. The New Simple Volume Wizard will appear. You will have to follow the instructions on the screen and customize the options accordingly for assigning drive letters, allocating unit sizes, choosing file systems, and more.

Step 3: Once you have entered all the details, click on Next. Then, hit the Finish button to confirm and complete the process.
Conclusion
Now that you have understood how to clone dynamic disk, you must try it. Cloning a dynamic disk provides you the flexibility of having an extra source of backup. Therefore, if there is any issue, you will be able to recover data from the new source. Cloning also helps in improving the performance of your system. You should adopt the right methods for cloning the dynamic disk to avoid any difficulties. Cloning also puts at risk of data loss. So, you can use data recovery software to overcome this problem.
FAQs
-
1. How to convert dynamic disk to GPT?
You can use the Disk Management and Command Line prompt to convert a dynamic disk to GPT. It is advisable to convert the same to GPT only if the computer is new and has UEFI firmware. This is because it offers better compatibility and support for modern features. -
2. Can I clone a dynamic disk?
Yes, you have the option of cloning a dynamic disk. In case you want to clone the dynamic disk, you will have to choose a third-party cloning software that allows you to do so quickly. -
3. Can a dynamic disk be bootable?
Yes, a dynamic disk can be bootable. However, you will have to consider different factors like the partition type, boot loader, and boot loader support. It is advisable to measure all the options to make the right choice.


 ChatGPT
 Perplexity
 Google AI Mode
 Grok
Grok


