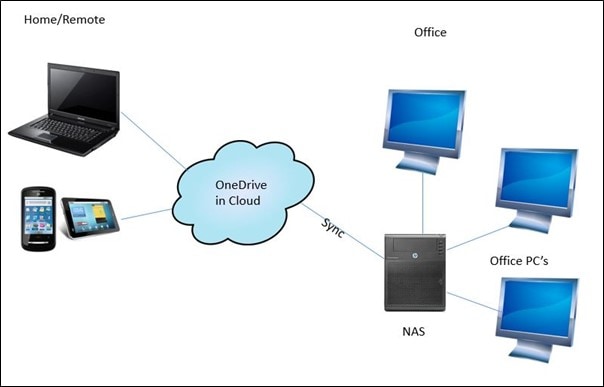
For users, it is possible to backup OneDrive to Synology, a capable network-attached storage or NAS system. However, syncing data from Synology to OneDrive or the opposite can get complex. But there are ways to do, and this post will detail each one. Read about them here.
Part 1: Overview of Synology NAS and OneDrive
Before discussing the processes available for data backupOneDrive to Synology NAS and vice versa, having a clear understanding of both is important.
Synology NAS - Overview
Synology NAS is a branded network-attached storage service that businesses and regular users can work with. Essentially, NAS services are not the same as conventional hard drives or common cloud storage services. It blends both solutions, with hard drives and internet access supported.
Pros
Silent and stable processing.
Multimedia transcoding supported.
Easy setup process.
Cons
One can only expand RAM a little.
Needs a strong internet connection consistently.
OneDrive - Overview
An example of a capable cloud service provider for storage is OneDrive, which does not operate on the same mechanisms or principles of NAS storage services. With OneDrive, users can store various types of files like photos, music, video, and documents in their cloud accounts. It comes with Microsoft Office integration, making it a suitable app for companies and professional teams who need good-quality collaboration benefits.
Pros
Strong security protocols in place.
Easy to use.
The intuitive function of sharing files.
Cons
Not many backup features are available.
Limits to adding special characters.
Part 2: Why Backup Synology NAS to OneDrive or OneDrive to Synology NAS?
If you are wondering why Synology OneDrive backup connection on either side is useful, first, you should understand the common strategy in place. The importance of Synology NAS is notable in periods of sudden IT disaster. Typically, users practice the 3-2-1 backup method for the best backup experience. These include the following stages typically:
Principle 1: Creating around 3 data copies and keeping them in different physical storage media sections.
Principle 2: Keeping the copies in 2 or more data format types.
Principle 3: Save one of the collected data backups in an offsite location like a commercial-based cloud account.
Let’s understand the stages and the reasons for using them in more detail.
Three Copies
The reason for creating at least three copies of the data in different storage devices is to reduce the danger of losing data if one of these devices gets damaged. To give an example:
- A network error can block backup data transfer online, but that will not affect local disk-based data.
- If a virus wipes out a hard drive causing it to stop operating or all data to be deleted, the backup data saved in the cloud account will still stay safe.
Two Storage Mediums
In Synology OneDrive sync, the medium or format refers to the physical style of data representation instead of regular layouts. Keeping at least another copy of the data will help you from storage-specific issues. Thus, this strategy implies that users should store one copy of the files on a hard disk and another for cloud service/FTP.
One Offsite
This principle mentions that users should keep one backup or more than that in an offsite location. Users will keep the secondary backup in another building or room, saving it from physical issues that can cause data loss. One can use the data saved in the secondary location if the primary one gets damaged in situations like:
- Fire emergency in the facility.
- Falling and breaking of the hard drive or computer device.
- External forces are affecting the destruction of buildings, like wars, etc.
- Data device lost due to theft.
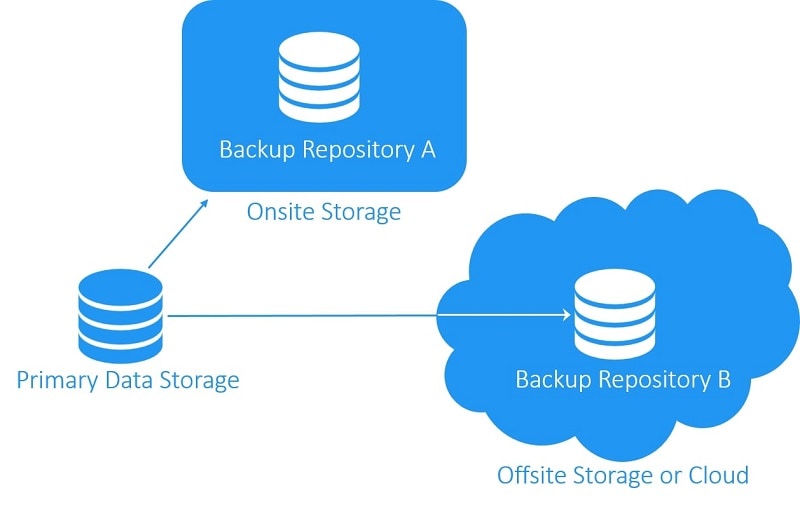
Currently, NAS is useful for professionals and regular users to handle multi-level data backup. Additionally, many users are turning to offsite storage services like commercial cloud, e.g., OneDrive. So, you can back up Synology NAS to an external hard drive or focus on OneDrive.
Specific benefits are noticeable for backing up data from Synology NAS to OneDrive or vice versa.
Why Backup from Synology to OneDrive?
Synology NAS has capable functionalities, and the devices have superior backup quality and storage capacity. However, as explained during the 3-2-1 strategy explanation, it is at the risk of other issues like hardware problems, natural disasters, etc.
Comparatively, when you Backup Synology to OneDrive, you will experience the following benefits:
- Real-time collaboration- OneDrive is powered with Microsoft Office integration, which is useful for work data transfers and collaboration. This solution makes it easier to share files in real-time with multiple team members (for professionals) and friends/family (for regular users).
- Long-term, cost-effective solution- All new registered members of OneDrive get around 5 GB of free cloud storage. Users can upgrade the account with paid plans if more space is necessary.
Why Backup from OneDrive to Synology?
The OneDrive account assures strong data safety for collaboration and transfers. However, as per the 3-2-1 principles, it is open to issues like software bugs, network errors, lack of storage capacity, etc. In that case, one mustback up OneDrive to Synology- here are some noteworthy reasons.
- No need for depending on online connection- For sharing files via OneDrive, users generally have to check that the network connection is active. So, focusing on high internet bandwidth is important then, but it causes more power consumption. Comparatively, you can share data files at LAN speed with Synology NAS, which consumes less power.
- Better syncing with multiple cloud services- If you have saved files on different cloud platforms besides OneDrive, it is easier to sync them all to Synology NAS via the Synology Cloud Sync feature. This benefit is not available in for OneDrive, i.e., it does not sync with other clouds.
Part 3: 3 Methods to Backup Synology NAS to OneDrive
To back up Synology to OneDrive, you can utilize different tools and programs. They are detailed hereafter.
Method 1: Backup Synology NAS to OneDrive with Cloud Sync
Cloud Sync is one of the best solutions currently available for users to connect Synology NAS using LAN with on-demand or public cloud storage services. It works with multiple protocols like OpenStack Swift, Amazon S3 API, and WebDAV. The software also supports concurrent processing, allowing users to choose and sync multiple files between storage services.
Overall, using this process allows users to collaborate better when accessing cloud services and NAS while getting efficient data backups.
How to use Cloud Sync for Synology to OneDrive Backup?
Step 1: Access your preferred browser on your PC. Search for Synology NAS official program and log in to your account.
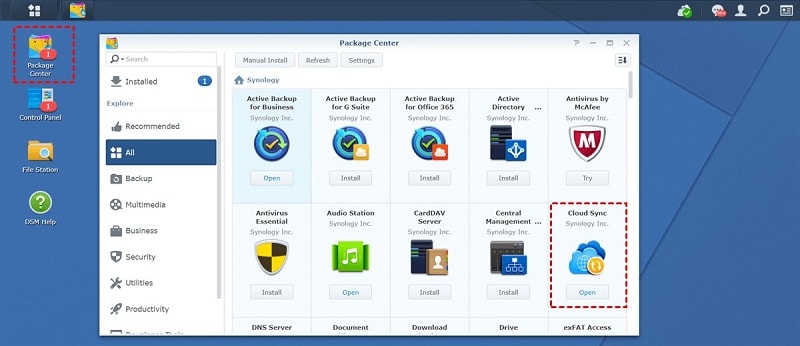
Step 2: Click on the Package Center option.
Step 3: Look for Cloud Sync > install the software. Then, double-click on it to launch.
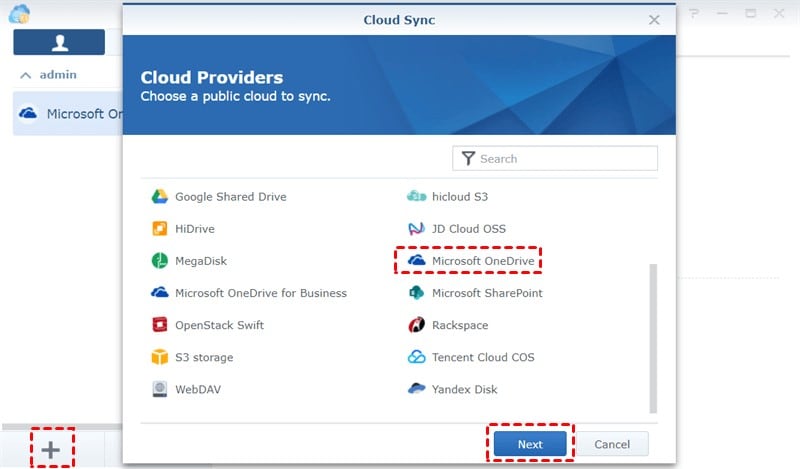
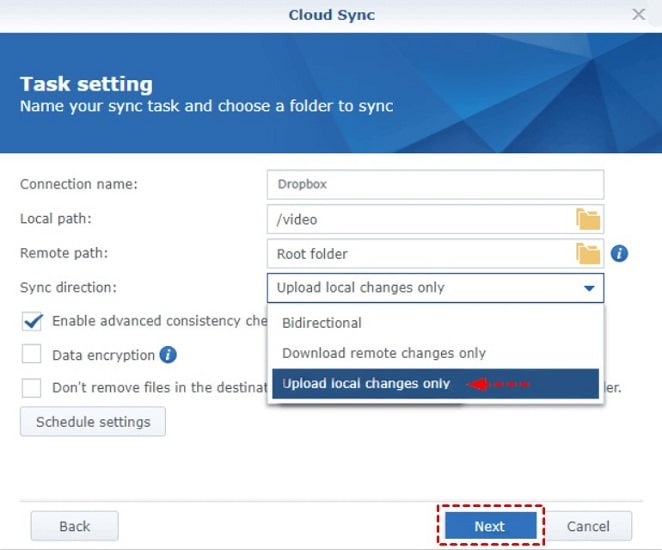
Step 4: Tap on the plus (+) icon on the screen's left side. Then, choose Microsoft OneDrive among the options and press the Next button.
Step 5: Fill up the parameters in the following pop-up window for syncing Synology to OneDrive, like:
- Local Path- Choose the data for backup.
- Sync Direction- Since you are backing up data to OneDrive from Synology NAS, choose the “Upload Local Changes Only” option.
- Remote Path- Choose the folder from which you will sync the data as the Root Folder.
Step 6: Choose the Next button to activate the backup process.
Method 2: Sync Synology NAS to OneDrive With Symbolic Link Subfolder
Users can sync their data on Synology NAS with their cloud service, like OneDrive, by creating a Symbolic Link or Symlink. This type of advanced-level shortcut link allows users to create links to specific folders or files.
This functionality can be enabled via different utilities on Windows, Mac, and Linux devices. For example, Windows Vista/7/8/10/11 versions support symbolic links via the Command Prompt. Alternatively, users can also operate third-party tools here.
To better explain how this work, users can store a file directory saved in C:\ program to D:\. However, the program in C:\ cannot work without the files. So, users create a symlink subfolder in D:\ for easy access without moving the files from the C:\ folder. Users can use this method to sync files with cloud service programs like OneDrive.
How to use Symbolic Link Subfolder for Synology to OneDrive Backup/Syncing?
Step 1: You must access the Command Prompt on your Windows device first. Steps different for OS versions-
- Windows 7- Access Start >look for Command Prompt > tap on the Command Prompt shortcut and right-click on it > Choose the Run as Administrator option.
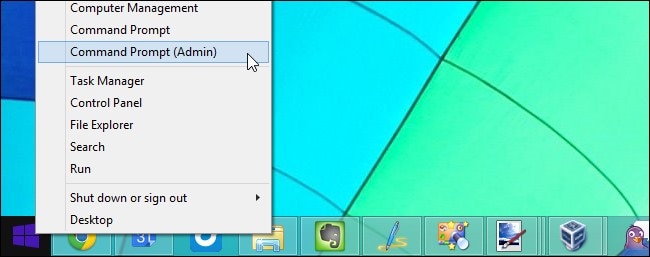
- Windows 11/10/8- Hit the Win + X keys on your keyboard > click on Command Prompt (Admin).
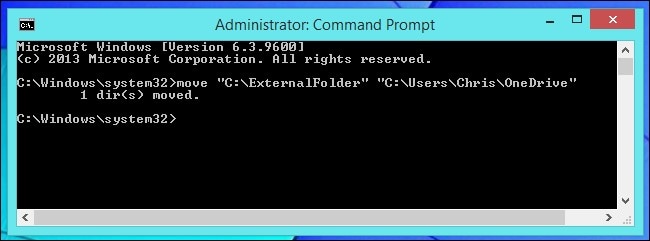
Step 2: On the next window, change the “C:\Path\To\ExternalFolder” command with the folder you will sync from, i.e., Synology NAS.
Then, replace the cloud storage folder section with the "C:\Users\NAME\OneDrive" command.
The command to add will read in total as:
move “C:\Path\To\ExternalFolder” “C:\Users\NAME\OneDrive”
Step 3: Then, make the Symbolic link. The command here will appear as:
mklink /d “C:\Path\To\ExternalFolder” “C:\Users\NAME\OneDrive\ExternalFolder”

Method 3: Sync Synology NAS to OneDrivewith Third-party Software
Another method for users to back up Synology to OneDriveis to work with a third-party software allowing this process. Different tools are available in the market for this, like:
- AOMEI Backupper Standard
- Backblaze
- Acronis Cyber Protect
For better understanding, let’s discuss how one of these solutions is useful, like AOMEI Backupper Standard. This software is a strong backup and data restoration program Windows users can use for multi-device data syncing.
It supports the backup of Synology NAS into OneDrive since the software itself is compatible with different storage sources, like cloud drives, external or internal hard drives, USB drives, etc. It includes many useful features for data backupSynology to OneDrive (or other sources), like scheduled backup, backup mode, encryptions, etc.
Alternatively, if you want a high-grade data recovery process for Synology NAS, you can use another capable third-party software for Synology NAS data recovery.
How to use AOMEI Backupper Standard for Synology to OneDrive Backup?
Step 1: Download the AOMEI Backupper Standard software and install it.
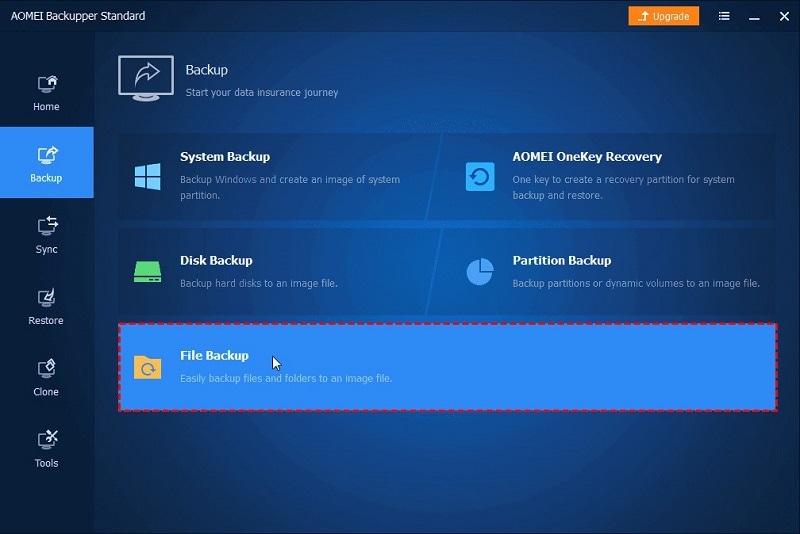
Step 2: Launch the app and click on the Backup button.
Step 3: Tap on File Backup.
Step 4: Next, tap on either Add Folder or Add File icon, depending on what files you are syncing.
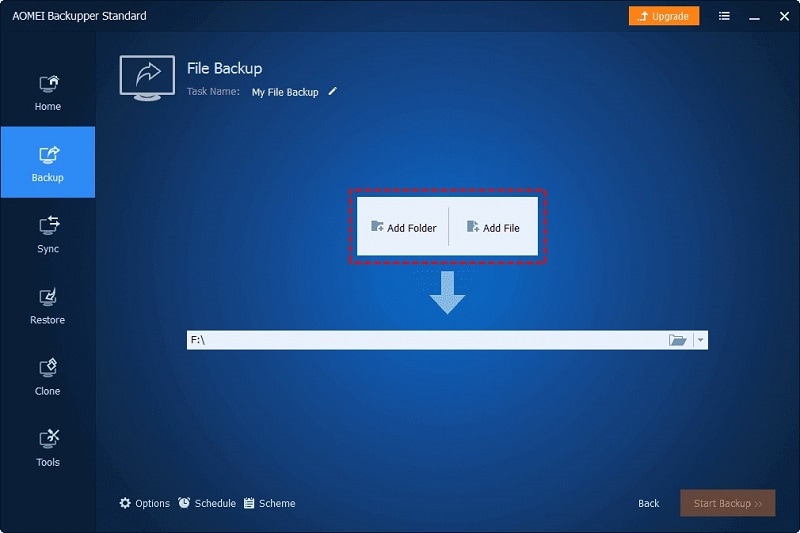
Step 5: Choose the Share/NAS option on the next pop-up window.
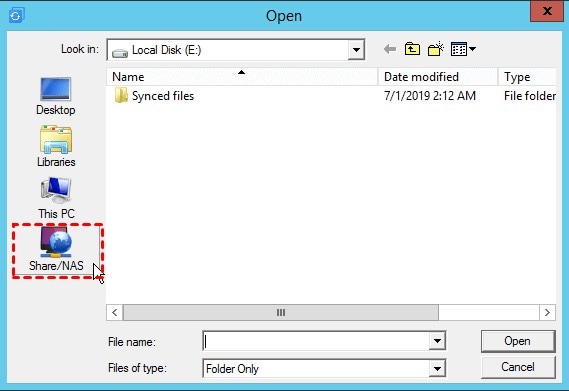
Step 6: Press the NAS device or Add Share option and add details regarding the Synology NAS storage you are syncing from, like address, password, and username.
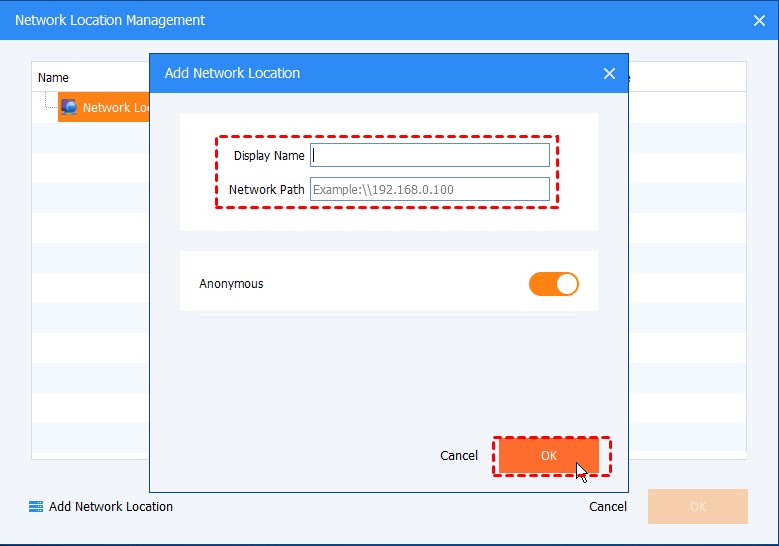
Step 7: Under destination path selection, choose OneDrive > Start Backup.
Part 4: 3 Methods To Backup OneDrive to Synology NAS
You can use one of the following methods to back up OneDrive to Synology NAS.
Method 1: Backup OneDrive to Synology NAS with Cloud Sync
Cloud Sync is useful for backing up Synology NAS to OneDrive, and vice versa. Indeed, the versatile and flexible software allows users to choose two-way or one-way sync direction, with encryption protection for data synchronization.
How to use Cloud Sync for OneDrive to Synology backup?
Step 1: On your computer, visit the main website of Synology NAS.
Step 2: Tap on the Package Center option and click on Cloud Sync after a quick search. Install the software.
Step 3: Launch the Synology Cloud Sync software.
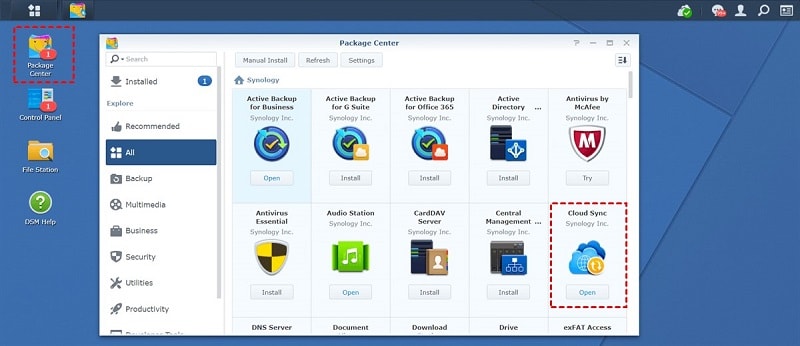
Step 4: After the main homepage of the service opens, tap on the plus icon.
Step 5: Tap on Microsoft OneDrive from the options in the list for allowing access and press the Next button.
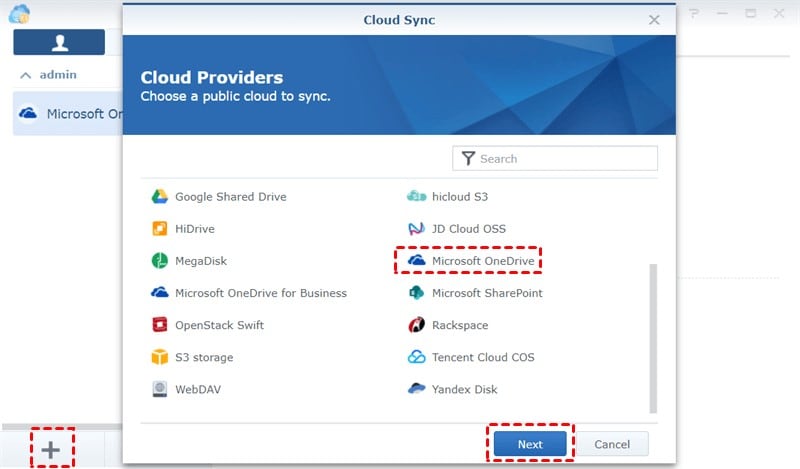
Step 6: Tap on the selections for the following boxes:
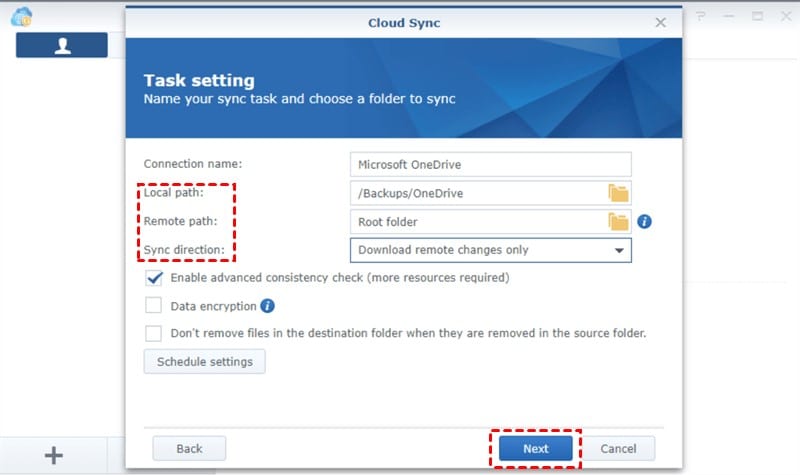
- Local Path- Choose a folder for storing data from OneDrive to Synology.
- Sync Direction- Select the "Download remote changes only" option as the sync mode.
- Remote Path- Choose the main OneDrive to Synology sync route via the Root Folder.
Finally, tap on Next.
Method 2: Backup OneDrive to Synology NAS by Download and Upload
One of the most commonly used methods to back up OneDrive to Synology is the Download and Upload procedure. It is the easiest method for basic-level data backup between two cloud service providers. So, it is best for users who need to back up only some files.
Keep in mind that the method can take a longer time to complete as well. So, when backing up from OneDrive, make sure you use a strong internet connection to avoid backup interruptions.
How to use the Download and Upload method for OneDrive to Synology backup?
Step 1: Access the OneDrive program on your device.
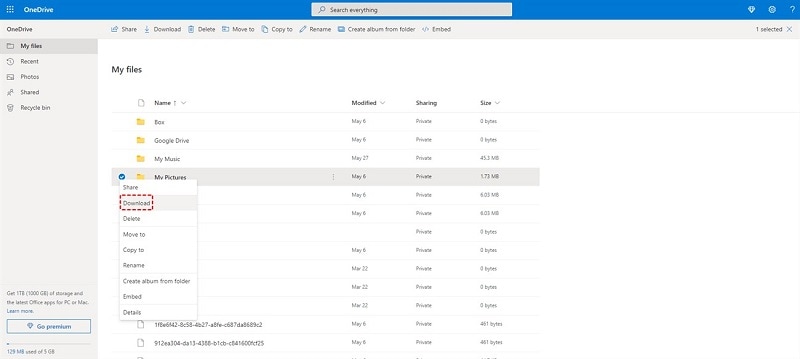
Step 2: Choose the folders or files you will back up.
Step 3: Click the Download button to save them in the local storage location on your PC.
Step 4: Access the Synology NAS account and login in to your browser.
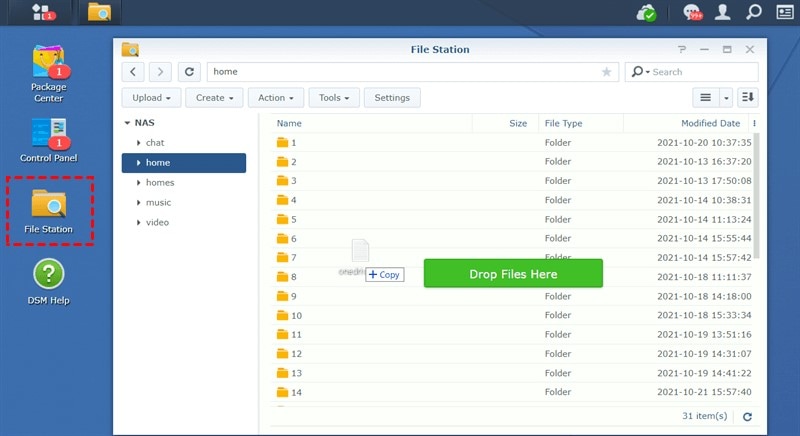
Step 5: Tap on File Station. Then, drag the downloaded files and drop them into the folder of your choice.
Method 3: Sync OneDrive to Synology NAS With Third-party Software
Some third-party tools work for backup OneDrive to Synology as well, like the previously mentioned Backblaze and AOMEI Backupper Standard options. In the case of the latter, users can easily use the sync function for quick NAS and cloud connection and data syncing.
How to use AOMEI Backupper Standard for OneDrive to Synology syncing?
Step 1: Launch the AOMEI Backupper Standard software.
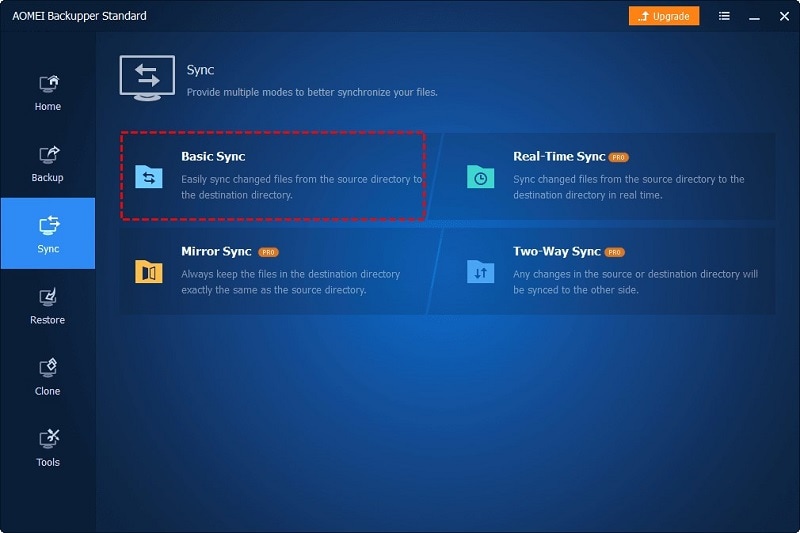
Step 2: On the home, click on the Sync tab and tap on the Basic Sync option.
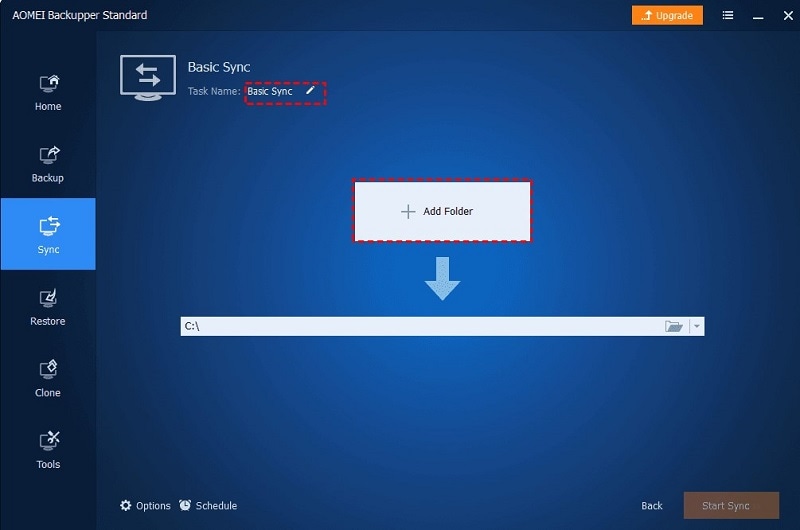
Step 3: Tap on the “Add Folder” option. Then, mention the OneDrive folder you will choose as your source directory.
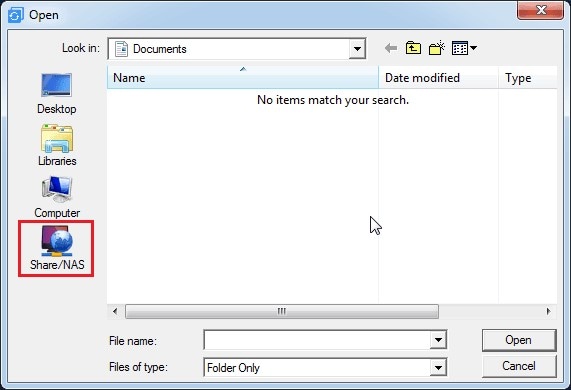
Step 4: Choose the selection box for the destination folder, and choose "Share/NAS" to include your Synology NAS device.
Step 5: Tap on sync settings for further configurations like scheduled task syncing and backup, like specifying the time for automatic syncing. Then, tap on Start Sync.
You may also like:
How To Use Rsync to Sync Data Between Two Synology NAS
Connecting Synology NAS to Backblaze B2
Back up Files to Synology NAS With Time Machine
Summing Up
In both directions, multiple methods are available for data backup and syncing between OneDrive and Synology NAS. Based on the solution or tool that you find easy to handle and accessible on your system, you can make your choice.
For Windows XP/Vista/7/8/10/11
For macOS X 10.10 or later

 ChatGPT
 Perplexity
 Google AI Mode
 Grok
Grok


