You should always back up Outlook emails to avoid various risks, such as losing valuable data or suffering cyber attacks on your business organization. Since an Outlook backup is vital to ensuring personal and professional privacy, this guide will take you through the top methods to back up your mail from Outlook and ensure you never lose sensitive email data again.
5 Easy Ways to Back Up Outlook Emails on Windows
Here are the top four methods to back up your Outlook data file and protect your data against whatever may come.
Method 1: Back Up Outlook Emails Using Wondershare Ubackit
Wondershare UBackit is one of the best Outlook backup and restore solutions on the market. The backup tool offers multiple options for restoring files, backing up Outlook, creating disk copies, etc.

Back up emails to local hard drives or external storage devices effectively, safely, and completely.
Provide automatic backup to back up your email files daily, weekly, monthly, or non-stop.
Set a password to protect your backups, keeping your data confidential should it be stolen, lost, or compromised.
Support incremental backup, which saves only the changes made to your files since the last backup, reducing backup time and saving storage space.
UBackit allows you to back up your Outlook 2003/2007/2010/2013/2016/2019/365 emails and data to an external disk or local disk drive. Here’s how to create an Outlook backup with UBackit in five easy steps.
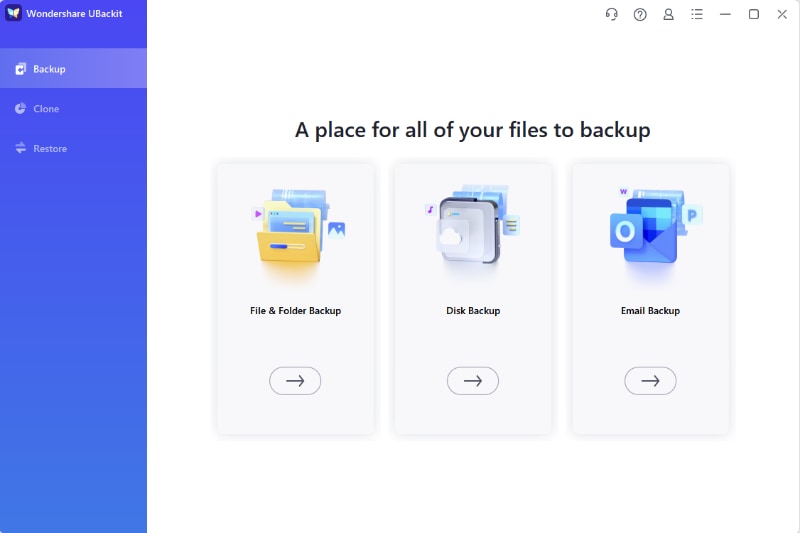
Step1 Choose Email Backup
Download and install UBackit on your desktop computer and run the app. In the Backup tab, select Email Backup.
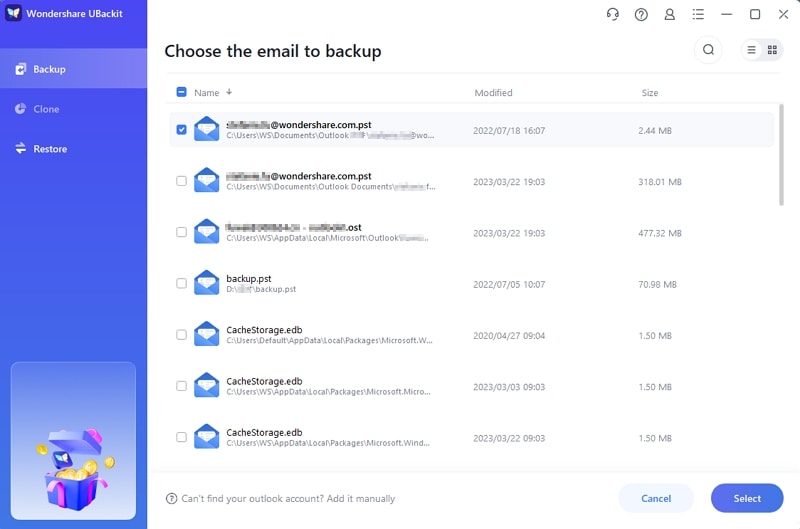
Step2 Choose Your Outlook Emails
The Backup tab will show you multiple available Outlook backup sources. Choose the Outlook files you want to backup, then click Select.
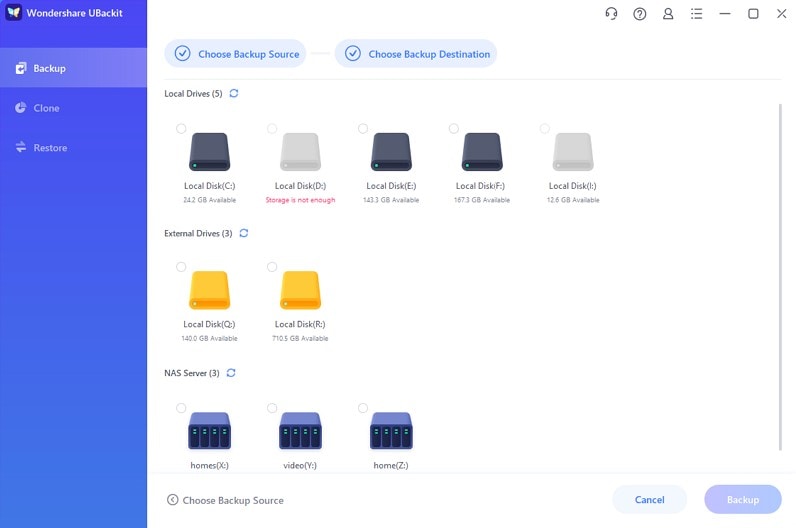
Step3 Choose Your Backup Destination
The next step is to determine where you want to back up your files. UBackit allows you to save your Outlook backup file on local drives, external drives, or a NAS server. Select the backup destination and click Backup.
Step4 Complete Outlook Backup
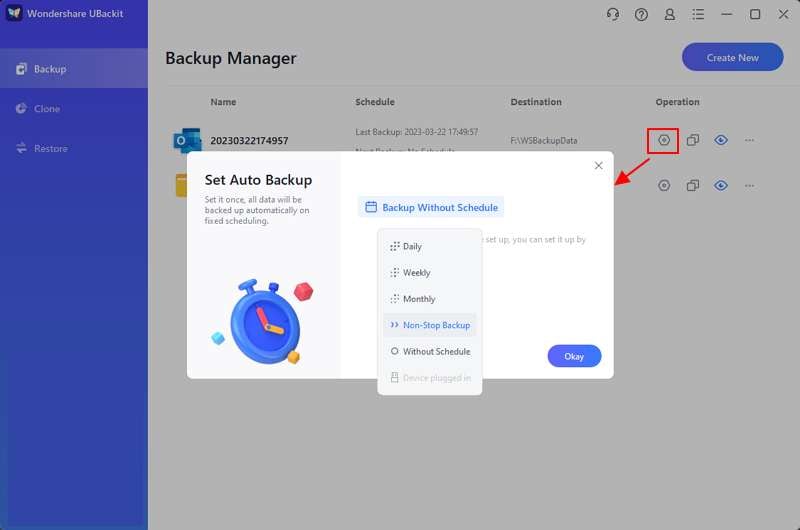
Give the UBackit tool the time to complete the backup process. Once it completes, you’ll see your Outlook data in the Backup Manager tab, including details like backup schedule, file names, target location, and available actions.
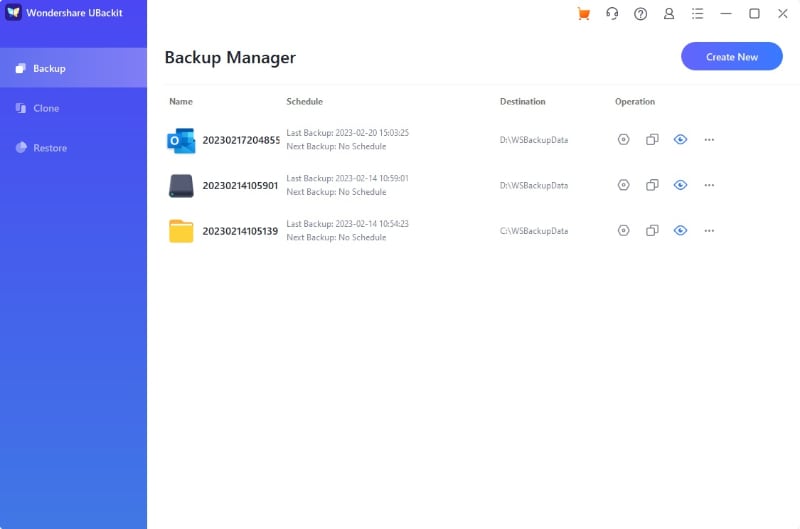
You can set Outlook automatic backup by clicking the Schedule icon. Additionally, backup encryption is at your disposal to safeguard your data from unauthorized access.
Method 2: Drop and Drag Emails to File Explorer Folders
This method is a quick and easy way to take Outlook backup by simply dragging emails from your Outlook account and dropping them into the File Explorer folder. Here’s how to do it.
Step1 Open File Explorer and Outlook
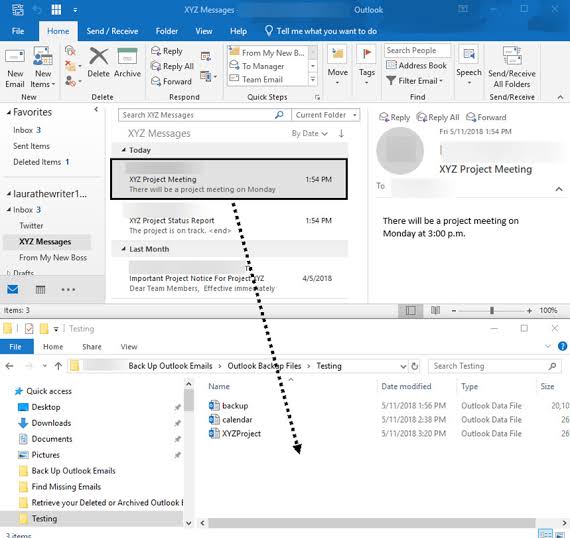
Open both the File Explorer and Outlook. Find the folder with your emails and create a File Explorer folder where you want to save your Outlook backup file.
Step2 Drag and Drop Emails to the File Explorer Backup Folder
Click on the emails you want to save and drag and drop them to the File Explorer backup folder. Since your new folder is now an Outlook file, it will open on Outlook when you double-click it.
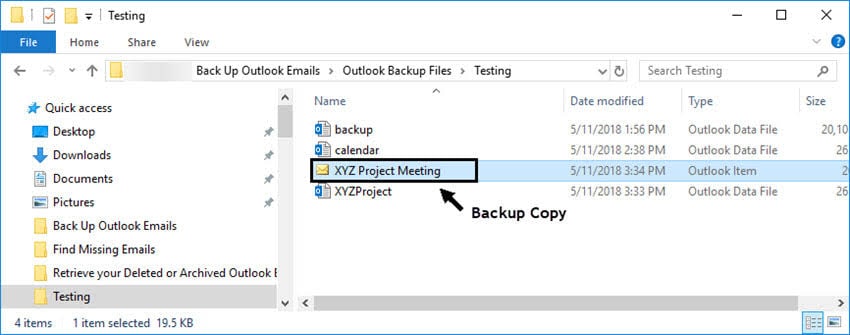
These are the two steps to complete your Outlook backup. Note that the backup created using the drag and drop process is not an Outlook data file, but rather an Outlook item file. You can open the message in Outlook by double-clicking on it.
Method 3: Backing Up Outlook Emails to Gmail
Follow these steps to export your emails from Outlook and back them up to Gmail.
Step1 Open Gmail
Start your web browser and navigate to your Gmail account.
Step2 Log into your Gmail account
Log into your Gmail account and confirm your identity by typing in your username and password.
Step3 Access settings
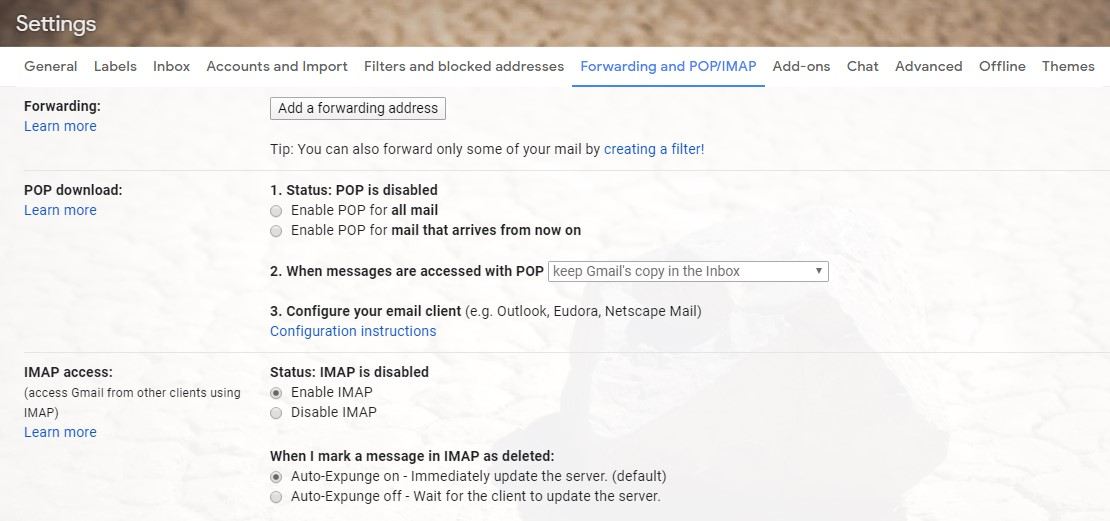
Access the Mail Settings tab via the Gear Icon and follow this path: Forwarding and POP/IMAP > Enable IMAP > Save.
Step4 Run Microsoft Office
Open Microsoft Office and locate the Tools option in the taskbar. Click the Import and Export option.
Step5 Export Emails
Import your Outlook emails by selecting Import from another file and clicking Next. A new window will appear. Select Personal Folder File (.PST) and click Next. Choose where you want to save your backup file, name your folder, and click Finish to complete the process.
Step6 Copy and Paste Your Outlook Backup File
Once the export is completed, right-click on your .PST file and select Copy. Find the Gmail tab in the panel and paste your file. That’s it – your Outlook emails now safely sit in your Gmail account.
Method 4: Backing Up Files to Microsoft Excel
Back up your Outlook data file to Excel with these steps.
- Step 1: Locate the File tab in Microsoft Outlook and select the Open and Export option to start the Import and Export Wizard.
- Step 2: When the wizard appears, select Import or Export > Export to a file.
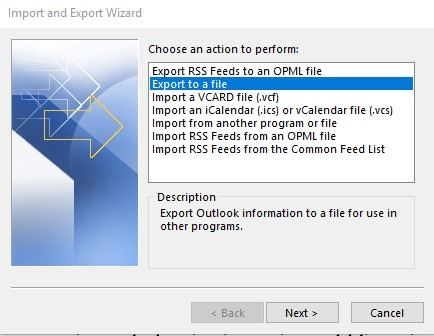
- Step 3: Select the file type compatible with Microsoft Excel to back up your Outlook files.
- Step 4: Select the backup destination to save your Outlook backup, name the file, and click Finish.
Method 5. Backup Outlook Emails to PST Format in Outlook 2007/2010/2013/2016/2019
PST is a file format used by Microsoft outlook in storing important things like an account email data which includes all the messages in the email, contact information, file attachment, and lots more. Below are the following steps on how to export emails from outlook to PST format.
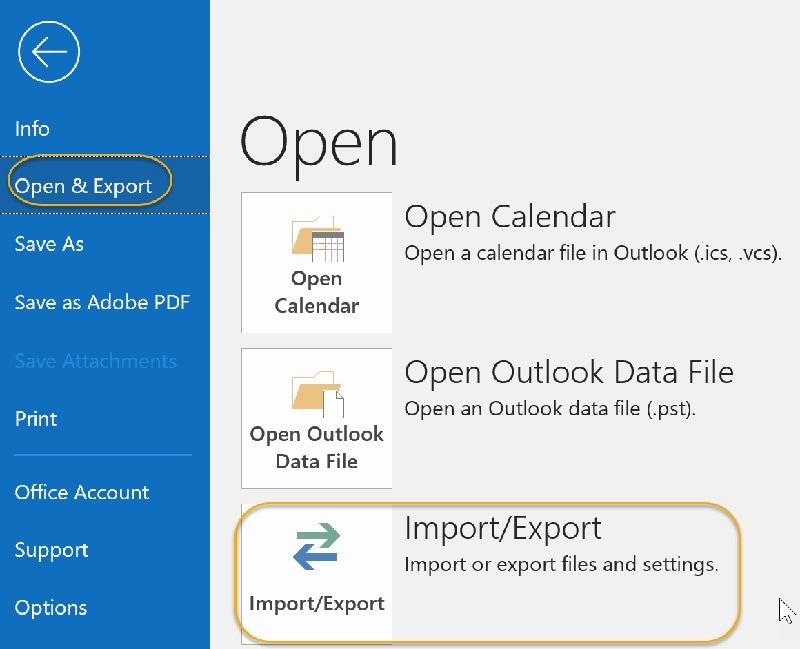
- Step 1: Click on File > Open and Export> Import or Export: The first step is to click on a file located at the upper left end of the taskbar, then navigate down to open and export, besides it, import of export shows up.
- Step 2: Choose Export to a fileand then click Next: you would see a couple of options, choose export to a file then navigate down to click Next.
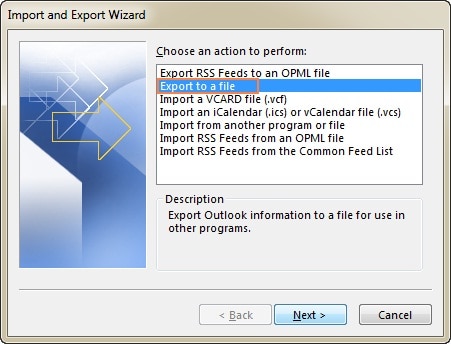
- Step 3: Select Outlook Data File (.pst), then click on Next.
-highlighted.jpg)
- Step 4: Select the email account and other subfolders that needs backup and click
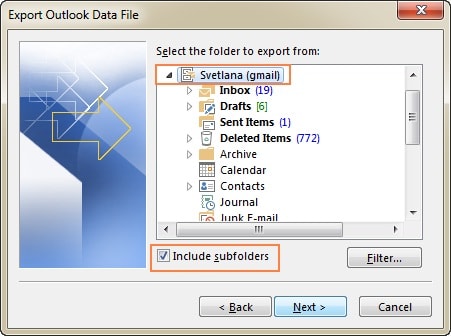
- Step 5: Choose the location where the Outlook backup file would be, Name the backup file and then select Finish.
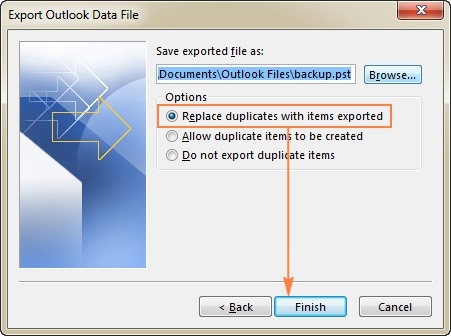
- Step 6: If you want to make sure that nobody has access to your files, enter and validate a password, and choose OK.

How To Back Up Outlook Emails on Mac
If you’re not a fan of Windows and prefer Mac, here are the steps to create a backup Outlook data file on Mac.
- Step 1: Open Outlook on Mac and locate the Tools
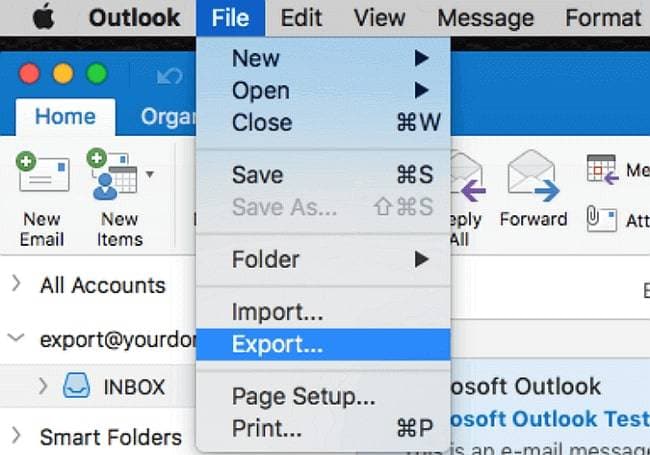
- Step 2: Navigate Tools to the File tab and select Export.
- Step 3: Find the Outlook files you want to export and click Continue.
- Step 4: Choose where you want to back up your Outlook account and click Save.
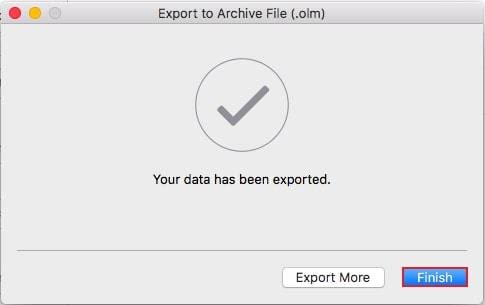
- Step 5: Click Finish to export your Outlook email files to the Mac Archive.
Why It’s Important to Back Up Outlook Emails
Your Outlook emails contain important information and details, such as email attachments, calendars, contacts, etc. If something unpredictable happens, you could lose all this data and expose your organization and yourself to various problems.

You can avoid all this by creating an Outlook backup file and saving it to a device of your choice. That way, you’ll have all your Outlook mail data readily available. Even if you lose your emails due to a natural disaster, your Outlook backup copy makes it easy to recover your emails in the blink of an eye.
Outlook backups are vital to any modern business. Even though you have multiple communication solutions, email is still one of the primary communication channels for both individual and corporate internet users.
You use it daily to exchange information, share documents, make agreements, create new contacts, schedule business events, etc. Since the Microsoft Outlook email platform contains all your personal and professional information, you should protect it however you can.
On the other hand, unpredictable situations can strike at any time. Whether you’ve lost Outlook data due to file corruption, accidental deletion, hardware malfunction, system crash, or a malware attack, a simple Outlook backup will help you restore your emails and avoid numerous inconveniences.
Ways You Can Lose Outlook Data
If you’ve been wondering how you could lose your Outlook data file, the answer is somewhat complicated.
Why? Because there are countless reasons why you may not be able to find your emails and mailbox data, including tasks, calendar entries, contacts, email messages, and pretty much every other piece of information contained in your email.

Here are common causes of losing Outlook data:
- Outlook archived your data – Outlook has the AutoArchive option that automatically removes old emails from your inbox and moves them to the archive folder.
- You’ve lost your Outlook data due to file corruption – your Outlook data has become corrupted due to malware infection, viruses, system crash, unexpected malfunction in the Outlook software, etc.
- Outlook keeps your data folders hidden – Outlook keeps certain folders hidden by default, such as Drafts, Inbox, etc.
- Improper file view – your Outlook data may appear to be lost if you’re using an improper file view.
- Your mailbox has exceeded its size limit – your mailbox size limit varies depending on the type of subscription you have.
- Outlook moved your PST file to the network server – if Outlook moved your data to the server, that can render your data unavailable.
If any of these scenarios ring a bell, here’s how you can deal with the situation.
Conclusion
By the time you’ve finished reading this article, you must have understood the importance of creating regular Outlook email backup files. These files contain your emails and all other vital information, including your calendar arrangements, contacts, email attachments, links, etc.
Whether you’re using the Outlook 2007, 2013, or 2019 versions, the steps mentioned here will help you back up your Outlook emails with ease.
An Outlook backup file preserves your vital data and makes it easily retrievable. If any unexpected events happen that might leave you without your precious Outlook data, you can easily restore your emails from the backup files.

 ChatGPT
 Perplexity
 Google AI Mode
 Grok
Grok


