
Typically, a single large partition is available on newly purchased external hard drives. You can easily store your data on this single partition. However, there are chances when you want to partition one. The article provides all information you need to know about partitioning an external hard drive.
In this article
Part 1. Partition an External Hard Drive: What Does It Mean?
Partitioning an external hard drive means dividing the hard drive storage space into multiple sections for better data management or other special needs. When you partition an external hard disk, you are essentially slicing up the storage medium into distinct sections of its whole. Most hard drives, even those that are external, are pre-formatted with a single partition.
Imagine a single partition as a large bucket in which all files are stored. Most Windows OS and macOS installs store the OS, together with any additional apps and personal data, in a single partition. However, there is a method that can divide that one large bucket into several smaller buckets.
Some gadgets, for instance, come outfitted with a second, more compact partition. This is intended to be used for data recovery in case any component of the hard drive or device fails. However, there are numerous additional scenarios in which you could find it beneficial to partition your external hard disk.
Part 2. Benefits Of Creating Partition on External Hard Drive
Not only will partitioning external hard drives improve speed, but it will also make it easier to retrieve lost data if the drive becomes corrupted. The following are some benefits that come with using a partitioned external hard drive:
- You can handle the data on the external hard drive in a more structured manner, which allows for improved data management.
- Better protection for your data: installing the operating system on an external hard drive might lower the likelihood of your data being corrupted since it will physically separate the OS from your personal files.
- Simple backup is possible because of the ability to direct a partition to keep precise copies of all the vital data you have. You may copy the whole disk instead when you need to duplicate all of your crucial data rather than selecting individual files or folders.
- Several file systems: If you have an external hard drive, you may construct partitions by specifying multiple file systems, such as NTFS, FAT32, or exFAT. Additionally, this is greatly helpful if you want to utilize the external hard drive with many operating systems.
- You can encrypt sensitive data by storing it on a separate partition and then hiding that disk entirely. This will prevent other people from accessing particular files on your computer.
Use Case |
Recommended Partitioning |
Best File System |
| Cross-Platform (Win/Mac) | Two equal partitions | exFAT |
| Windows Backup & OS | System (300GB) / Data (Remainder) | NTFS |
| Gaming (Xbox/PS5/PC) | Single large partition | NTFS (PC) / exFAT (Console) |
| Media Server (4K Video) | Large clusters (64KB) | NTFS |
Part 3. Things to Consider Before Partitioning an External Hard Drive
Here are some points you need to consider before partitioning an external hard drive:
File System
During the partitioning process, you will be prompted to choose the file system. The three Windows file systems with the most widespread adoption are NTFS, FAT32, and exFAT. Here in this article, we list some pros and cons of each one, but for a better understanding of which one to choose, you can read these three articles:
File Systems |
Pros |
Cons |
| FAT32 | · FAT32 can hold 268.173.300 files with 32 KB clusters. · This file system supports 2-TB or 16-TB drives with 64-KB clusters. · This system moves the root folder where the backup FAT table copy is stored. · FAT32 drives may enlarge boot records. |
· It can't store 4GB files. · FAT32 partitions cannot exceed 8 TB. · It lacks the permission and security features of NTFS. · Current versions of Windows cannot be installed on a FAT32-formatted device. |
| exFAT | · exFAT restores accidentally deleted files. · Restores Windows exFAT file system · It recovers data from a hard disk, USB, memory card, etc. · Stores file greater than FAT32's 4 GB limit. · No file or partition limits |
· FAT32-incompatible · It lacks journaling and other NTFS capabilities. |
| NTFS | · Boot sector backups are possible. · Allows disk quotas and 2TB volumes · Mac OS X and Linux support NTFS. · This file system reduces file searches. · It allows enormous files and has almost no partition limit. · Higher-security file system that lets users customize file permissions and encryption. · Restores file system consistency using log and checkpoint data. · Compressing files, folders, or the whole drive saves disk space. · Change journal helps recover data rapidly if power fails or other difficulties arise. · Allows users to establish disk quotas, restricting disk use. · No file- or partition-size constraints |
· MS-DOS, Windows 95, and Windows 98 don't support NTFS. · NTFS is sluggish |
2026 Technical Update: Partitioning for USB4.0 & Thunderbolt 4
If you are using a high-speed USB4.0 or Thunderbolt 4 external SSD, your partitioning speed will be significantly faster (up to 40Gbps). However, these drives are sensitive to cable quality. If Disk Management fails to initialize the partition or hangs at 0%, ensure you are using a certified 40Gbps cable. Using a legacy USB 2.0/3.0 cable on a USB4.0 drive during the format command in DiskPart can lead to "Semaphore Timeout" errors, potentially corrupting the drive's partition table.
Recovery
Always perform a backup after making any changes to your hard disk. Although partitioning does not usually result in data loss, it is still a good idea to back up your data just in case the partitioning procedure is unsuccessful.
Disk Style |
Max Capacity |
Compatibility |
| GPT (Recommended) | No practical limit (18EB) | Windows 7/8/10/11 & Modern Macs |
| MBR (Legacy) | 2 TB Max | Old Windows XP/32-bit systems |
Part 4. How To Partition an External Hard Drive on Windows 11/10/8/7
Here are two different ways to partition an external hard drive on Windows 11/10/8/7:
Way 1. Partition an External Hard Drive in Disk Management
Utilizing the built-in Disk Management tool with Windows is the quickest and easiest method for creating partitions on your new or old external hard drive. The default utility that comes with Windows can create new partitions, despite some third-party software having somewhat enlarged feature sets.
When you start your computer, ensure your external hard disk is connected. Then, follow the instructions below to partition an external hard drive while using Windows.
Step 1. On the keyboard, press Windows + R. Then, launch the Windows Disk Management tool by inputting the diskmgmt.msc command and pressing Enter.
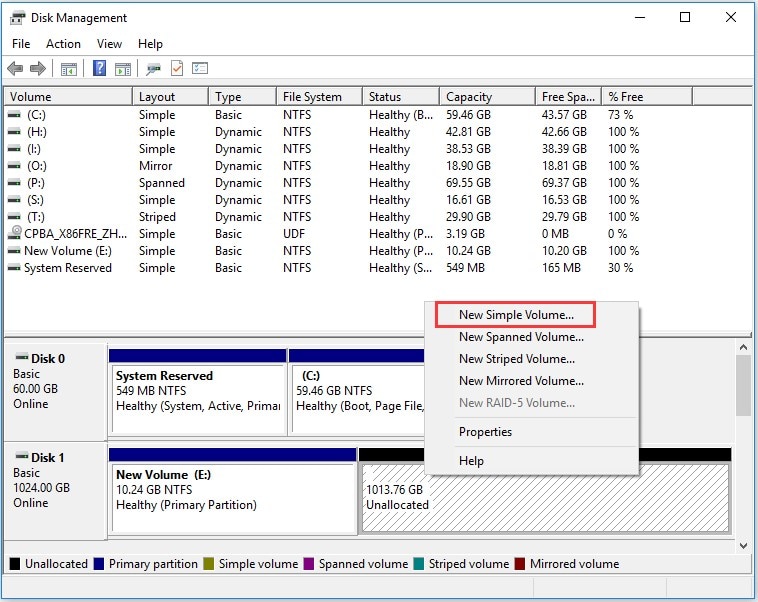
Step 2. Choose the external hard drive or solid-state drive (SSD), right-click the unallocated space or free space, and then choose New Simple Volume from the menu that appears. If there is no free space left on the external hard drive, you will need to click the Shrink Volume button first.
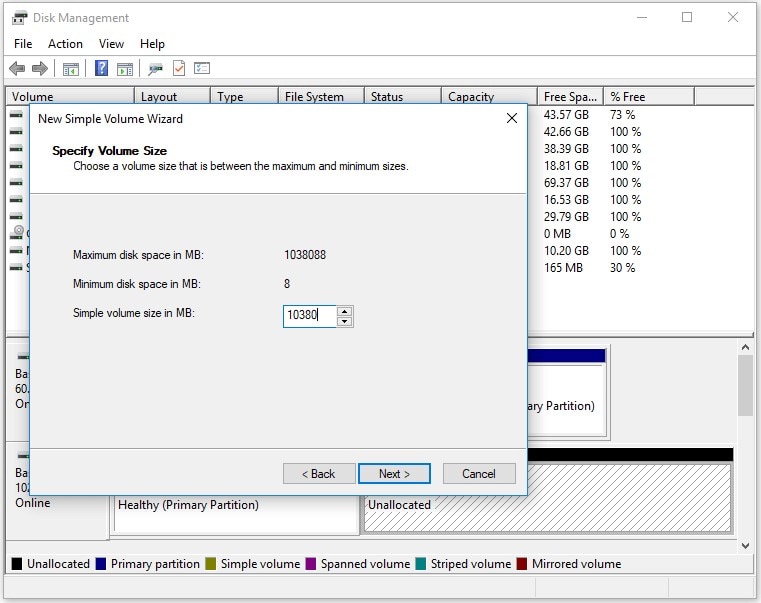
Step 3. Fill in megabytes volume size that falls between the maximum and the smallest allowed sizes. In addition, click the Next button.
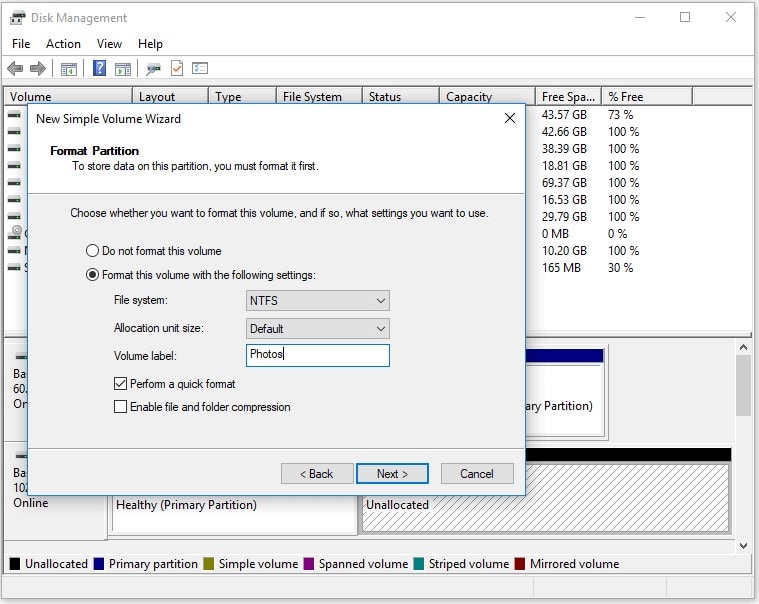
Step 4. Choose a drive letter and then click the Next button. Before you can save data to this partition, you will need to format it in the window you are now seeing. You can select a file system and give the disk a label. After that, check the box that says Perform a quick format, and click Finish.
Limits of creating a partition on an external hard drive with Disk Management:
- When you use Disk Management to reorganize the partitions on the external hard drive, you must first format the partition.
- It is impossible to construct a FAT32 partition larger than 32 gigabytes.
Way 2. Partition an External Hard Drive Using DiskPart Commands
You can take control of your hard disks with the help of the command-line program known as DiskPart. It allows you to create, remove, and format partitions, depending on how you utilize them. It also allows you to designate drive letters and mount points to specific locations. Because it is such a powerful tool, DiskPart carries the potential risk of being misused.
This article will teach you how to partition an external hard disk on Windows using the DiskPart command line for free.
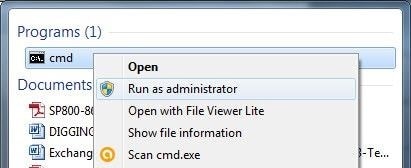
Step 1: Search the command prompt on your computer. Then, right-click and choose Run as Administrator.
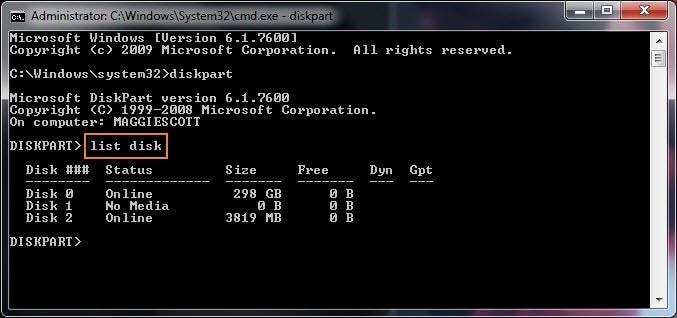
Step 2: After the command line has been opened, enter diskpart in the command prompt and press the Enter key.

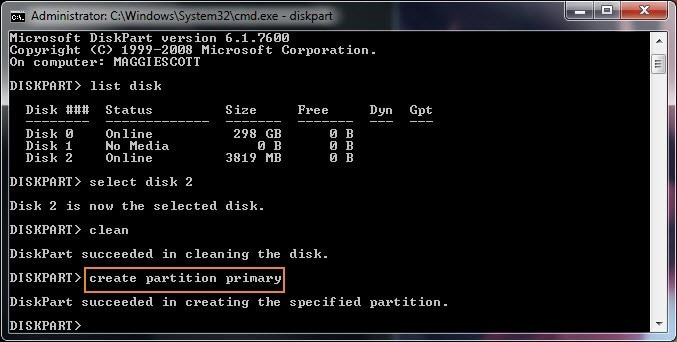
Step 3: Then, a new window for DiskPart opens. In this box, enter the command list disk and hit the Enter key to proceed. It will list all of the available drives.
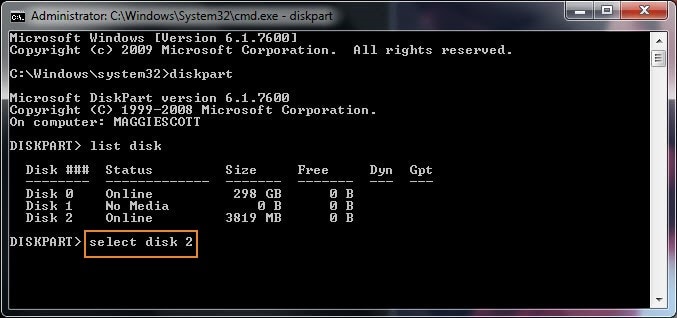
Step 4: Input select disk (disk number) to choose the external hard drive you want to partition. Indicate the number of the drive that has to be formatted in the appropriate field.
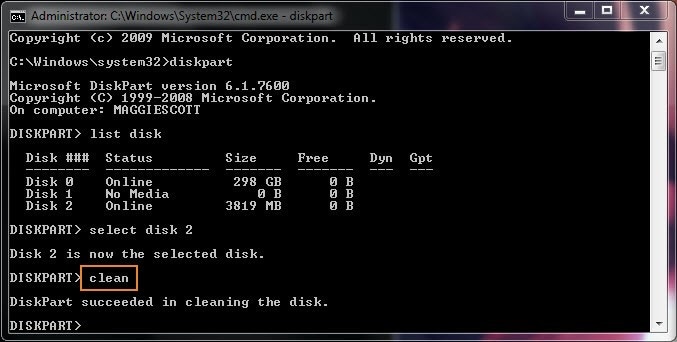
Step 5: Next, Enter the command clean. The drive will be successfully cleaned up after using this command, which will erase all files and directories irreversibly. So, make sure you have backed up all critical files on this external hard drive.
Step 6: To re-enable access to the disk, enter create partition primary size=1024 (Replace 1024 with the partition size in MB that you want to set. 1024 means you will create a 1GB primary partition).
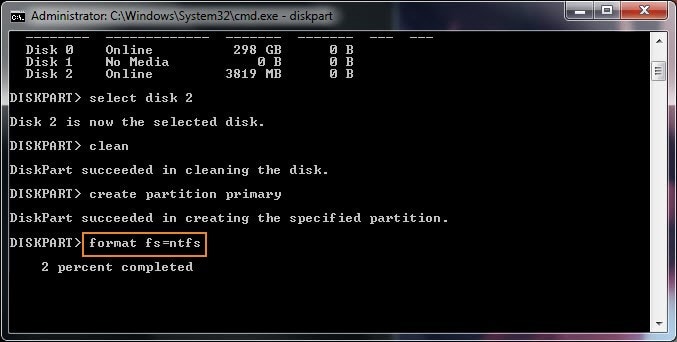
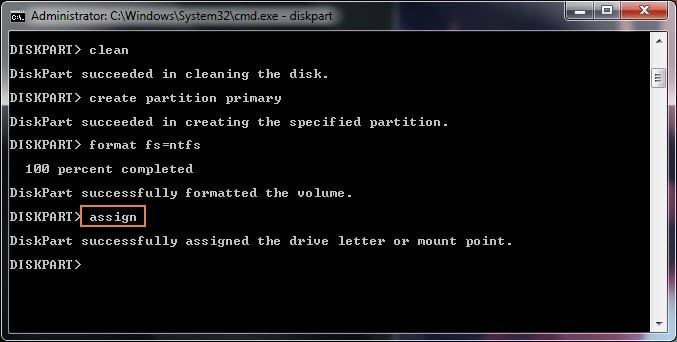
Step 7: Type format fs=ntfs (You can replace NTFS with the file system you want). The created hard disk partition should now be formatted using the NTFS file system.
Step 8: If you want to designate a drive letter, you may type assign letter=H (Replace H with a new letter for your external hard drive.) in the space provided.
Step 9. Finally, type exit to close the external hard drive partitioning process in DiskPart.
Limits of creating a partition on external hard drive with DiskPart:
- You cannot create a new partition size over 32 GB using the FAT32 file system in DiskPart.
- It is not possible to undo the effects of DiskPart commands. So be careful to use this tool.
Pro Tip: How to Handle "Disk Not Initialized" When you first connect a new external drive, it may not appear in File Explorer. Open Disk Management and look for a disk labeled "Not Initialized." Right-click the disk name and select Initialize Disk. For any drive larger than 2TB, you must select GPT (GUID Partition Table). Selecting MBR will limit your external drive to 2TB, regardless of its actual capacity. Once initialized, the "Unallocated Space" will appear, allowing you to proceed with Step 2.
Part 5. How To Recover Lost Data if You Encounter Data Loss After the Partitioning
When you use Disk Management or DiskPart to create a partition on an external hard drive, you must first format or delete the existing partition, which erases all the data on the drive. So what to do if you discover that you have lost some critical data after reorganizing your partitions without creating a backup? Using Wondershare Recoverit, you can get rid of this situation.

Wondershare Recoverit – Leader in Data Recovery
5,481,435 people have downloaded it.
Restores data from 500+ loss scenarios, such as deleting, disk formatting, lost partition, computer crash, virus attack, etc.
Recovers 1000+ file types, including documents, photos, Ultra HD videos, audio files, and emails.
Recovers data from 2000+ storage media like internal and external hard drives, NASes, USB flash drives, SD memory cards, CF cards, etc.
Offers preview before recovery. No data, no charge.
Follow the steps below to recover any lost data after partitioning your external hard drive:
Step 1: Select the External Hard Drive
Connect your hard drive to the computer and launch Wondershare Recoverit after downloading and installing. Then, select the external hard disk where you lost data under the Hard Drives and Locations section.

Step 2: Start Scan
After that, Recoverit will search for the missing files on your external hard drive. It takes some time, depending on the file size. However, you can use the filters to find your desired files quickly.

Step 3: Recover Data From the Disk
You can preview any file by clicking on it to make sure you will restore the correct one. Finally, choose the files you need and click Recover to retrieve them to a safe location.

For Windows XP/Vista/7/8/10/11
For macOS X 10.10 or later
Summing Up
This article focused on partitioning an external hard drive on Windows 11/10/8/7. Examples of such drives include HDDs, SSDs, USB drives, and removable disks. It was also an attempt to provide an introduction to two useful disk partitioning applications.
1. Will partitioning my external drive void the warranty?
No. Partitioning is a software-level change and does not affect the physical hardware warranty of the drive provided by the manufacturer.
2. Can I partition a drive that already has data?
Yes, by using the Shrink Volume feature. However, always use Wondershare Recoverit if a power failure occurs during the shrink process, as this can corrupt the file headers and lead to data loss.
3. Why can't I create a FAT32 partition larger than 32GB?
This is a legacy Windows limitation. To use FAT32 on larger external drives, you must use third-party tools or format the drive using the exFAT file system for better compatibility.


