

This article is going to help you troubleshoot Outlook to send and receive errors in messages/emails. Follow these twelve tips or the below mentioned detailed steps of Wondershare Repairit for Email for fixing the Outlook send receive error 0x80040610 and many other Outlooks related errors such as Outlook error while preparing to send sharing message or Outlook 365 send-and-receive error.
Overview of Send And Receive Error in Outlook
Here, we are having a list of some common and variety of possible Outlook send and receive error/ Outlook send receive error 0x80040610 occurring in front of you when you try to send an email message from Outlook express/ Outlook. We are going to help you out with all the possible issues you will come across using Outlook for sending or receiving errors in messages.
One can encounter several types of errors other than just message sending/receiving error while working on Microsoft Outlook. Other server errors such as the appearance of no connection error, Outlook send and receive an error, Outlook send-and-receive error 0x80040610, Outlook error while preparing to send sharing message, Outlook 365 send to receive an error, the operation timed out (POP) server 0x8004210a. All these errors arise while working on Outlook due to some sort of discrepancy in meeting the exact requirements of the server or internet connection. Let us find out one by one every possible reason and solution to that reason. Here we go!
Before jumping out to the solutions, first, let us have a glance at the kinds of error you may encounter or if it is the same error you are stuck with. A wide-ranging possible encounter of errors in Outlook is mentioned below.
Some common List of Outlook Errors:
- No connection could be made because the target machine actively refused it.
- The server could not be found.
- Sending and Receiving reported error (0x800ccc0f): 'The connection to the server was interrupted.
- Your server has unexpectedly terminated the connection.
- Sending and Receiving reported error (0x80042109): 'Outlook is unable to connect to your outgoing (SMTP) e-mail server.
- The operation timed out waiting for a response from the receiving (POP) server 0x8004210a.
- A time-out occurred while communicating with the server 0x800ccc19
- Error: 0x800ccc15; 0x80042108; 0x800ccc0e; 0x800ccc0b; 0x800ccc79; 0x800ccc67; 0x80040900; 0x800ccc81; 0x80040119; 0x80040600.
- Error 0x8007000c
- Error 0x800C013b
- Error 0x8004210b
12 Tips to Fix Outlook Send and Receive Error
Keeping in mind the above-described errors related to the Outlook send and receive an error, we have come up with 12 tips to fix Outlook error while preparing to send a sharing message.
1 Assure your internet connection
You must initially make sure of the internet connection; you need to follow these steps below to do so.
1) Start your internet browser.
2) You need to type the following two URLs in the address bar
If the internet connection problem persists, look at the troubleshoot network connectivity problems in your particular browser in which you are browsing.
2 Verify Outlook email account settings
1) By opening your Outlook, select the account for which you want to check email account settings
2) After this, click on the file tab present on the ribbon
3) Select info and choose the account for your email id
4) Click on account settings, a menu as a drop-down list appears. Click on the account settings.
5) On the window of account settings, make sure that the email address is chosen and click on change.
6) Verifying the basic accounts settings:
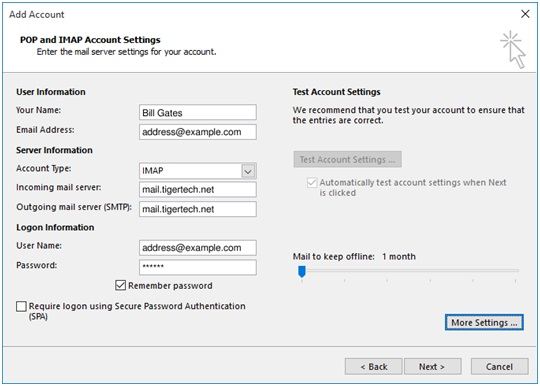
The window for account settings should appear like this:
If instead of this window, you are seeing a different one with buttons marked as "reset mail and settings"," next" then look at the section below what to do-
What to do if I am not getting the screen above mentioned after clicking on change in the account settings?
Instead of seeing server settings, you will face a window appearing with buttons marked as "reset mail and settings" and "next" in the alterations made in the year 2018 by Microsoft in the Outlook interface.
If the above-described screen is faced by you, you are asked to go to the settings in a way that is different from the older versions.
- First, completely close the Outlook program
- Go to the control panel of the windows system folder
- Search in the control panel app for the keyword 'mail'
- Click on that mail result
- Click on the email accounts button
After following these steps you would be able to see the account and select the change button and able to view the settings window described above in step 3.
Though you will be having 'your name' and 'password' different shown on the screen else will be the same as shown on the above screen. The below described things should be cross-checked for similarity.
- Your email address should all be in the lowercase
- Account type should be IMAP
- mail.tigertech.net as your incoming and outgoing mail server
- user name should be your email id in lowercase letters
- the check should be made at Remember password
- The following setting should be unchecked: "Require logon using Secure Password Authentication (SPA)"
After you have finished verifying the above settings, you need to click on the more settings option. The window related to "Internet E-mail Settings" will appear.
7) Verifying the Outgoing Server settings
Your outgoing settings window should appear like this:
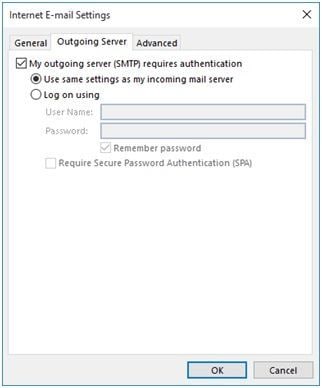
You are required to verify the below settings:
- Put a checkmark on the option- My outgoing server (SMTP) requires authentication
- Select- Use the same setting as my incoming server
8) Verifying the Advanced settings.
After clicking on the advanced tab, you should be able to see a window like this
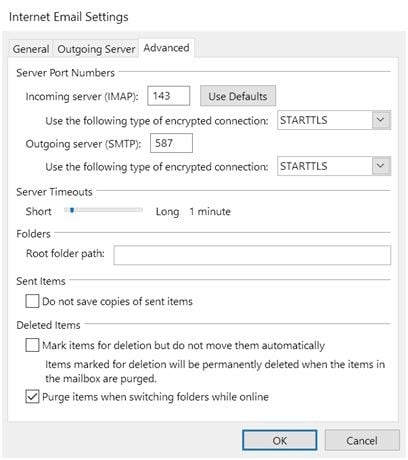
You will be having these values as shown in the screen above for incoming server as 143, outgoing server as 587, STARTTLS for- use the following type of encrypted connection.
Some of the Outlook 2016 versions may represent these settings in this way: 993 as incoming server, outgoing server as 465, SSL for- Use the following type of encrypted connection.
Click on the OK button to close the internet email-settings window if everything seems to be okay.
9) Test your settings
Click on the Next button. A message notification saying- "all tests completed successfully" will appear. If the test is failed, again check the setting if you have entered them correctly.
Now, if the window of test settings is still open, close it to continue further.
Click on a finish to finish your "Change Account" wizard.
Close the account settings window.
Futher Reading:
Fix "Outlook Encrypted Connection Is Not Available"
Fix "Outlook Not Receiving Emails from Gmail"
3 Review firewall settings and disable email scanning with Anti-Virus program
Sometimes any kind of Outlook 2016 sends receive error or Outlook 365 send receive error may occur when your antivirus software installed is inclusive of the email scanning feature. You have to do some supplementary configurations for using Outlook or Outlook express with antivirus software. E.g. you need to configure the Kaspersky antivirus office plug-in to work with Outlook or Outlook express.
Configuring the firewall software for enabling the mentioned files to access the internet are mentioned as-
- Outlook.exe (for Outlook)
- Msimn.exe (for Outlook Express)
Make sure that the default settings for the input and output ports are the same as-
For outgoing access- port 25
For incoming access- port 110
If someone is not sure about the ports, they can ask from their ISP or system admin.
4 Repair your Outlook or Outlook Express
You can fix the Microsoft Outlook send receive error or Outlook error while preparing to send a sharing message by following the steps for fixing these errors. If the files related to Outlook express are damaged and are not doing well, you need to follow these steps step by step until your problem of Outlook send-and-receive error resolves.
1) Try restarting your computer
2) Close all the other opened apps or programs other than internet explorer and Outlook express.
3) Deleting the temporary internet files on your internet browser
4) Select compact all folders in Outlook express
- Go to the File menu and click on work offline.
- Make sure that no news or e-mail folders are left open; check this from the folder list.
- Close the folder list.
- Go to the File menu and select folder, click on compact all folders
- Don't use your PC unless all the compact procedure completes.
- If still, any error occurs during compacting, try closing the Outlook express then again open it and repeat the same process. If the error persists, restart your PC and try compacting again.
5) Try to Re-register on Outlook express
- Start> Run or plus windows + R keys.
- Type msimn /reg, and click on OK in the 'open' box.
- Internet explorer>tools>options>programs set the Outlook express as your default email client.
6) Try re-registering the DLL Library files which are used by Outlook express.
- Click on start> run or press Windows + R key.
- Type regsvr32 urlmon.dll in the 'open' box and then click OK.
You need to repeat the registration process to run:
- regsvr32 shdocvw.dll
- regsvr32 browseui.dll
5 Run the Inbox Repair Tool to repair your .PST file
A .pst file is responsible to store your folders such as emails, contacts, etc. if the .pst gets corrupt; you may encounter Outlook send and receive an error. Running the inbox repair tool can resolve the error caused by the .pst file.
Step 1: Launch your inbox repair tool after closing the Outlook express
Step 2: Repair your .pst file
Locate your .pst file in the inbox repair tool by typing the name and path of your file or browse your .pst file and click on start.
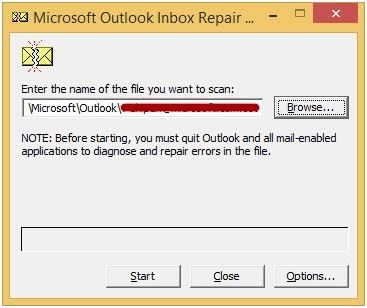
Step 3: Recover repaired items to a new .pst file
After you have finished running your inbox repair tool, you can recover your repaired items by starting the Outlook. Move your repaired items into a new personal folder with a .pst file entry in your profile.
Please make a note that the steps required to follow for creating a new personal folder .pst file may vary according to the version of Outlook you are using.
6 Try a Outlook repair tool to fix corrupted PST/OST files
A corrupted Outlook file will also lead to the "Outlook not sending/receiving" error, therefore, restore the corrupted Outlook PST/OST files to good quality will fix solve this problem. Wondershare Repairit for Email is your perfect resort. This tool will help you repair any corrupted Outlook PST/OST files within clicks. The following are its main features:

-
Repair damaged PST/OST Files in Outlook in all Email corruption scenarios, such as hard disk crashes & bad sectors, virus attacks & tojan horse, outlook corruption & malfunctions, improper shutdown procedure, etc.
-
Restore Outlook Emails deleted for a long time with a very high success rate.
-
Repair emails in bathes without size limits and support to preview all of them before saving.
-
Compatible with Windows 7/8/8.1/10/11, Windows Server 2012/2016/2019, and MacOS X 10.11~ MacOS 12 (Monterey).
Download Wondershare Repairit for Email and follow the below steps to repair your corrupted PST files:
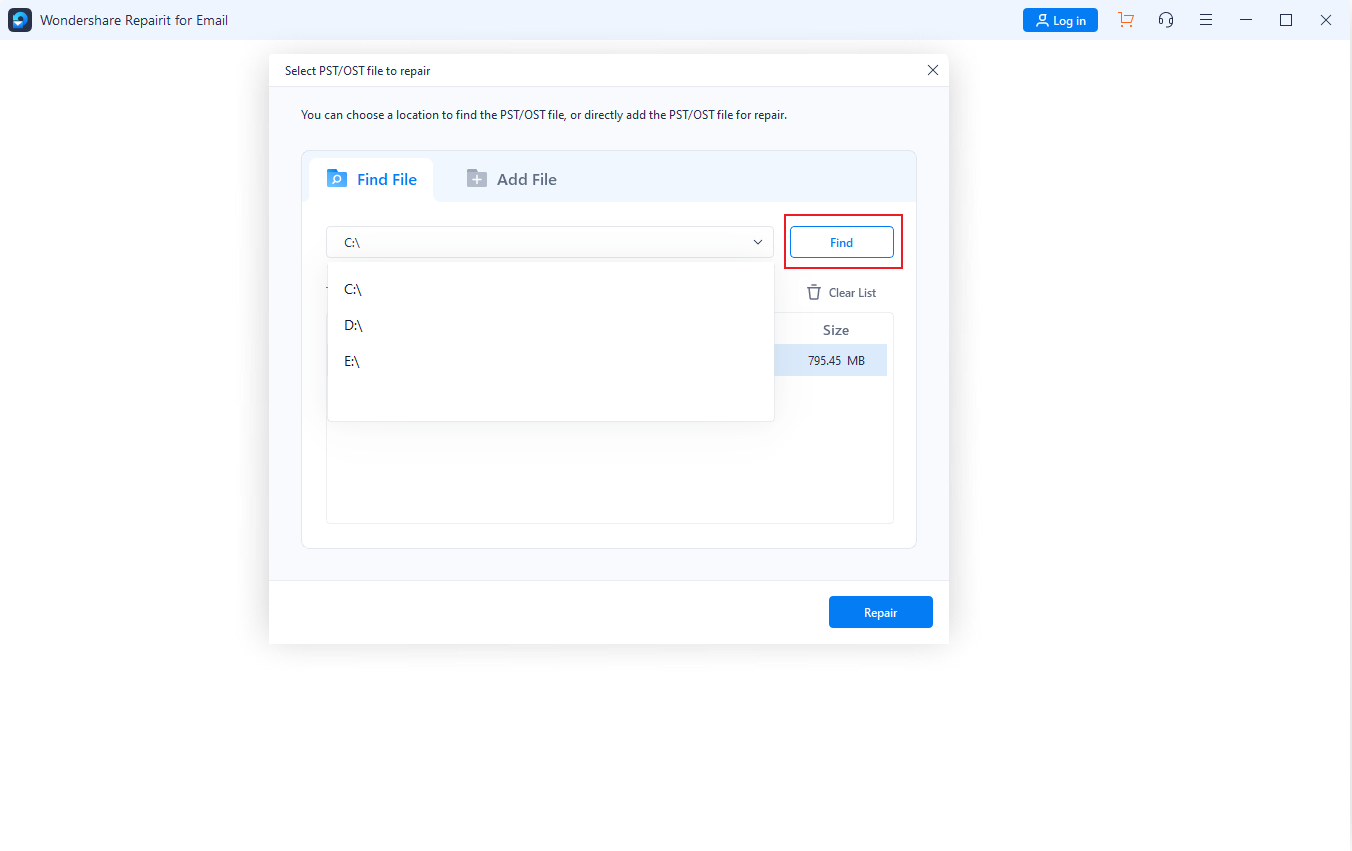
Step 1: Upload the corrupted Outlook PST/OST files.
Lunch Wondershare Repairit for Email and click "Select File" to add the corrupted PST/OST files.

Select files from the desired location by clicking the "Find" button, then click the "Repair" button. You can add a single or batch of emails.
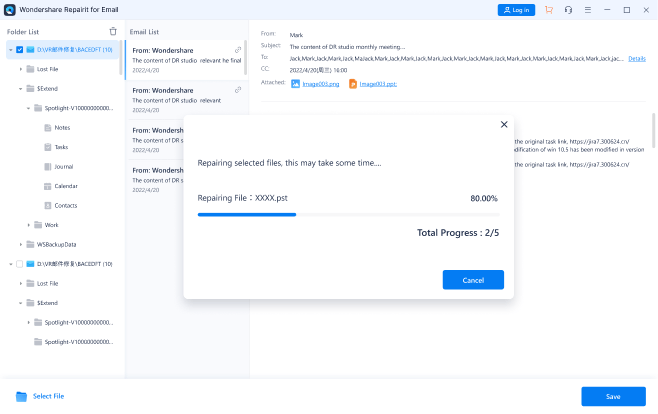
Step 2: Repair the uploaded PST/OST files.
Repairit for Email will automatically repair your corrupt PST/OST files in seconds. Just wait for a few seconds.
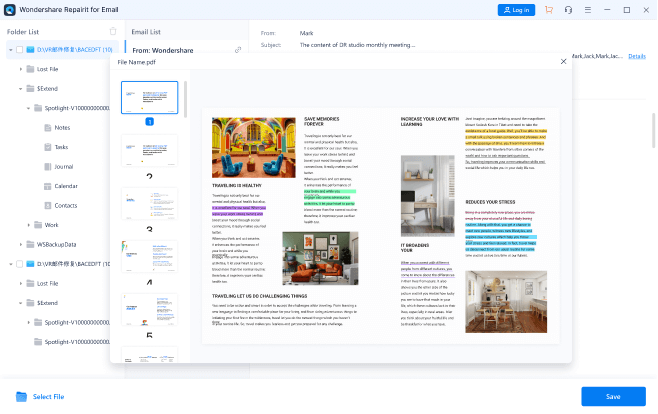
Step 3: Preview and save the fixed emails.
After the repair process finishes, you can preview the restored Outlook mailbox data. Select what you want to save, hit the "Save" button to save the fixed PST/OST files on your computer or Mac.
7 Delete Suspected Message from Mailbox
The presence of suspicious emails in your inbox may create obstacles in sending or receiving any email messages in Outlook. Delete the suspected messages by following the below-mentioned steps-
- First, you need to have access to your mailbox with the help of your ISP's web-based email program. Delete the emails.
- You can contact your ISP and tell them to do so.
8 Ensure that your email profile works correctly
For ensuring that your currently existing email profile is working correctly on Outlook, you need to create a new email profile. If you can send and receive by this new email profile and are no more facing the issue of Outlook 2016 send receive error/Outlook 365 send to receive an error, then the newly created account needs to be set as your default profile.
9 Start Outlook in safe mode
Try starting Outlook in safe mode by following the steps defined below
- Tap on the search bar of your operating system.
- Type Outlook.exe /safe.
- Press enter
If you are face up with the notification indicating about the email profile saying that it has been damaged/ conflicting third party application/ add-ins are installed then you need to create a new email profile.
10 Delete Messages Stuck in Outbox
Check if any unsent messages got stuck in your outbox. Clear the messages whom you find stuck in the outbox.
11 Run MAPI Repair Tool
If you found the Mapi32.dll file damaged or corrupt, there's a probability that you can receive the error following error message when you try sending or receive messages in Outlook.
Sending and Receiving reported error (0x8007000E): Out of memory or system resources. Close some windows or programs and try again.
For resolving this issue, you need to run the MAPI repair tool which is a (Fixmapi.exe). This file can be located in one of the following folders.
- C:\Winnt\System32
- C:\Windows\System32
12 Incorrect Mail Address in SMTP Distribution List
If one SMTP address in a distribution list is corrupted or incorrectly formed, error 0x8004210b can occur. You should examine all email addresses in the distribution list to make sure that they are correct. Additionally, you can send individual test email messages to each distribution list member to identify invalid email addresses.
In this article, we have made 12 possible solutions for you to rectify your Outlook error while preparing to send a sharing message. You can follow every step in a sequence to rectify your Outlook error while preparing to send a sharing message. At last, if none of the methods work for you, however, most probably you are going to make your problem solved but we also have the solution for in none of the above 12 tips work for you, in case of severe file damage. Wondershare Repairit for Email has been recommended to you hereby rigorous experience and analysis amongst various recovery tools and a step by step procedure has been described for you to troubleshoot your Outlook send and receive an error. Hope you have found your solution for the Outlook error!