
 TL;DR:
To configure automatic NAS backups on a Windows PC, use built-in features like File History for basic incremental saves, or utilize a dedicated tool like Wondershare UBackit for comprehensive scheduling, disk cloning, and data encryption.
● Wondershare UBackit is best suited for users requiring advanced flexibility and security, supporting encrypted, real-time, and incremental backups for entire disks, partitions, and Outlook data to Synology or QNAP devices.
● Windows File History provides a native solution for automating incremental file and folder backups to a network drive, but it lacks encryption and cannot perform disk-level backups.
● Windows Backup and Restore is the most limited built-in option, restricting users to unencrypted, full backups of files and folders that require manually repeating the setup steps each time a backup is needed.
Ask AI for a summary
 ChatGPT
 Perplexity
 Gemini
 Claude
 Grok
Grok
Accidentally deleted important files on NAS Device?
No worries. Wondershare Recoverit can get back your lost data within 3 steps. The ultimate and professional data recovery tool is totally reliable and 100% safe.
Losing data is a potential problem we all deal with. Even though a hard drive’s failure rate is 1.5%, considering how many there are, that percentage can amount to a massive number, and you could lose everything in moments.
If you’re serious about securing data, store it on external devices like a NAS. That keeps your files safe and accessible to other devices. It’ll also let you configure automatic NAS backups, so you won’t have to deal with them constantly.
Today, we’ll show you how to turn on NAS auto backups and the best solutions for handling these.
Table of Content
Automatic Backups and Why They’re Better
As backup solutions have enormously evolved in the past few years, setting up a backup is easier than ever. You no longer need to deal with data backups constantly, as there are ways to configure backups to run once a day, once a week, or however often you want them to. The backup tool can run as scheduled, creating data backups in the background without requiring you to click buttons, copy files, or monitor the process.
They’re excellent for both individuals and companies as they secure files, folders, and drives and run without human intervention once configured. Your files will be safe and secured; you can access them anytime from any device on the same network. Configuring such a backup type will give you peace of mind since you won’t have to think about your files.
An automatic backup solution is an option you should look into, as these tools offer a significant advantage. They’re smart enough to know what to do, recognizing older files and only copying the new or changed ones.
It means the backups are fast and don’t take up a lot of computer resources. These tools run independently, and as they only copy a few files each time they run, they finish relatively quickly.
Three Ways To Create Automatic Backups to NAS
There are a couple of ways to turn on automatic NAS backups. For example, Windows users can enjoy some built-in solutions from Microsoft, but these tools are simple and don’t offer advanced features.
On the other hand, third-party apps offer much higher functionality and advanced backup and restore features. Wondershare UBackit is one of those third-party apps.
Automatic NAS Backup Tool: Wondershare UBackit
An excellent way to create any backup type is with Wondershare UBackit. Whether you need file, folder, partition, or disk backups, backing up Outlook data, or cloning a disk, UBackit does it all, and it does it quickly and efficiently. Of course, you can also back up to an external drive or create backups to a NAS device.
With many options and features, such as incremental, real-time, scheduled, and encrypted backups, UBackit is a genuinely great backup, clone, and restore solution. Moreover, the user interface is simple, clean, beginner-friendly, and intuitive. Nevertheless, here is a short guide on using it and creating NAS auto backups below.
Here’s how to configure NAS automatic backups with UBackit:
- Step 1: Open UBackit after downloading and installing it on your Windows PC.
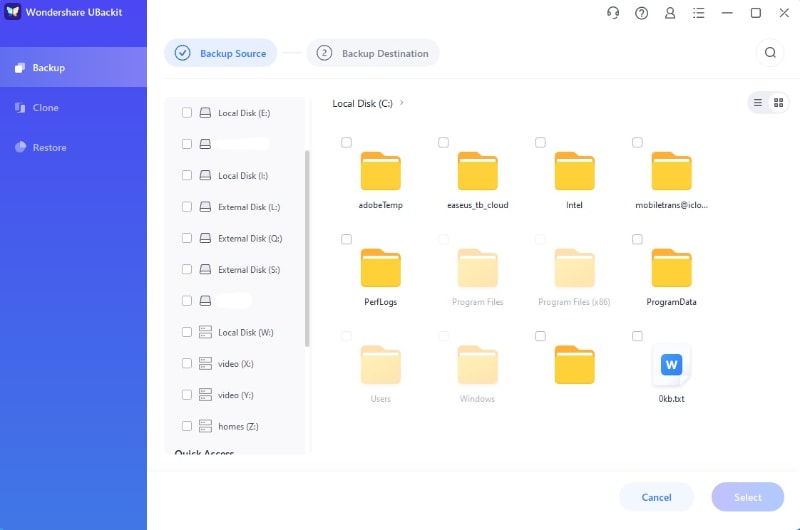
- Step 2: On the left side, select Backup and choose File & Folder Backup or Disk Backup, depending on what you want to back up to NAS.

- Step 3: Select the files and folders you want for automatic backups > Select. You can select the files from local drives, external hard drives, USB drives, or NAS devices that are mapped to your PC.
- Step 4: Select the NAS device as your backup destination > Backup.

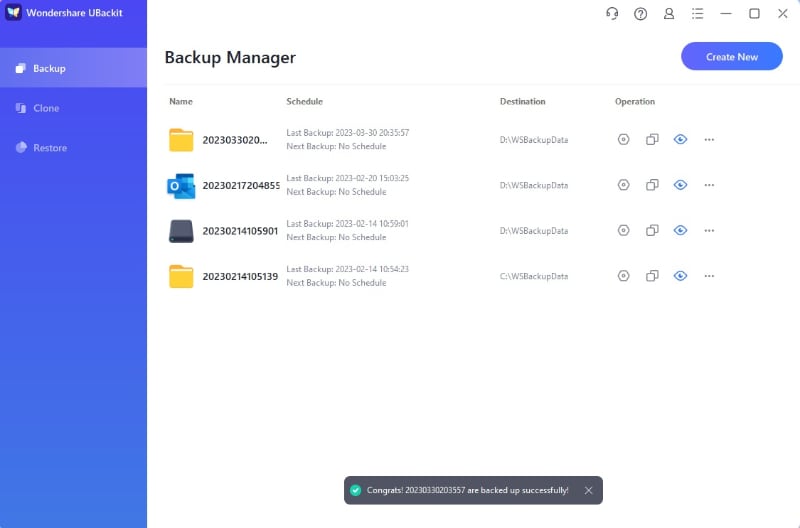
- Step 5: You’ll be redirected to the Backup Manager, where you can see the progress of the first backup. Wait for the first full backup to complete. Once the backup will finish, you’ll see it in the Backup Manager.
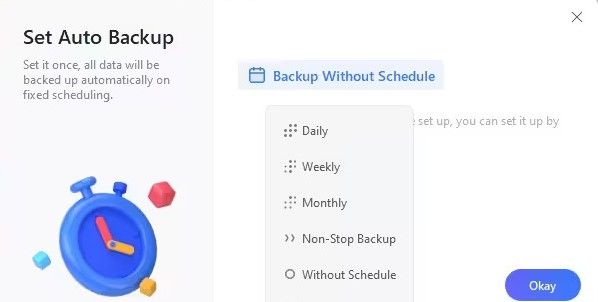
- Step 6: Now, select the Schedule option under Operation. You’ll see a prompt about setting up NAS auto backup, where you can select how often you want the backup to run. Click Okay when you’re done.
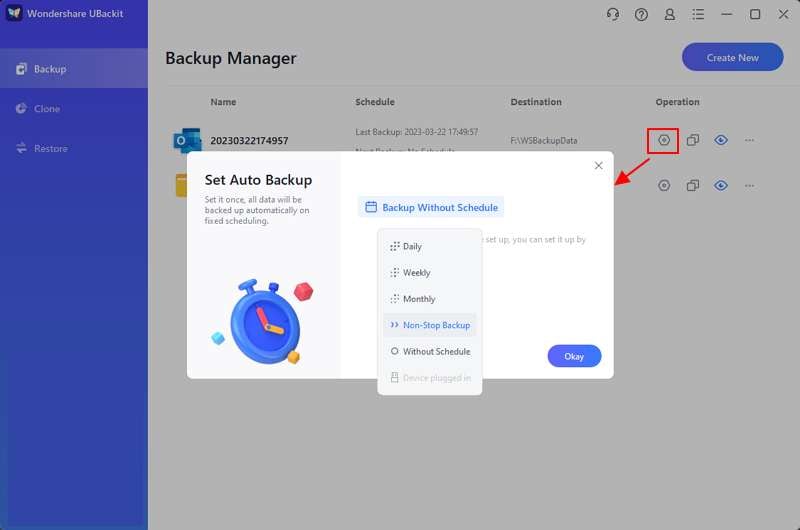
That’s it. You’ve successfully set up NAS automatic backups with Wondershare UBackit. The backup will run as scheduled and incrementally, saving new or changed files from the backup source based on the first full backup to a secured Synology or QNAP NAS device.
Schedule NAS Auto Backup With Windows Backup and Restore
Another way to handle NAS auto backups is with the Windows Backup and Restore feature. It’s a simple, built-in Windows feature that all Windows computers have, but it’s certainly not as powerful as a third-party app built exclusively for backups.
Nevertheless, you can still use Backup and Restore to create simple backups. Here’s how to use it:
- Step 1: Open the Control Panel on your Windows computer.
- Step 2: Navigate to System and Security > Backup and Restore.
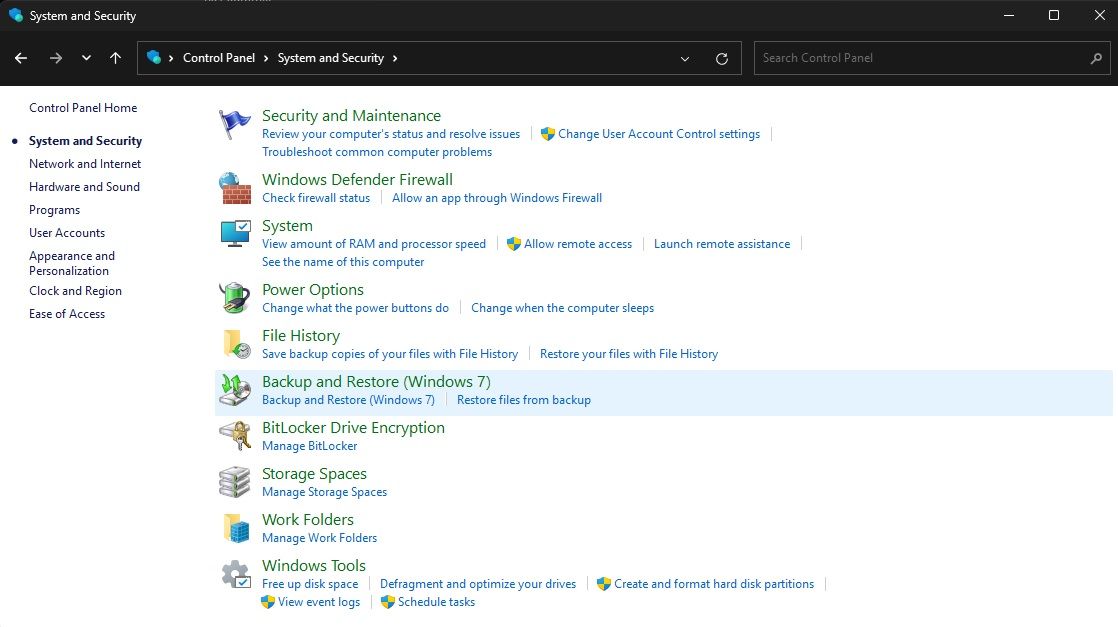
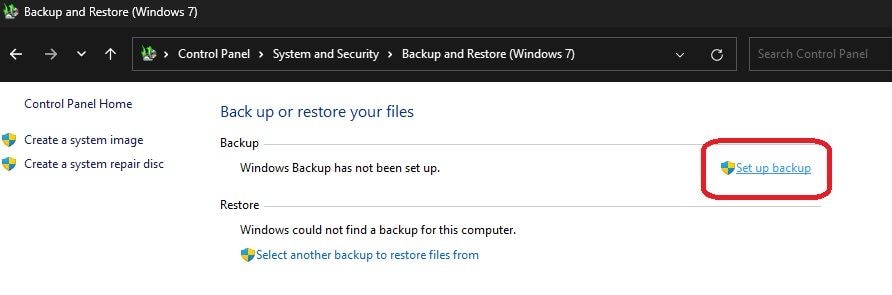
- Step 3: Select Set up backup on the right side of the screen.
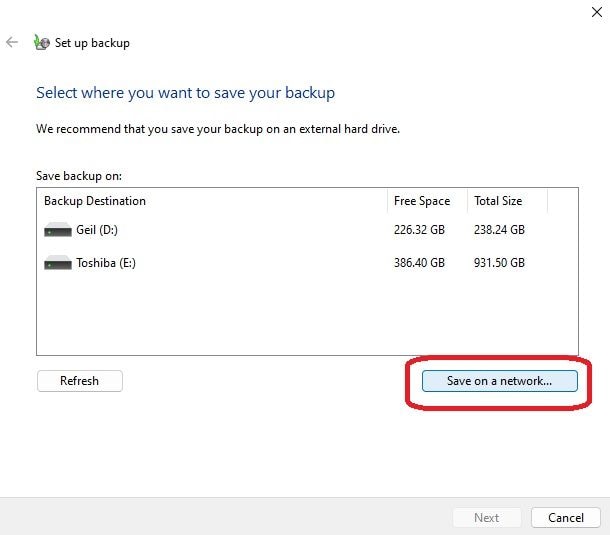
- Step 4: Click on Save on a network.
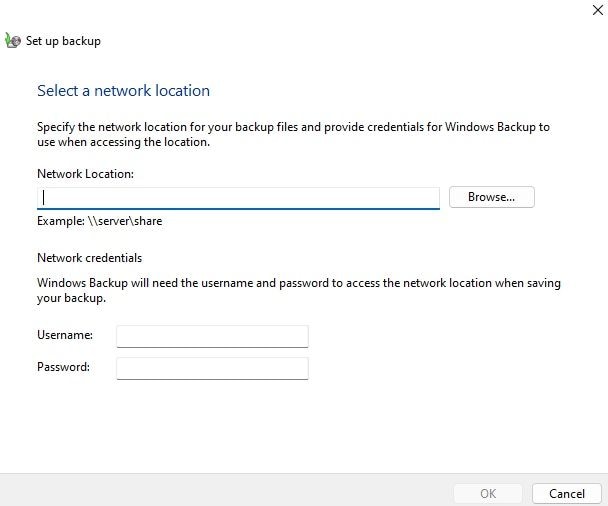
- Step 5: Click on Browse to select the NAS device you want to back up to > enter Username and Password > OK.
- Step 6: Select Next > Let Windows choose.
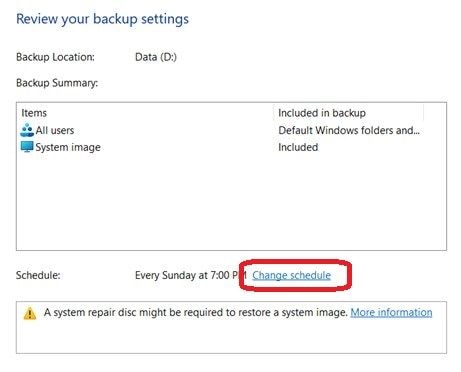
- Step 7: Click Change schedule > choose when to backup > Save settings and run backup.
Unlike Wondershare’s UBackit backup tool, Windows Backup and Restore feature is limited. You can only do full backups with it, which means you’ll have to repeat the steps each time you want to create a backup.
Moreover, you can only back up files and folders with Backup and Restore. Additionally, there’s no backup encryption, and when it comes to security, your backups will have no protection whatsoever.
Perform a NAS Auto Backup With File History
Finally, there’s also the File History option. It’s another built-in Windows feature similar to Backup and Restore. However, unlike the previous option, the File History method lets you create NAS incremental backups.
On the other hand, just like the Backup and Restore option, it only does file and folder backups and has no encryption. Nevertheless, here’s how to set up NAS auto backup with File History:
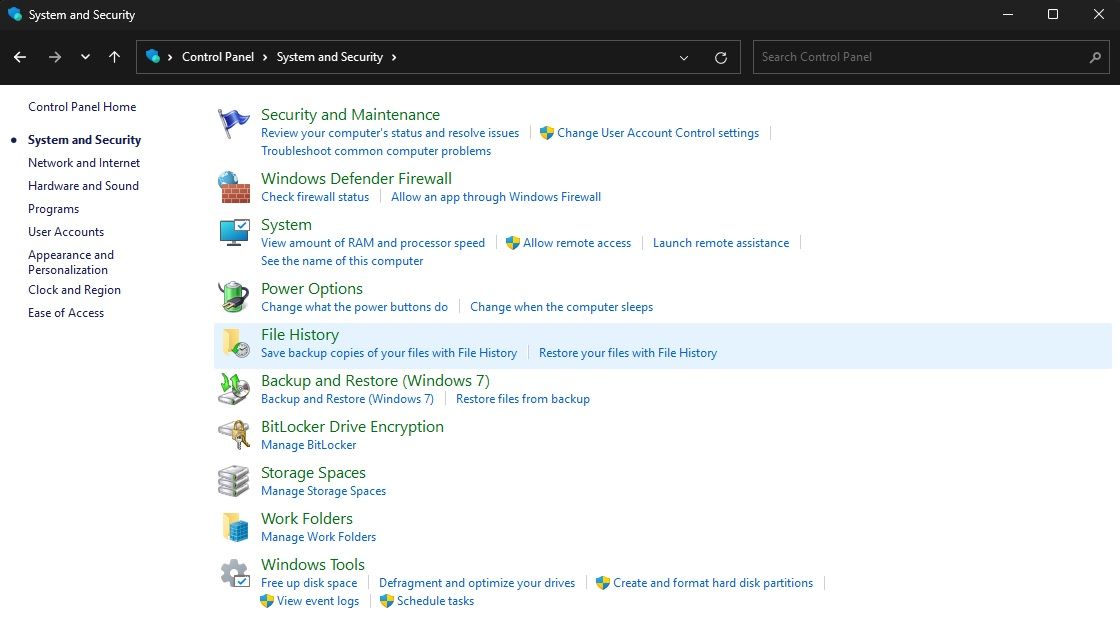
- Step 1: Launch Control Panel on your Windows computer.
- Step 2: Head to System and Security > File History.
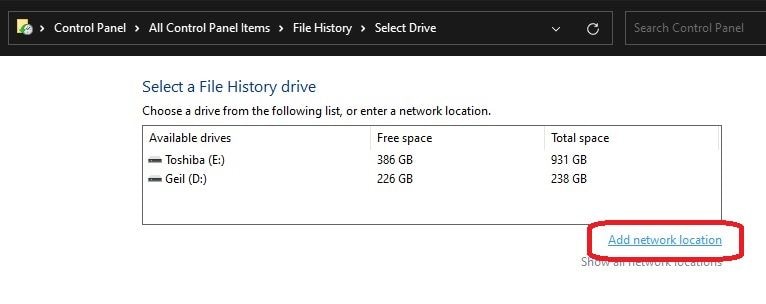
- Step 3: Choose Select Drive on the left side.
- Step 4: Click on Add network location.
- Step 5: Toggle the Automatically back up my files option > More options.
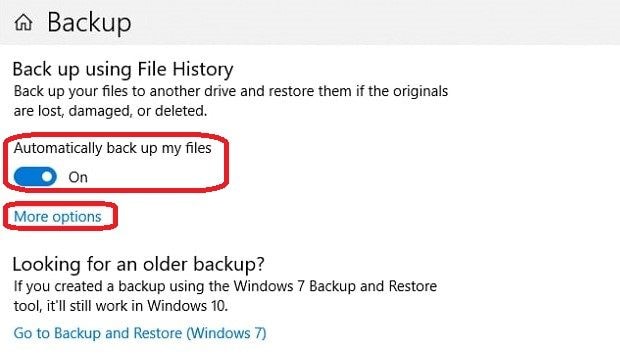
- Step 6: Configure how often to create backups under Back up my files > Back up now.
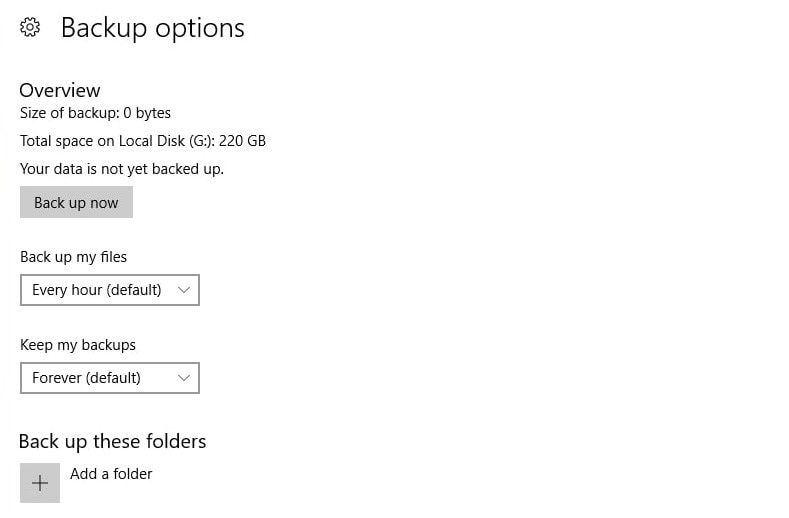
The built-in File History Windows feature is simple and easy to use. However, its features are much simpler than those of a dedicated backup application. You can try File History and create simple and scheduled backups, but if you want other backup features, you should turn to Wondershare UBackit.
Conclusion
Keeping your essential data backed up and safely stored on an external device like a NAS is vital in preventing disastrous data loss. The three methods above can help secure your crucial data on a NAS and find the best way to configure NAS auto backups.
The two mentioned built-in Windows methods are great for an occasional backup, but they lack features and options that a third-party backup tool can offer. That’s why dedicated backup tools are a better choice and why an app such as Wondershare’s UBackit is the clear winner regarding backup solutions.


