In today's digital age, safeguarding your valuable data has become more crucial than ever. One of the most effective ways to ensure that your essential files and system settings remain protected is by cloning your C drive to an external hard drive. This process not only helps prevent data loss due to system crashes, but also facilitates an easy transition when upgrading or replacing your computer.
This guide will teach you to clone the C drive to the external hard drive using different cloning software.
Why Clone C Drive to External Hard Drive?
As we all know, the system drive (C drive) is typically where the Windows operating system is located and the computer boots from. It is an extremely important partition on the computer. When you clone the C drive to an external hard drive, you are cloning the operating system to the external hard drive. When and why should you carry out this process? Several cases have been summarized below.
- You intend to clone the operating system from HDD to SSD and use the bigger SSD as a boot disk. Meanwhile, the old HDD can function as a data disk. This allows you to make the computer run quicker and store more info.
- If your computer occasionally stops operating and you wish to upgrade it, copy the C drive to a new drive. Therefore, it does not need to reinstall the operating system and any required software.
- If your device has been utilized for a long time, and several tools are installed on the C disk, it is recommended to replace the hard disk to boost performance. You must clone the system drive to an external hard drive to make the new hard disk function like the old one.
You may also be interested in:
How to Clean C Drive and Free Up Space?
Prerequisites For Cloning C Drive to External Hard Drive
Follow the preparations you need to do before copying C Drive to the external hard drive.
1. Prepare the external hard drive: HDD/SSD.
If you're using a desktop computer, shut it down and open the casing. The SSD/HDD can then be connected to the PC via the SATA connector. Users of laptop computers can attach an external hard drive immediately.
2. Boot the new HDD/SSD.
After restarting the computer:
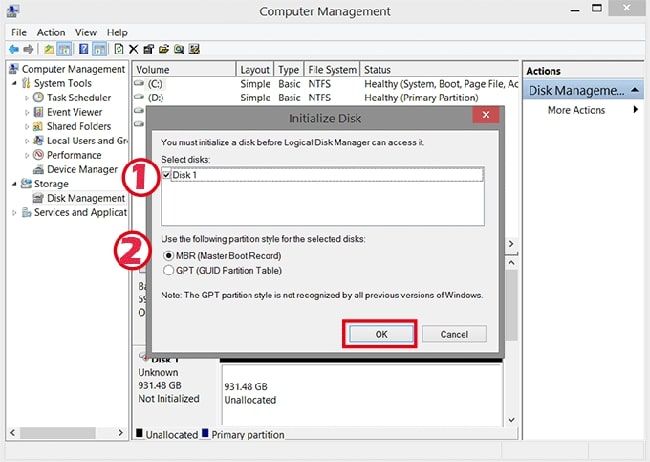
- Explore Computer Management and select Disk Management. You can now select the Initialize Disk option.
- Select the disk and the partition style: MBR or GPT.
- Click OK to complete the initialization. Furthermore, you must create a new volume for the disk.
4 Best Tools to Clone C Drive To External Hard Drive
Cloning your C drive to an external hard drive is a smart practice for data backup, system migration, and disaster recovery. It lets you have an exact copy of your C drive, securing important data. However, manually performing this task can be time-consuming and prone to errors. Fortunately, specialized tools are available to simplify the process. This section will explore the four best disk clone software for copying your C drive to an external hard drive.
1. Wondershare UBackit - Disk Clone
If you don't have adequate storage space on your C Drive, you can increase its capacity by cloning your disk to an external hard drive. The best cloning software, like Wondershare UBackit, can help you. UBackit enables you to clone partitions and drives if the backup destination's capacity exceeds the backup source's.

Wondershare UBackit - Your Reliable Disk Cloning Software
Disk Clone: You can clone hard drive to SSD or another HDD easily. It supports a wide range of disk types, such as HDDs from all brands, SATA/M.2 SSDs, NVMe SSDs, USB drives, NAS drives, and SD cards.
Partition Clone: Instead of cloning the entire disk, you have the option to clone a particular partition.
Sector-by-Sector Clone: You are allowed to replicate a hard drive or partition bit by bit.
Supported OS: It is compatible with Windows 11/10/8.1/8/7, 32 bit and 64 bit.
Step-by-Step Guide
Wondershare UBackit lets you copy C drive to the external hard drive with a few clicks. Follow the steps below:
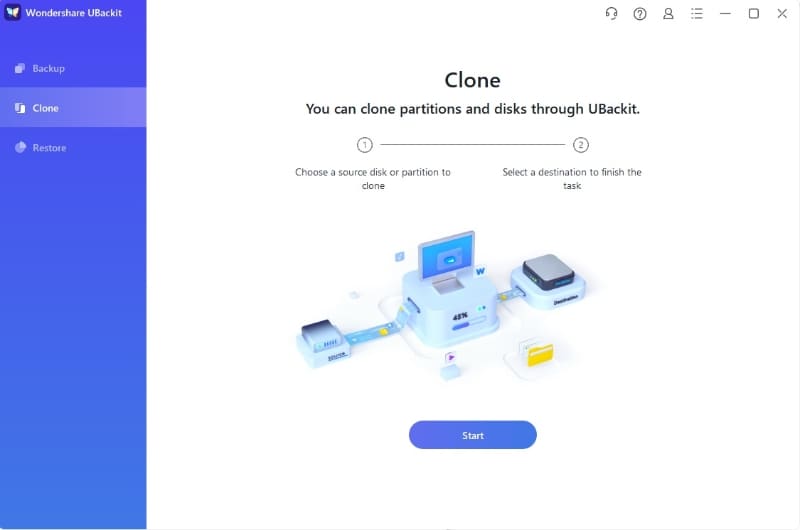
Step 1Open the Clone Tab.
Install, and run Wondershare UBackit on your computer. Then, select Clone from the left-hand menu, and click the Start Clone option.
Step 2Specify a Clone Source and Target Destination.
Select your C Drive as the source disk to create a clone and select Next.
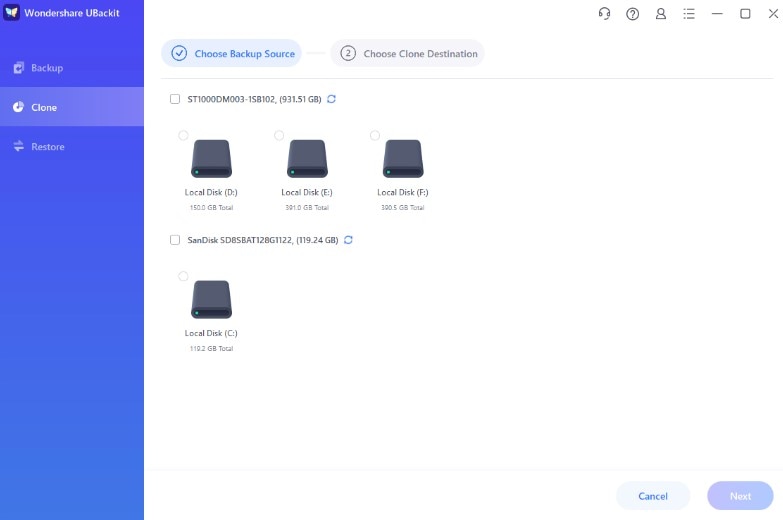
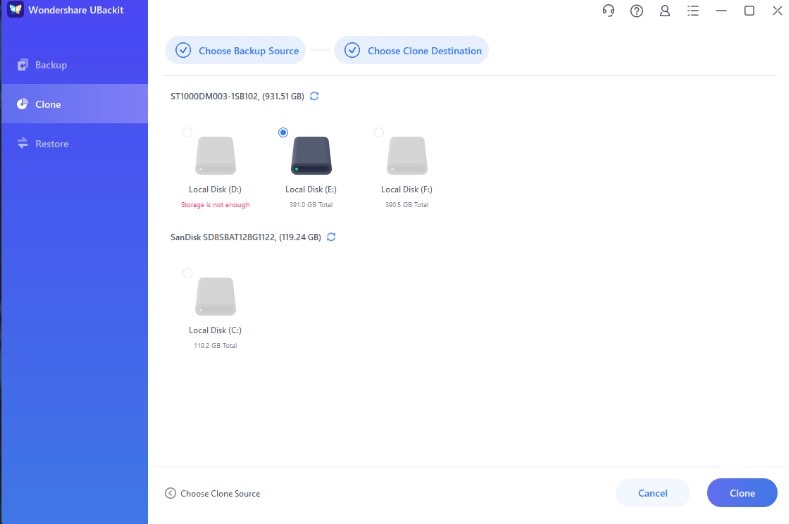
After selecting a source disk, you must select a source destination. Ensure the destination disk has enough space to store the data. Select your external hard drive and begin the process by clicking Clone.
Step 3 Start the Cloning Process
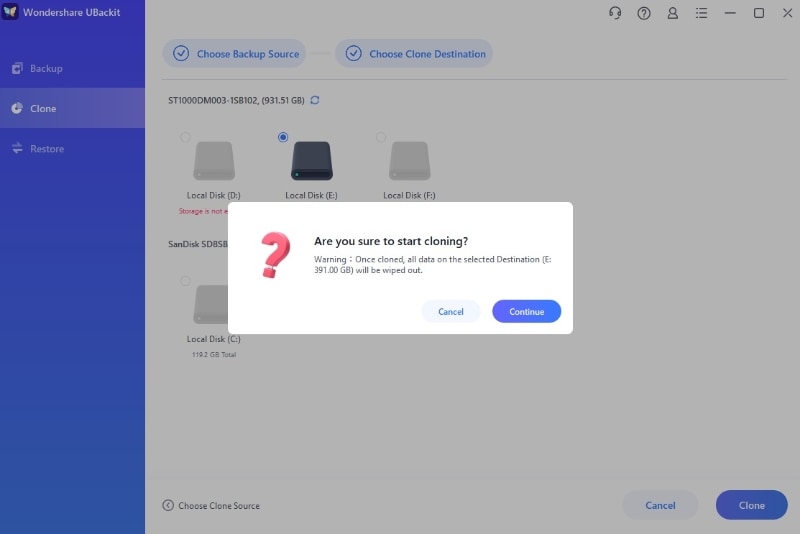
Confirm the copying process by clicking Continue. Remember that this method will remove all data on the drive.
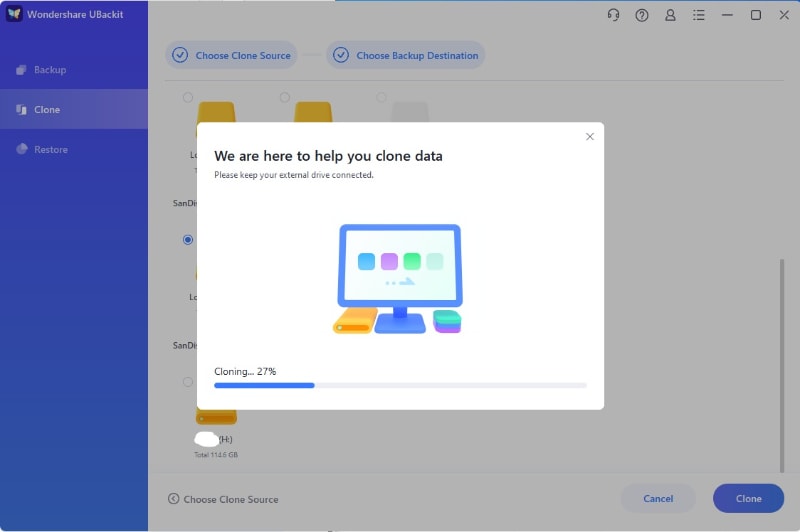
The disk cloning process will take time based on the data volume you are copying.
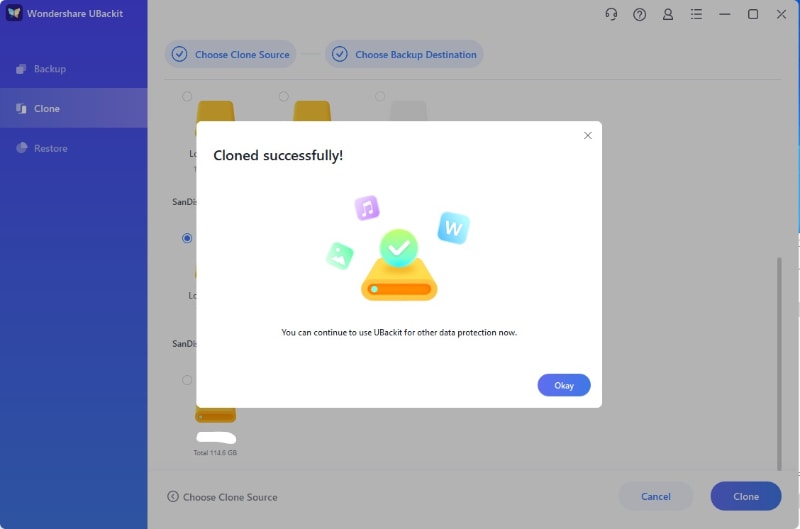
You will be alerted on your screen when the cloning process is completed.
2. AOMEI Backupper
For professional disk backups, another alternative is to use AOMEI Backupper Standard. It is a reliable and user-friendly free cloning software for Windows 10 that allows users to back up C drives to external devices. It may easily and safely back up folders and partitions on all Windows PCs to external hard drives.
Here are the instructions for backing up the C disk to an external hard disk.
- Step 1: Download the free AOMEI Backupper Standard, then select System Backup from the Backup menu in the taskbar.
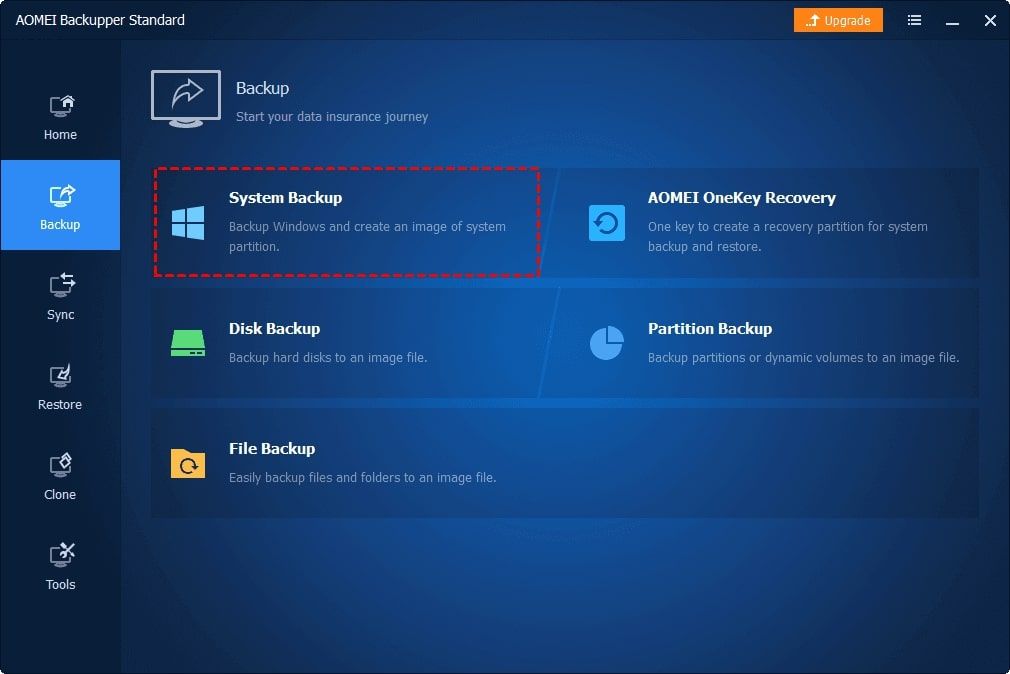
- Step 2: Select the C disk and click on the destination location to select the external hard disk linked to your computer.
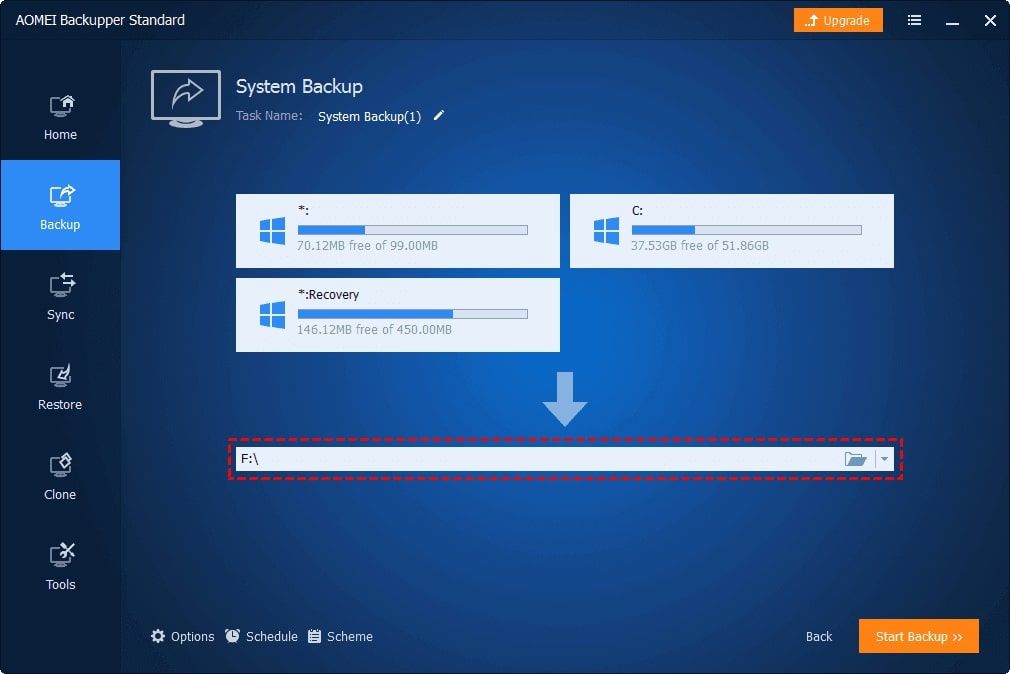
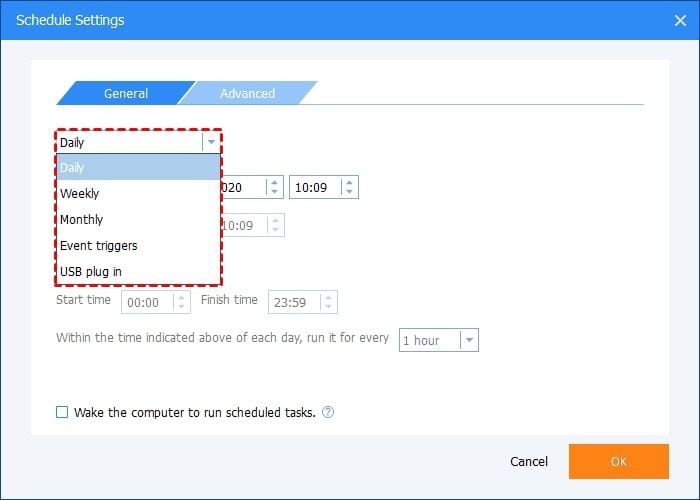
- Step 3: Go to the Scheduler button and enable scheduled backups. Choose when the C drive should be automatically backed up to an external device.
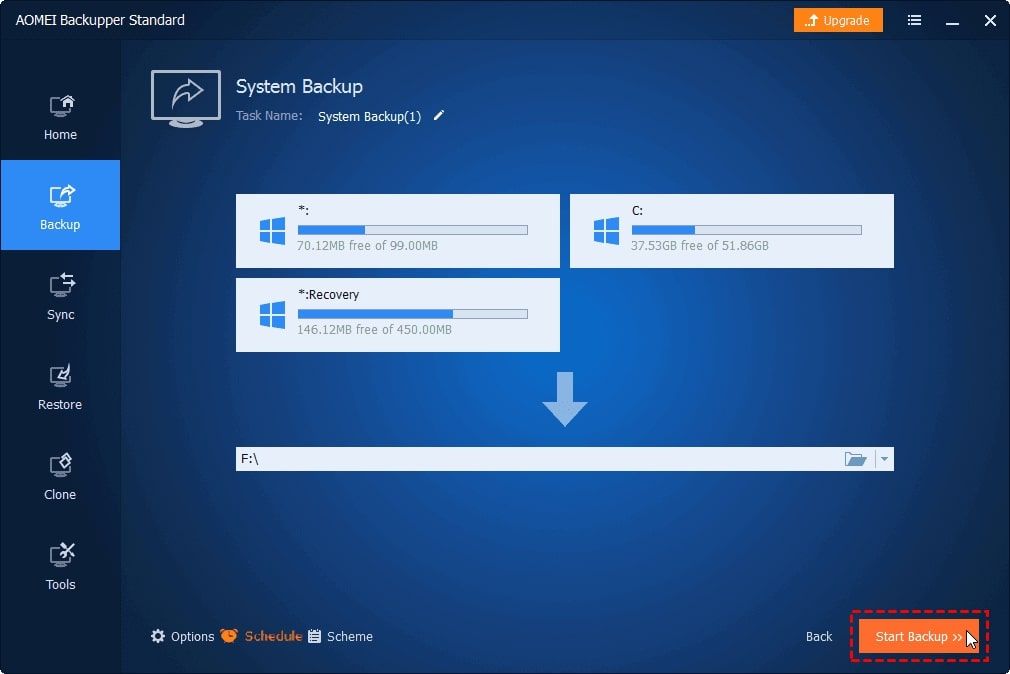
- Step 4: To back up the C drive to another location effortlessly, click Start Backup.
3. Macrium Reflect
Windows users have many excellent copying solutions, but the top third cloning tool you can use to copy C Drive to an external hard drive is Macrium Reflect Free. It is free and simple to use.
Follow the directions below to perform the process:
- Step 1: Download and install Macrium Reflect.
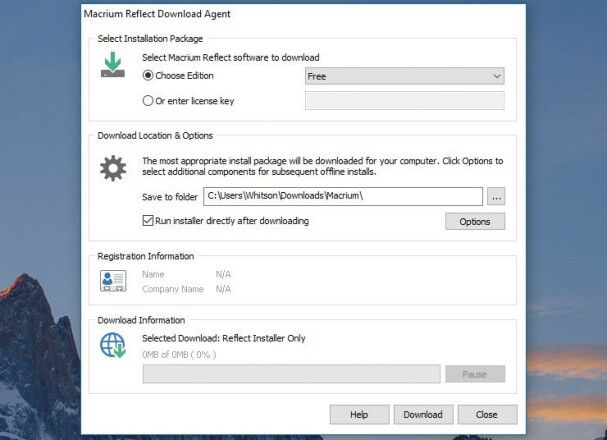
- Step 2: When you launch Macrium Reflect, you'll get a full list of all the disks linked to your computer. There are two options: directly clone one disk to another or build an image of a disk.
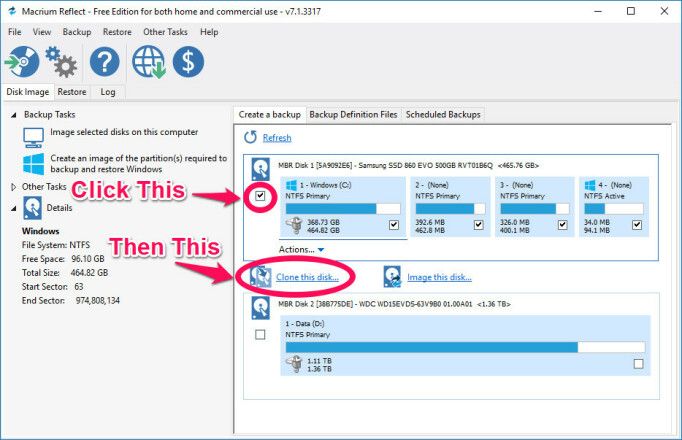
Cloning allows you to boot from a second disk, which is useful for moving data from one drive to another. On the other hand, Imaging allows you to keep as many complete, one-to-one copies of your source disk as the destination's capacity allows.
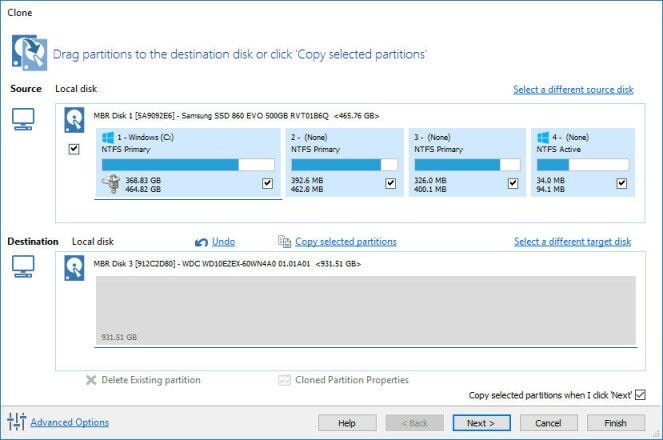
- Step 3: Select the C drive to be copied and click Clone This Disk or Image This Disk. Choose your external hard drive as the destination disk in the following window. If the drive has any old data, select it and click the Delete Existing Partitions option until it is empty. If cloning to a larger drive, click the Cloned Partition Properties button and expand your main partition to fit the entire disk space.
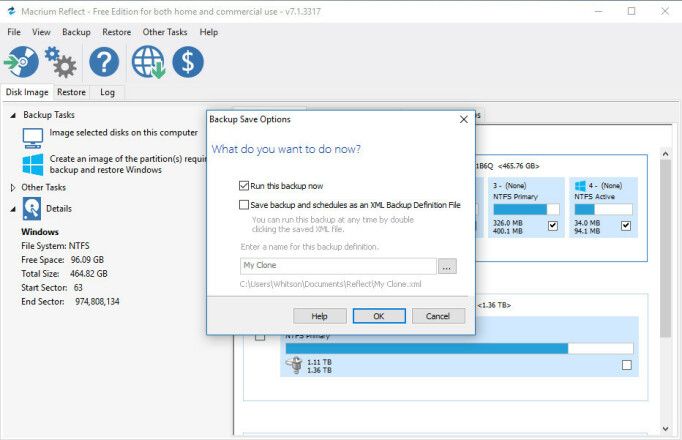
- Step 4: You can also schedule this clone, which is useful if you want to image your disk regularly for backup purposes. You may also store the backup and its schedule for safekeeping.
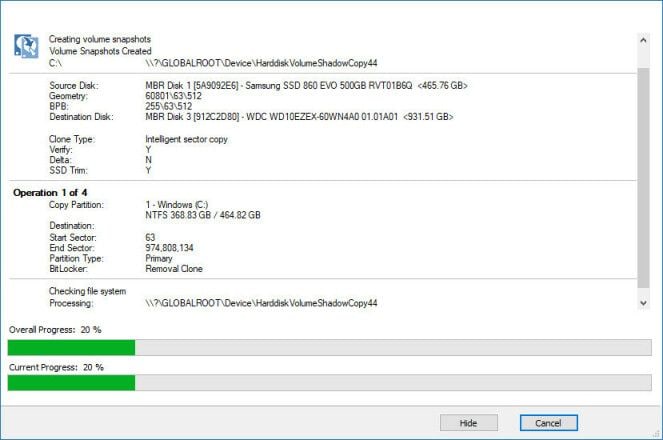
- Step 5: Macrium Reflect will then begin the cloning process. Allow enough time for this to complete depending on the size of your drive. You can boot from your cloned drive by selecting it in your BIOS. You can keep the second drive attached while imaging your drive for future image backups.
4. iSumsoft Clone Go
The powerful and free-to-try Windows cloning software, iSunshare CloneGo, has been built to make cloning an external hard drive in Windows as simple as possible. It allows you to clone the C drive to an external hard drive. The external hard disk may also be made bootable on any Windows machine. Let's go over how to do it step by step.
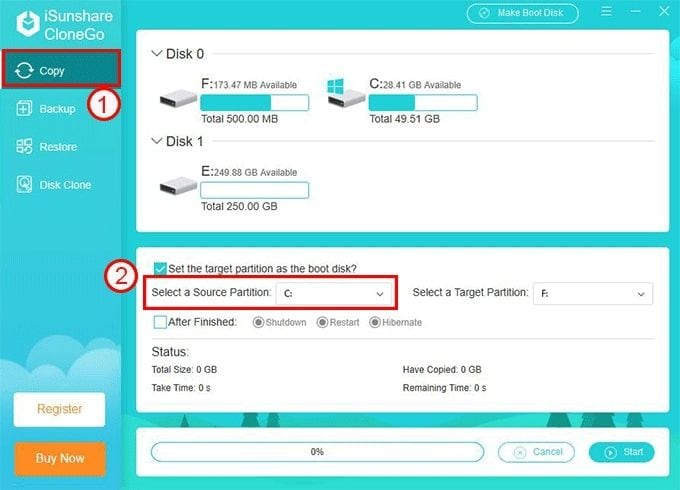
- Step 1: To begin, download and install CloneGo on your computer. Then, launch this software and select Copy from the left menu. After that, under the Select a Source Partition section, pick C drive as the source target.
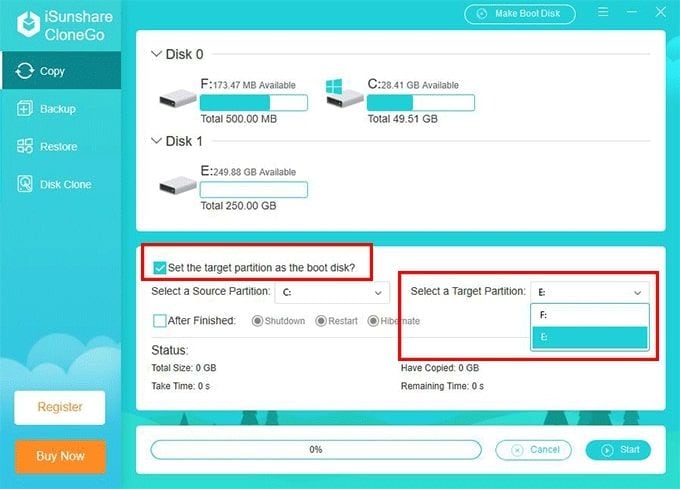
- Step 2: In the Select a Target Partition section, you must select the external hard disk or its partition as the destination target. And it will be formatted later by this software. You should create a data backup on the external hard drive if it is not a new drive. You should also enable the option "Set the target partition as the boot disk" to boot the computer from the external hard drive.
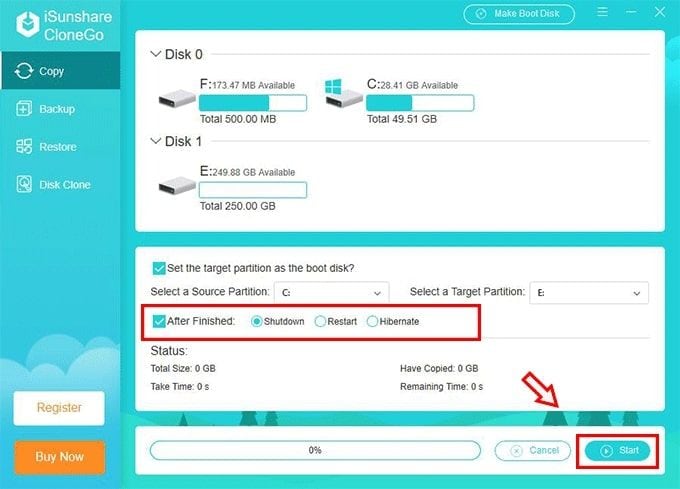
- Step 3: If you believe you cannot wait for the lengthy cloning procedure, tick the After Finished option and pick Shutdown/Restart/Hibernate. Then, to begin the cloning process, click the Start button.
- Step 4: After you have cloned the C drive in the external hard drive, you can install it on the computer, and it is best to add the new volume to the hard drive for future data management.
Conclusion
That's it! You learn the four cloning software for cloning C drive to an external hard disk. If you want to copy your computer data in the quickest and safest method possible, Wondershare UBackit is the ideal solution. It will efficiently clone all of your files to other locations.

 ChatGPT
 Perplexity
 Google AI Mode
 Grok
Grok


