
In today's fast-paced world, data is the lifeline of businesses. Losing valuable data can be devastating for businesses of all sizes. That's why it's crucial to have a reliable backup system in place. QNAP and Synology are two of the most popular network-attached storage (NAS) devices that offer advanced backup features. In this article, we'll explore how to backup QNAP to Synology and backup Synology to QNAP, enabling you to protect your important data and ensure business continuity.
Why Do NAS to NAS Backups Between QNAP and Synology?
NAS systems have become a common storage solution for businesses. They give you remote access to your data and allow you to constantly store new files on the go.
Remote access is also more secure, as cybercriminals must bypass multiple security protocols and other measures to access your data. If you use the 3-2-1 backup strategy, you’ll have three copies of your data in three different locations.
Creating a NAS-to-NAS backup between QNAP and Synology gives you several advantages:
- Backup in case one NAS system fails – if one fails, you’ll have a copy of your data safely stored on another NAS.
- Free up space on your primary device – if QNAP is your primary NAS system, a backup allows you to free up storage space on your primary system by moving infrequently used files to reduce the load and improve performance.
- Create multiple backup copies – the 3-2-1 backup strategy allows you to keep one backup copy off-site and other copies in different storage solutions. If your primary device fails or gets damaged, you’ll have access to your data on demand.
- Save time, effort, and resources – NAS to NAS backups are ideal for migrating data between NAS devices without having to transfer your data manually.
No matter what happens, you’ll have your backups readily available. In addition, NAS systems are ideal for moving data between applications, systems, and devices, allowing you to instantly secure everything and avoid the risk of file corruption, hack attacks, data loss, etc.
How To Backup QNAP to Synology With Rsync
You can back up QNAP NAS to Synology with Rsync by following these steps.
- Step 1: Download and install Hybrid Backup Sync on your QNAP.

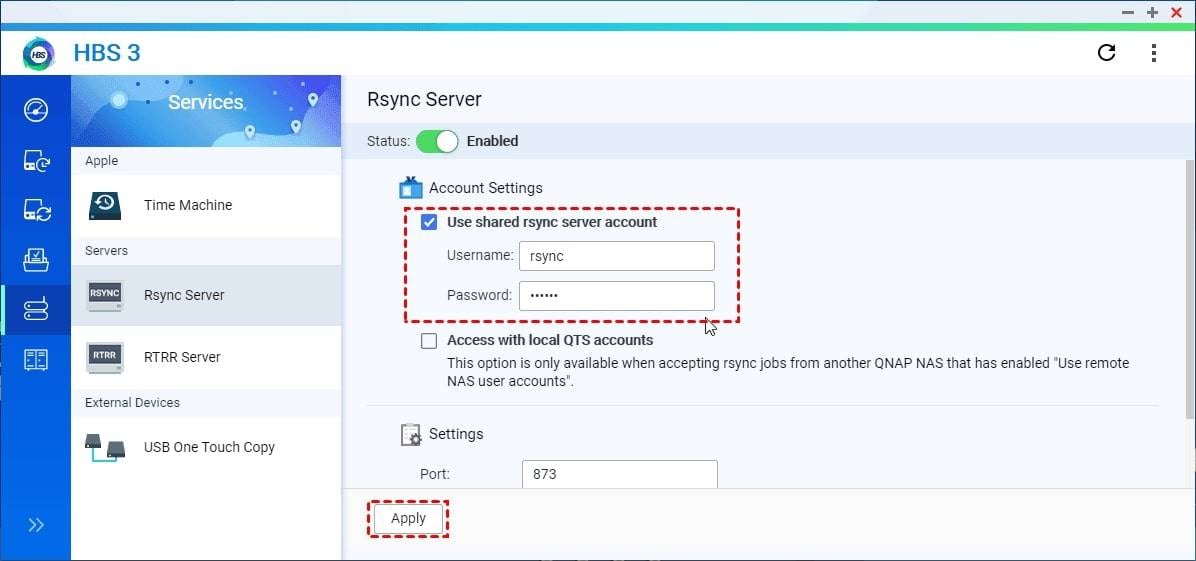
- Step 2: In the HBS3 window, click Enable Rsync Server to enable the Rsync server.

- Step 3: Click the Use shared rsync server account box to customize your Rsync server account settings and select Apply to confirm your changes.
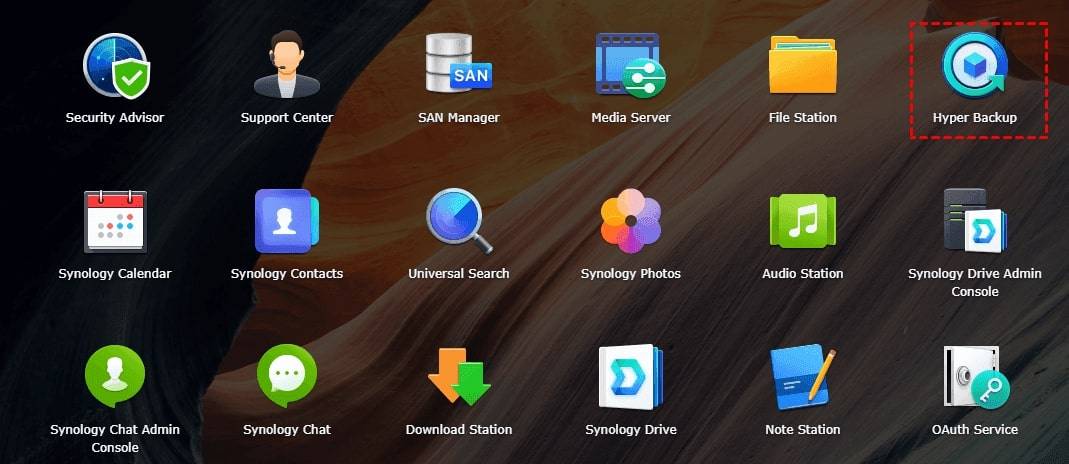
- Step 4: Install Hyper Back on your Synology and launch it.
- Step 5: In the Hyper Backup window, click the + tab and select Data backup task.

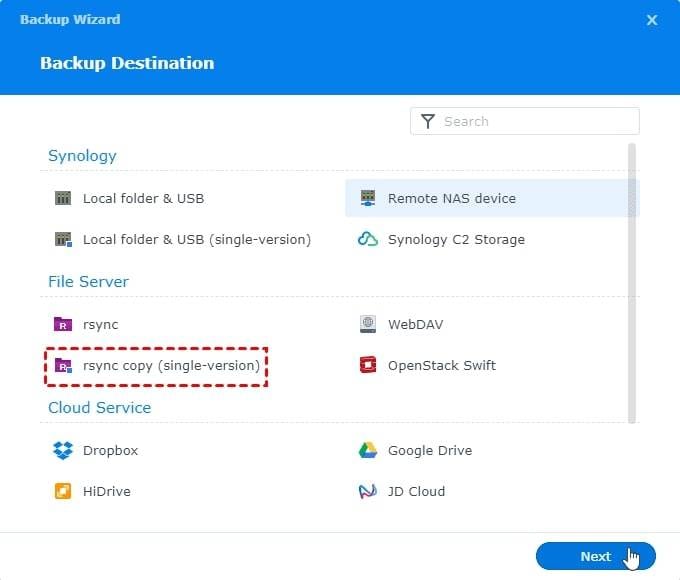
- Step 6: Click rsync copy (single-version) to select your backup destination and hit Next.
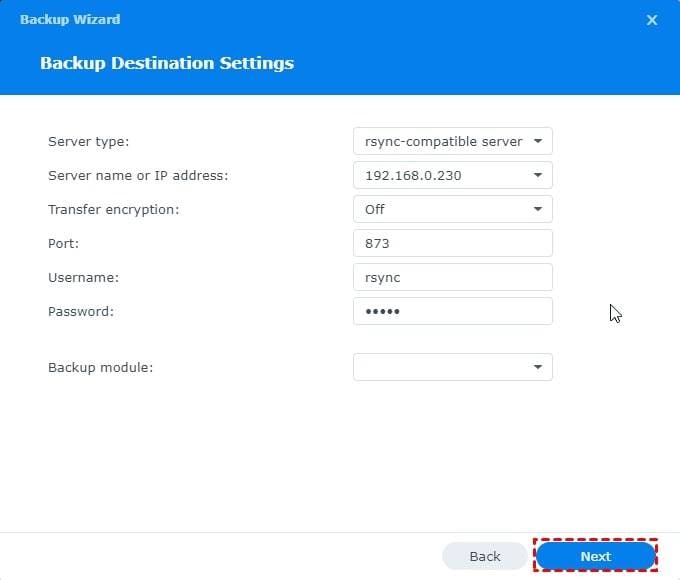
- Step 7: In the Backup Destination Settings tab, input rsync-compatible server in the Server Type field, and enter your QNAP NAS credentials and backup module, then click Next. Select QNAP folders to back up, click Apply, and hit Back up now.
How To Backup Synology to QNAP With QTS and QuTS system?
You can back up Synology NAS to QNAP with QTS and QuTS system by configuring Rsync Server on QNAP and creating a backup task on Synology. Follow these steps to complete the process.
- Step 1: Use your admin credentials to log in to QTS/QuTS as an administrator and navigate to App Center to download and install HBS 3 Hybrid Backup Sync. Launch HBS 3 and select Services>Rsync Server>Enable>Rsync Server. Type in 873 in the Port section and click Apply.

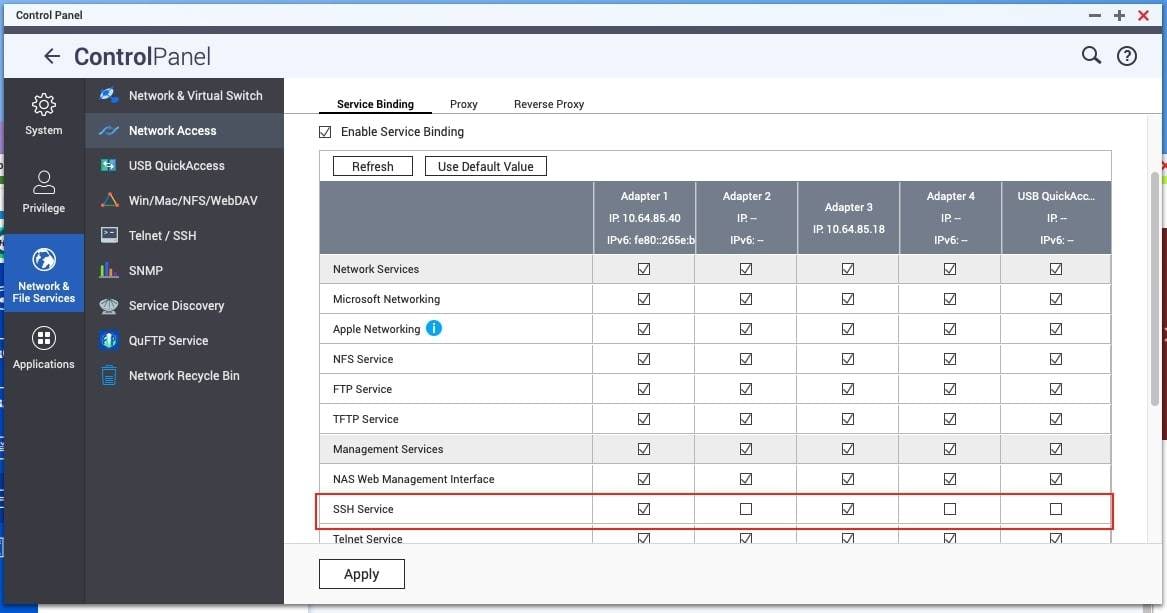
- Step 2: Open Control Panel and select: Network & File Services > Network Access > Service Binding. Click SSH Service to enable service on the port you want to back up and select Apply.
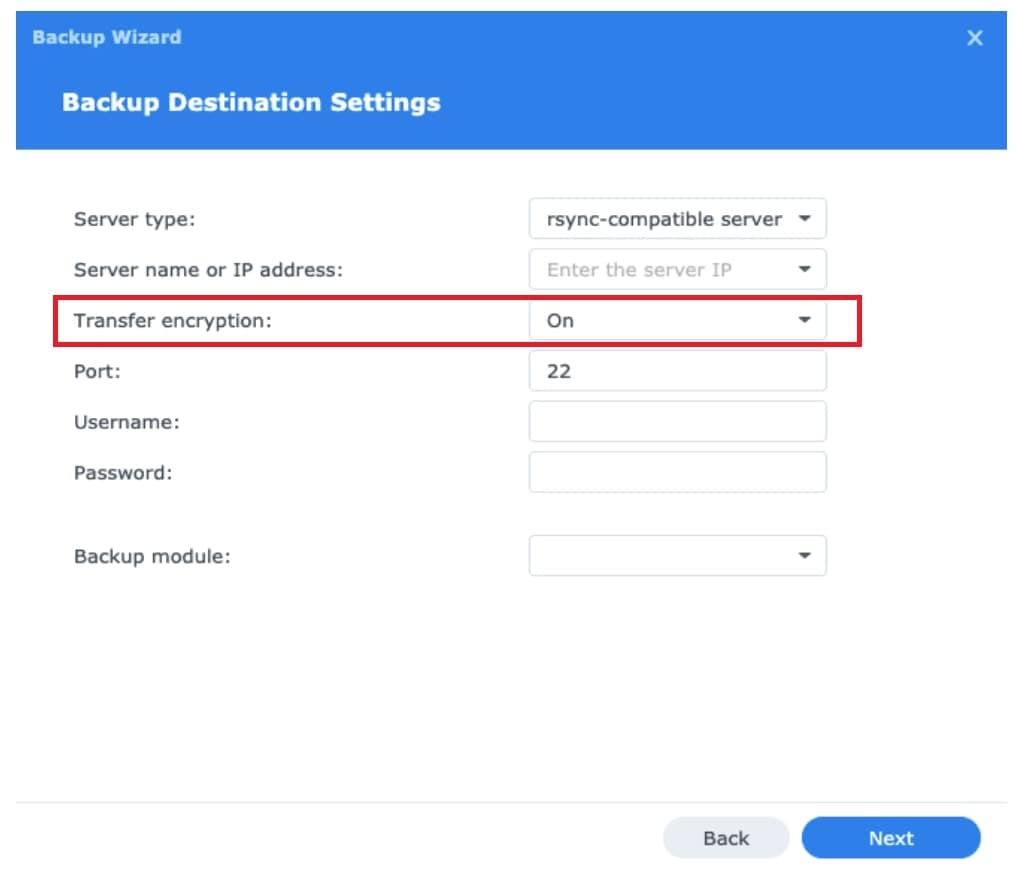
- Step 3: Download and install Hyper Backup and open it in Synology to run Backup Wizard. Select Data Backup Task and set Rsync copy (single-version) as your backup destination. In the Server Type field, enter rsync-compatible server and select On to enable Transfer encryption. Click Next to complete the process. Your QNAP and Synology are now connected and ready for data transfer. You can copy files from Synology to QNAP.
NAS to NAS Backup Between QNAP and Synology With Wondershare UBackit
Wondershare UBackit is a reliable and user-friendly backup tool for NAS to NAS backup between compatible NAS devices like QNAP and Synology.
Mount your NAS systems with IP addresses and passwords to your computer to get access to your NAS files.
Install UBackit on your PC and follow these steps to perform NAS-to-NAS backup between QNAP and Synology and vice versa.
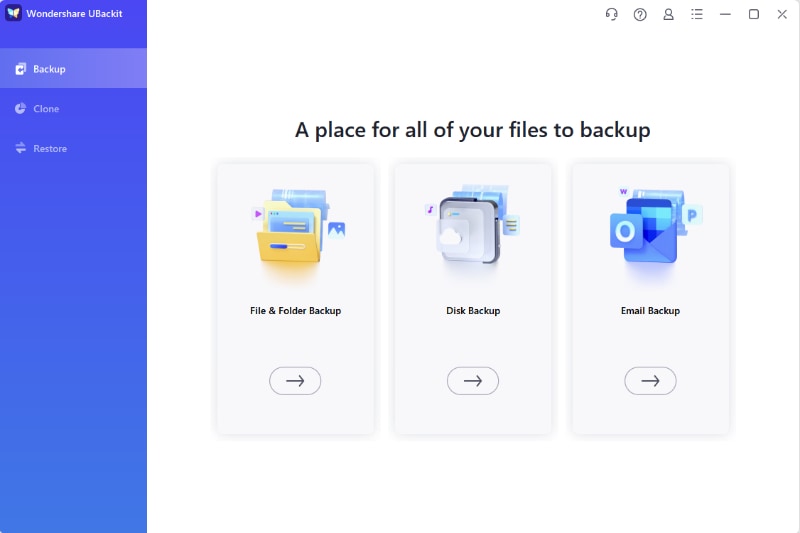
- Step 1: Run the UBackit app and open the Backup section. Select Disk Backup.
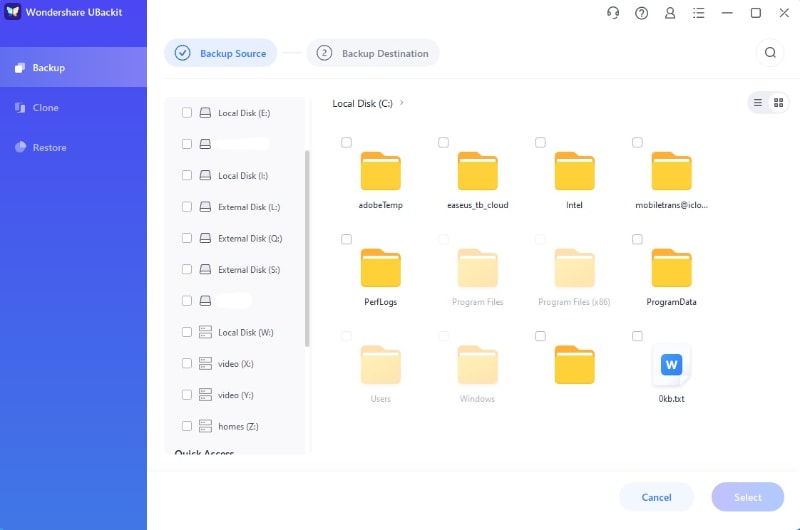
- Step 2: Choose the QNAP or Synology NAS you want to back and click Select.
- Step 3: Select your Synology or QNAP NAS as the backup destination in the NAS Server section and click Backup.
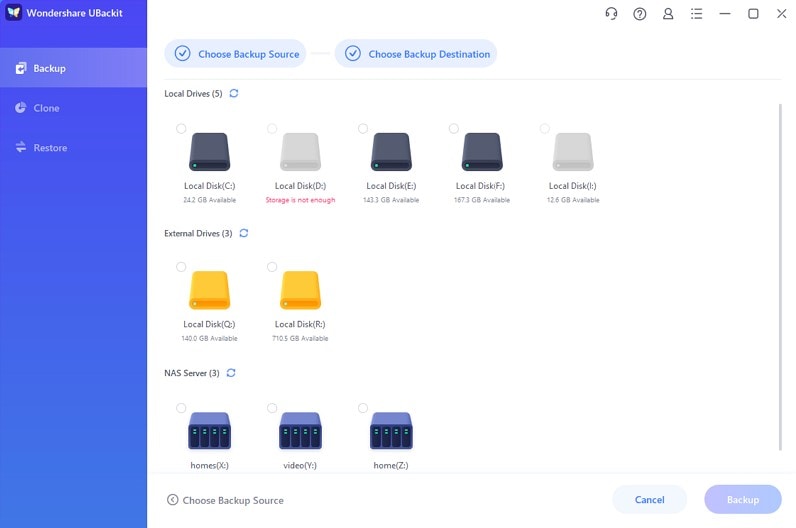
- Step 4: Wait for Backup Manager to complete the backup process.
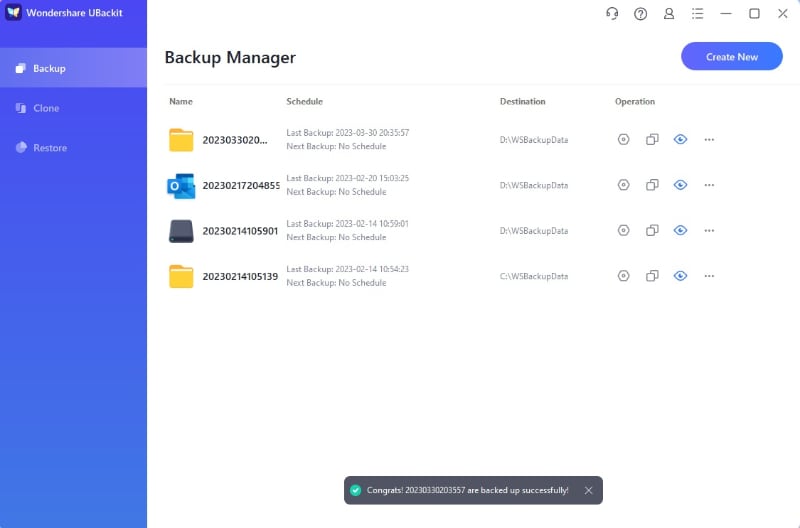
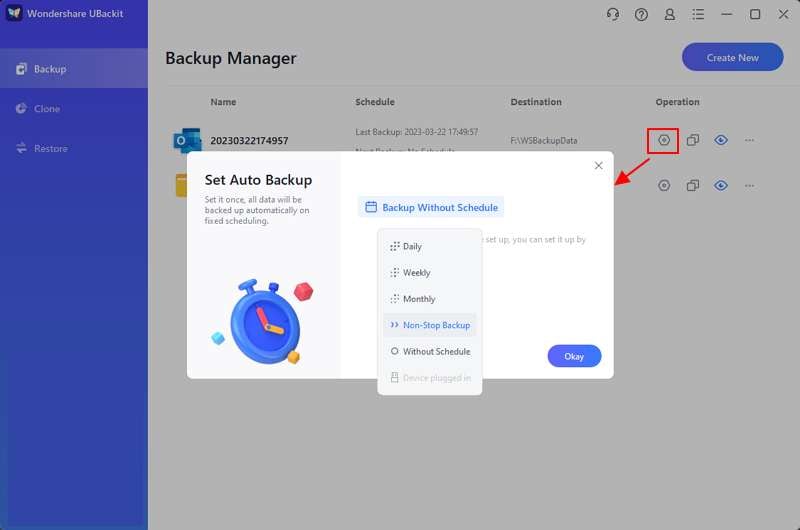
When UBackit completes the backup process, you’ll receive a notification. Now, you can choose what you want to do next. You can set up an automatic backup for your NAS data by clicking the Schedule icon or create a new backup task by clicking Create New.
Conclusion
NAS systems are quickly overtaking the data storage industry. QNAP and Synology devices are already a standard in data storage, allowing you to safely, securely, and reliably back up and store your NAS data on demand.
Although these systems provide a limited storage capacity, you can always expand it by adding another NAS device and freeing up the primary device by moving your files to the second one.
Aside from preventing overloading your primary NAS, NAS-to-NAS backups also allow you to avoid the risks of data loss, file corruption, accidental deletion, and physical damage to your drives.

 ChatGPT
 Perplexity
 Google AI Mode
 Grok
Grok


