Many of us store important business or personal information in our Gmail accounts, so it's essential to ensure we keep all data. However, backing up Gmail emails may seem daunting for some users. This tutorial will show you how to back up Gmail emails. We'll explain the different easy methods to back up Gmail emails. So, let's get started!
Part 1. Why It is Needed to Have Gmail Backups
Backing up your Gmail account is essential for various reasons.
- Many Gmail users have relied on the platform for years and regularly backup their emails to prevent data loss. Backups are crucial to ensure the long-term accessibility of your email and restore accidentally deleted emails or access your email offline.
- Gmail backups can be useful for archiving old emails, freeing up storage space in your account, and providing a searchable archive of past communications. By keeping backups of your Gmail account, you can ensure that you always have access to your data, protect it from loss or damage, and manage your store efficiently.
- Cybercriminals often target email accounts to gain access to sensitive information or use the account for fraud. If your Gmail account is compromised, you could lose access to your emails or have them deleted, leading to the loss of important data. Therefore, having regular backups of your Gmail account can help you to recover from a cyber-attack and ensure that your data is always safe and accessible.
Part 2. 6 Ways to Backup Gmail Emails
There are several methods available for backing up Gmail emails. Here, we will employ the best solutions to take email backups from Gmail.
Way 1. Back Up Gmail Using Google Takeout
Google Takeout is the most basic backup snapshot service offered by Google. You can export almost all your Google data from your settings across all your applications. Google Takeout saves the data to your Google Drive or allows you to download several ZIP files. It's simple, comprehensive, and completely free.
Google Takeout copies your entire Google Account, including Gmail data. Take the following steps to perform the backup process using Google Takeout:
- Step 1. Begin by entering https://takeout.google.com/settings/takeout into the Address field of your browser. Sign into your Google account. If you're logged in, the following screen appears:

- Step 2. To view the list of data that you can back up with the utility, use the scroll bar on the right side of the screen:

- Step 3. Move the Gmail slider to the right to back up your Gmail account. The screen expands when you click the down arrow to the left of the slider, and you can further refine which parts of your Gmail you want to back up. Select one option below:
- To back up all of your Gmail, click Include all.
- Press Select labels to bring up a screen to select which folders to back up.

- Step 4. Once finished choosing which data types to back up, click the Next button in the lower-left corner of the screen. The screen Customize archive format shows. Use this screen to define the following archive’s file format, size, and delivery method.

Note: Google Drive archives count against your Google storage quota. If your archive is particularly large, consider another method of receiving it.
- Step 5. Once you decide on the archive format, click the Create Archive button. Then, you'll see a notification that your archive is being processed. Please remember that your email may differ depending on your selected delivery method.

Way 2. Back Up Gmail in Outlook
Outlook is an email service provided by Microsoft. It was first introduced in 1997 as part of the Microsoft Office suite of applications. Outlook offers a range of features, including email, calendar, contacts, and task management. It also supports integration with Microsoft services, such as OneDrive and Skype. Outlook can be accessed through a web browser, the Outlook desktop app, or the mobile app.
Configure your desktop client to retrieve messages from Gmail and save them to your computer using the IMAP protocol. Here's what you should do:
Step 1Turn the IMAP Access on
Click Settings > Settings > Forwarding and POP/IMAP in Gmail. Click Enable IMAP.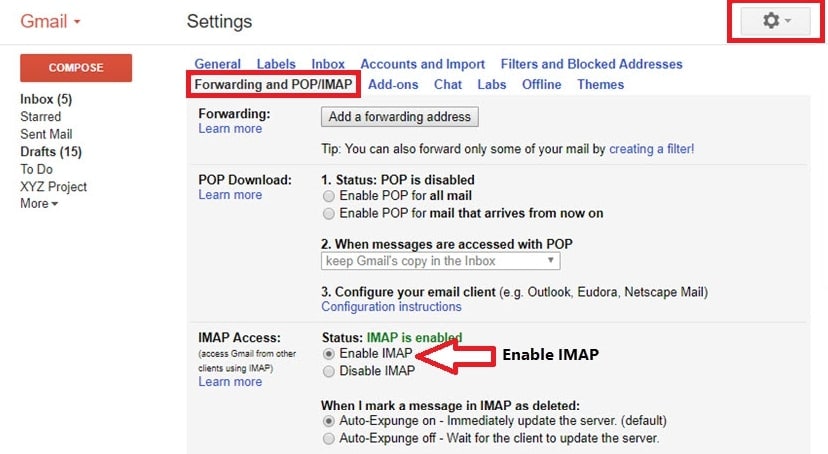
Modify the security settings in your Google account to allow your desktop email client access to your Gmail account. To begin, navigate to https://myaccount.google.com/. The My Account screen will appear: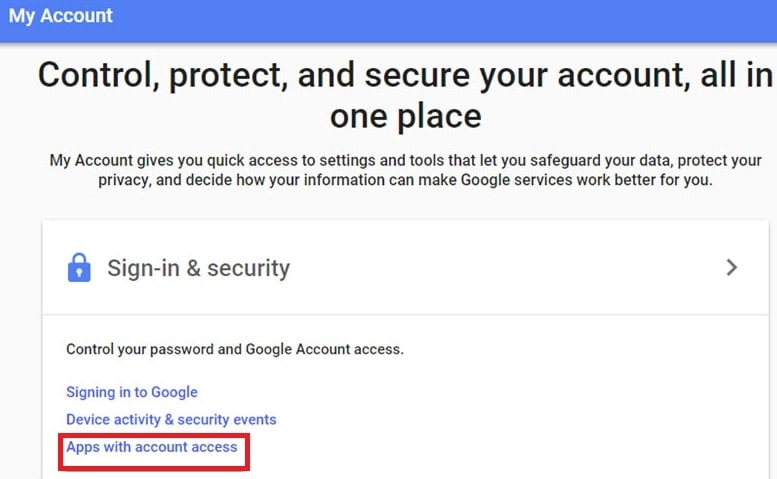
Click Apps with account access. The Sign-in & Security screen is displayed. Scroll down to the Allow less secure apps.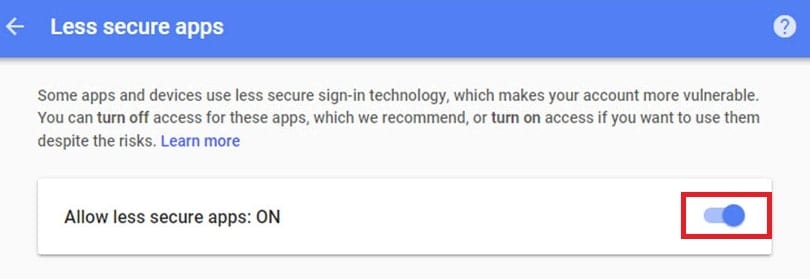
Allow your desktop email client to access the Gmail account.
Step 2Add The Gmail Account to The Desktop Email Client
The following step is to connect your Gmail account to your desktop email client. The exact procedure you'll follow depends on your desktop email client.
Click File for Microsoft Outlook. Click the Add Account button when the Account Information screen appears: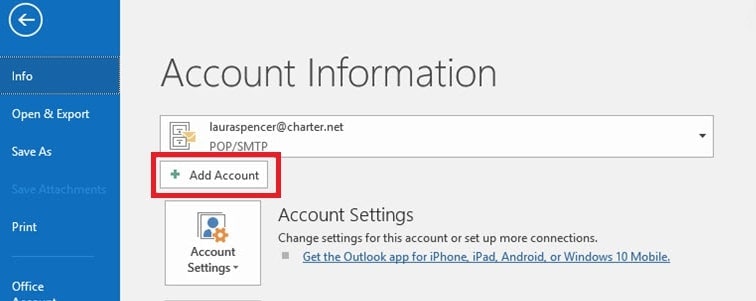
You will be asked to enter your Gmail account and password to add to Outlook. Fill in the blanks and press the Connect button. Link your Gmail account to your desktop account by clicking OK.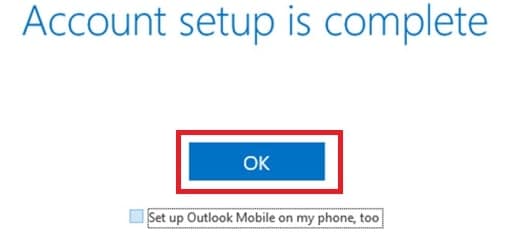
Allow your desktop email client to access the Gmail account.
Note: In your Outlook inbox, you'll find an email with the subject Microsoft Outlook Test Message. You'll receive the same message in your Gmail inbox.
Messages sent to your Gmail will also be sent to MS Outlook. You can still open your Gmail messages through Outlook even if you lose access to your Gmail account. But remember that deleting a message from your Gmail account will also remove it from your Outlook inbox.
Way 3. Third-Party Gmail Backup Tool
When backing up Gmail emails, a third-party tool can be convenient and secure. In a previous article, we discussed UpSafe Gmail Backup, a popular Gmail backup tool that offers users a straightforward backup process. However, several other third-party Gmail backup tools are available, each with unique features and benefits.
One such tool is Wondershare Ubackit, known for its advanced backup options and secure storage facilities. The following are the main features of Wondershare UBackit:
Wondershare UBackit - Your Reliable Email Backup Tool
Back up emails to local hard drives or external storage devices effectively, safely, and completely.
Provide automatic backup to back up your Outlook files daily, weekly, monthly or even non-stop.
Set password to protect your backups, keeping your data confidential should it be stolen, lost, or compromised.
Support incremental backup, which save only the changes made to your files since the last backup, reducing backup time and saves storage space.
UBackit does not yet directly support webmail backups. However, users can use Ubackit to back up their Gmail with access to their account using the Outlook client. The powerful Outlook backup tool in Wondershare UBackit enables you to duplicate your full data and makes it simple to open all backed-up email files in Outlook.
You can instantly create an Email backup by performing these four steps.
Step 1Choose Outlook Backup
Install and start Wondershare Ubackit. Navigate to Backup & Restore > Create New > Outlook Backup.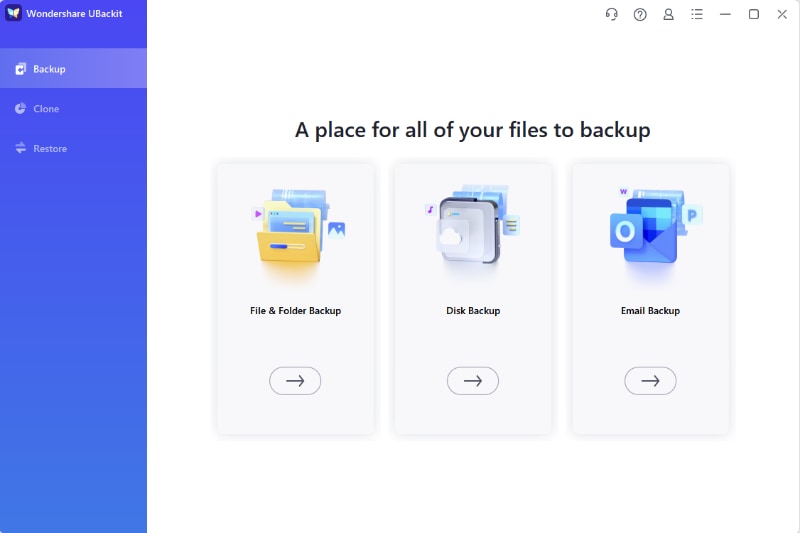
UBackit will start looking for email files available on your PC. Please wait for a while.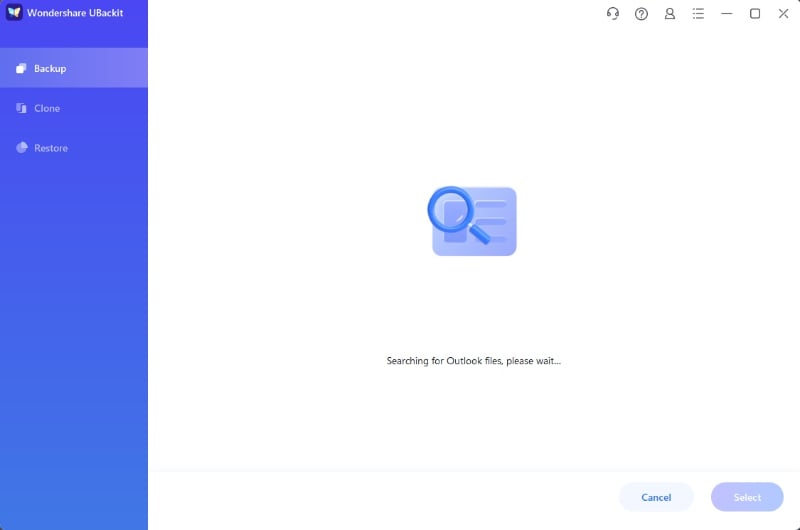
Step 2Choose the Gmail Files You Want to Backup
Select the files you want to back up by checking the boxes next to the file names. Then, click the Select button in the bottom right corner of the app once you're done.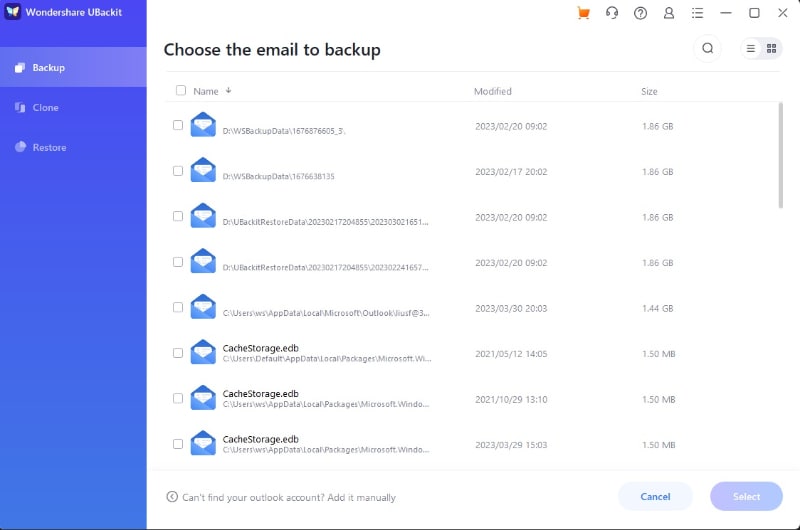
Step 3Choose Gmail Backup Destination
Now, you will be asked to choose a location where you want to back up your Gmail emails. The backup can be saved either to an internal drive or any external source.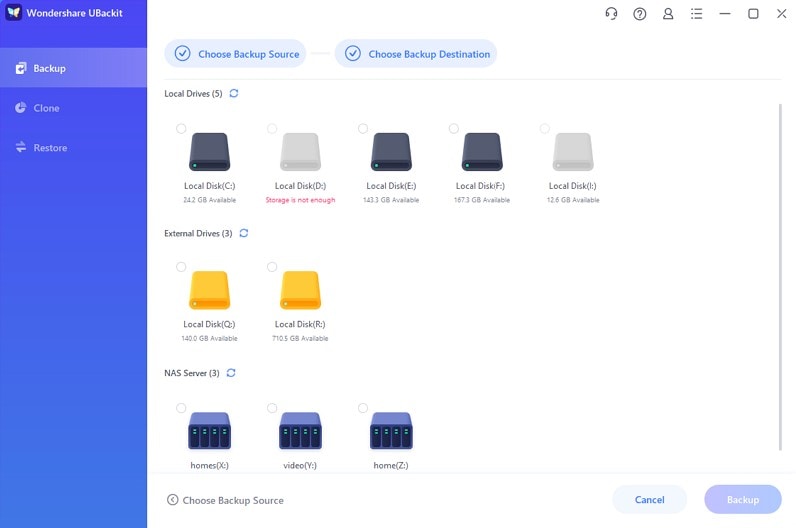
Step 4Complete the Gmail Backup
The email backup program will start backing up your Gmail to the chosen location. It may take several seconds. The backup file manager will show up on the screen after the backup is completed. Users can plan an automatic backup of Gmail by selecting the Schedule option. Also, a password-protect feature is provided by clicking the three dots icon in the top right corner.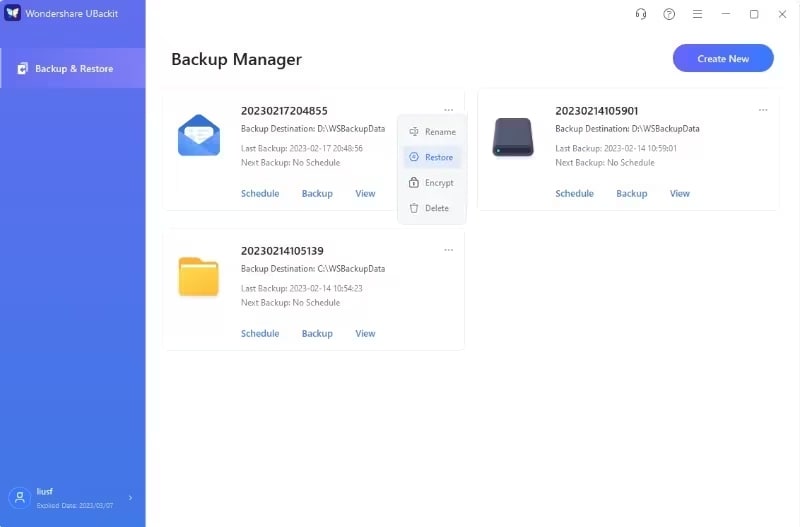
Besides Wondershare Ubackit, there exist numerous third-party applications that you can use to take backup of Gmail emails. You can explore them on the list of best Gmail backup tools.
Way 4. Back Up Gmail Emails Using Gmail Forwarding Filter
The most basic of these processes is to create a filter in Gmail. Arrange to forward your email to another email account on a different service. That's all there is to it. Done.
You can easily access the filter setup in Gmail using one of three methods. Use whichever method is easiest or most convenient for you.
- Step 1: To access your Settings, click the gear icon and then See All Settings in the sidebar. Click Create a New Filter on the Filters and Blocked Addresses tab.

- Step 2: If you just created a forwarding address in the Forwarding and POP/IMAP tab, search for it by clicking the Creating a Filter button.

- Step 3:Another option is to use the Search box at the top of Gmail. Click the arrow on the right part of the search box. It combines the search for an email with the creation of a filter.

Note: You can enter the criteria you want Gmail to use by visiting the most popular fields. These are Size, Has the Words, Doesn't Have the Words, From, To, Topic, and the following. Also, there are choices for attachment-containing emails and whether you wish to include chats. To specify the emails, you want to forward, fill out one or more fields.
Way 5. Save Emails From Gmail to Evernote
Each Evernote account includes a unique email address that you can use to send items directly to your Evernote archive. It is similar to the Gmail forwarding filter in that you would continue to use Gmail to forward everything.
Evernote now has a Gmail add-on that allows you to save emails from Gmail to Evernote. This add-on incorporates the well-known green elephant into your message interface. Tapping it adds the message to Evernote.
With the Evernote for Gmail add-on, you can save important emails to Evernote and easily share your notes via email – all from a single location. Evernote for Gmail is available on the web, as well as on iPhone and Android devices.
- Step 1. You must first install the Evernote for Gmail add-on before you can use it. Following installation, the Evernote icon will appear in your add-ons section.

- Step 2. Evernote for Gmail saves important emails to your Evernote account without requiring you to leave your inbox. To save an email from Gmail to Evernote, follow these steps:
- Select the email that you want to save to Evernote.
- Select the Evernote add-on. The icon appears in a vertical column to the right of the open message.
- Choose a notebook, add a tag, edit the title if desired, and add any notes or comments. If you don't do anything, the default settings will be used.
- Tap the Save
Way 6. Use GMvault To Backup Gmail Emails
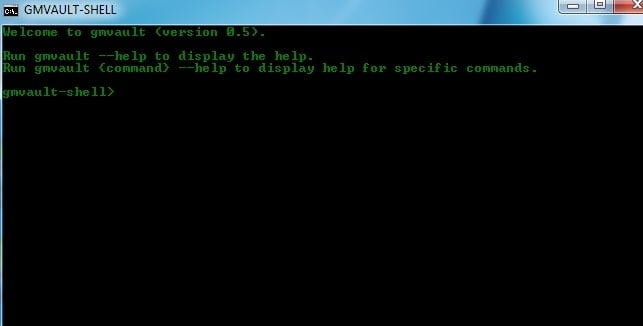
GMvault is a versatile Python script that works on Windows, Mac, and Linux platforms and provides a broad range of functionalities, such as creating a complete backup of your Gmail archive and seamlessly transferring all email data to another Gmail account. This tool is a practical solution for transferring emails between different accounts.
GMvault's command-line script nature makes it appealing, allowing users to schedule automatic backups. This feature is beneficial because it guarantees that you will remember to back up your Gmail, and you can set it up and let it run. GMvault supports multiple accounts' backups on a single device and several file formats, including standard ones like .mbx, that can be managed using traditional email clients.
Use the full sync mode to back up your entire Gmail account in a separate directory. Your email backup repository can be tarnished and easily moved from one device to another.
Part 3. Integrate Gmail Backups into Your Workflow
It can be frustrating to lose important Gmail messages, so making Gmail backups a regular part of your workflow is important. Following these tips lets you get the most out of your Gmail backup strategy and protect your important emails.
- Regularly backup your Gmail account to safeguard against data loss. It can be achieved by manually creating backups occasionally or automatically backing up your information regularly.
- Backup your messages in multiple ways to enhance security. For example, you can download a local copy of your messages and use a cloud backup service to protect against potential failures.
- To ensure the security of your account, you should continue to follow good Gmail security practices, including using secure passwords and taking advantage of other online security measures.
- You may need to adjust your backup frequency depending on your email volume. Some backup utilities allow for automatic backups, while others require manual backups. It's important to understand the backup system you're using and regularly check your backup files to ensure they're running correctly.
- Keep an eye on your backup storage space and consider storing older backup files in a different location if you exceed your storage limit. However, be cautious when deleting older backup files, as you may not be able to recover them later if needed.
- Automate your backup process as much as possible to reduce the likelihood of forgetting to back up your Gmail account. You can utilize Google Sheets as a database to automate your backup data.
- Research backup tools carefully before purchasing any to ensure they offer the required security, features, and reliability.
- Enhance your email security while also upgrading the integrity of your account. It can be achieved by enabling multi-factor authentication, selecting a unique and strong password, using strong passwords for all backup solutions, and employing additional security measures when sending sensitive emails.
Summing Up
You must back up your Gmail emails regularly to avoid losing your data. Reduce the possibility of data loss by backing up your Gmail now using the different steps we just showed you. While there are many third-party Gmail backup tools, Wondershare Ubackit is a reliable and secure option for backing up your Gmail emails.

 ChatGPT
 Perplexity
 Google AI Mode
 Grok
Grok


