
 TL;DR:
Synology Drive provides a free cross-platform solution to securely back up computer data to a Synology NAS, but recovering older files requires manual pre-configuration of the server version limits.
● You must install the Synology Drive Server package on the NAS and the Synology Drive Client on your Windows or macOS desktop to configure continuous, manual, or scheduled backup rules.
● File version restoration is not activated by default; you must manually enable version control within the Synology Drive Admin Console to retain the maximum limit of 32 historical backup versions.
● Wondershare UBackit serves as a simpler Windows-only alternative that backs up files, disks, partitions, and Outlook emails to a mapped NAS device with version control enabled by default.
Ask AI for a summary
 ChatGPT
 Perplexity
 Gemini
 Claude
 Grok
Grok
Backing up your computer data to a Synology NAS device is perfect for storing documents, spreadsheets, images, and other files in a secure location. You can access them remotely, enable seamless sharing with connected network users, and free up storage space.
Most importantly, you can restore lost files due to accidental deletion, file corruption, malware, or other unexpected problems. How? With Synology Drive.
The Synology Drive backup solution is a no-brainer for Synology NAS users — and this guide is all you need to get the hang of it. Before diving into the Synology Drive backup steps, let’s see what this cloud storage solution offers and why everyone should use it.
Table of Content
General Information About Synology Drive
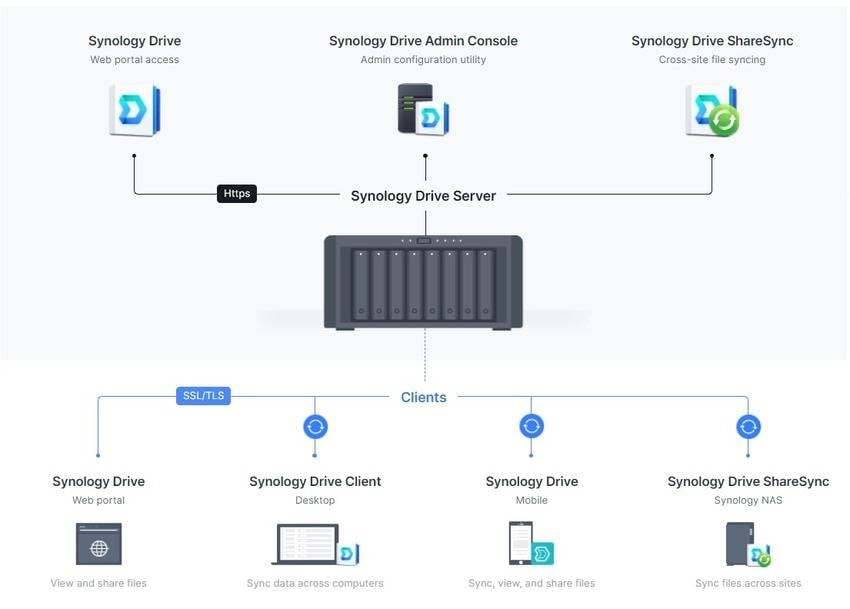
Synology Drive is a free cloud storage solution that lets you store, manage, synchronize, and share data across Windows and macOS computers, connected NAS devices, and Android and iOS phones. Besides a desktop client and mobile app, it’s accessible via a web browser.
This intuitive cross-platform software (and online portal) is part of the Synology Drive Server package. The package includes Synology Drive Admin Console for client and server monitoring and management and Synology Drive ShareSync for syncing data between NAS devices. Here’s why you should install it.
Why Should You Use Synology Drive for Backups
A Synology Drive backup provides several benefits, including:
- No additional fees — You don’t have to pay extra to use Synology Drive because it’s a free app.
- Secure backups — Synology Drive’s firewalls, 2FA (two-factor authentication), industry-standard encryption blocking unauthorized access, and many advanced measures against computer viruses and malware will keep your data safe.
- 24/7 data access — You can view and manage backed-up files anytime, regardless of the device. You can even enjoy real-time collaboration with the Synology Office integration.
- 100% data ownership — Unlike many other cloud storage solutions, Synology Drive doesn’t access or use your backed-up data. It doesn’t even upload it to Synology servers (unless you enable it via Synology C2 cloud backups). It stays on your NAS device.
- Automatic backups — The Synology auto backup feature lets you set continuous or scheduled backups, ensuring consistent data protection.
- Seamless data restoration — Synology Drive keeps 32 backup versions per file, letting you restore data in case of unforeseen issues like malware, file corruption, and accidental deletion.
Now that you know the benefits of Synology Drive backups, it’s time to learn how to use this valuable solution.
Download and Install Synology Drive Client
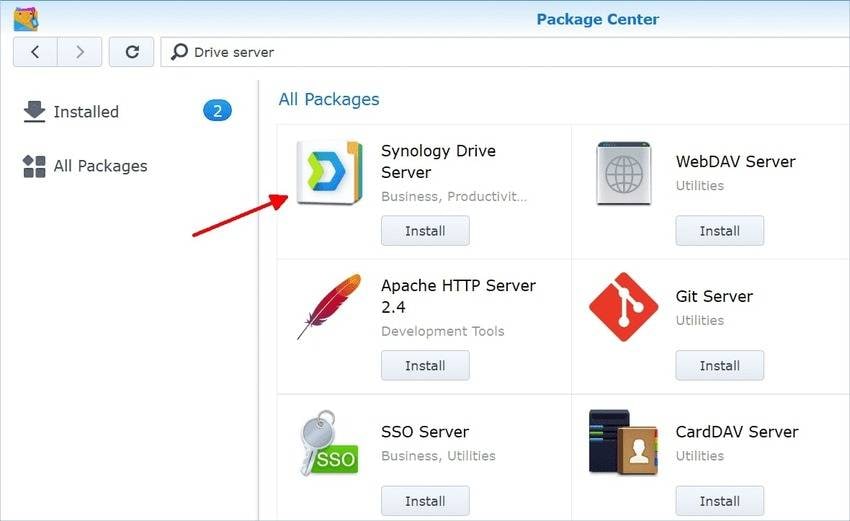
To back up your computer data to a Synology NAS using Synology Drive, you need Synology Drive Client — a desktop utility for Windows and Mac. It requires installing Synology Drive Server — which automatically installs the Drive, Admin Console, and ShareSync. Here’s how to do it:
- Step 1: Launch the Package Center on your Synology NAS, find the Synology Drive Server package in the search bar, click Install, and follow the installation wizard.
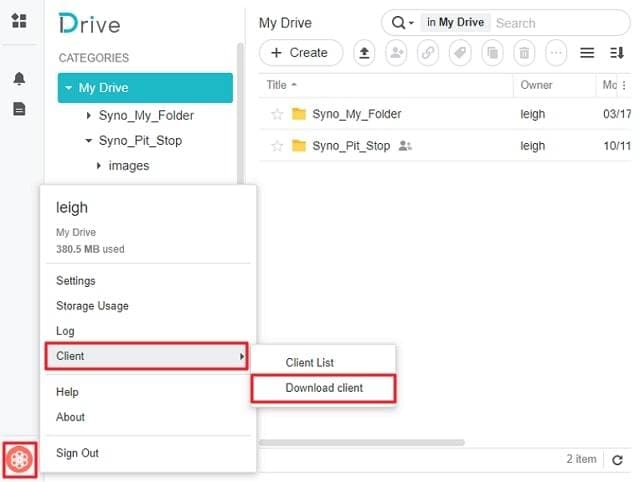
- Step 2: Launch Synology Drive, log into your Synology account, click the Account icon in the bottom left corner, and go to Client > Download client.
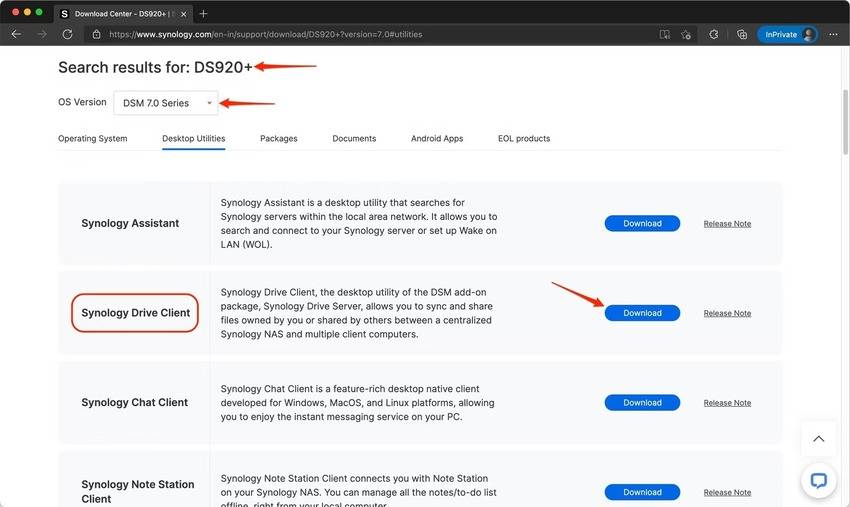
- (Alternative to Step 2) Go to the Download Center on Synology’s website, select your NAS device and operating system, navigate to the Desktop Utilities tab, and click Download next to Synology Drive Client.
You can now use Synology Drive Client to back up computer data to your Synology NAS device.
How To Do a Synology Drive Backup
Here’s how to do a Synology Drive backup:
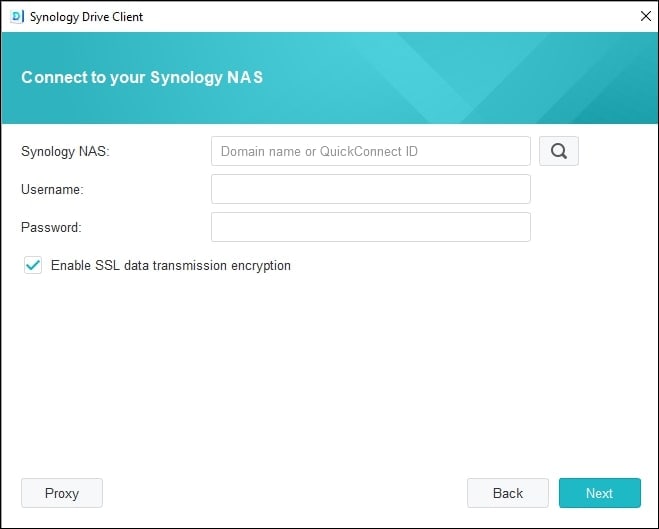
- Step 1: Launch Synology Drive Client and click Start Now.

- Step 2: Type your Synology NAS device’s domain name (or QuickConnect ID), username, and password in the specified fields. Tick the “Enable SSL data transmission encryption” checkbox and click Next.
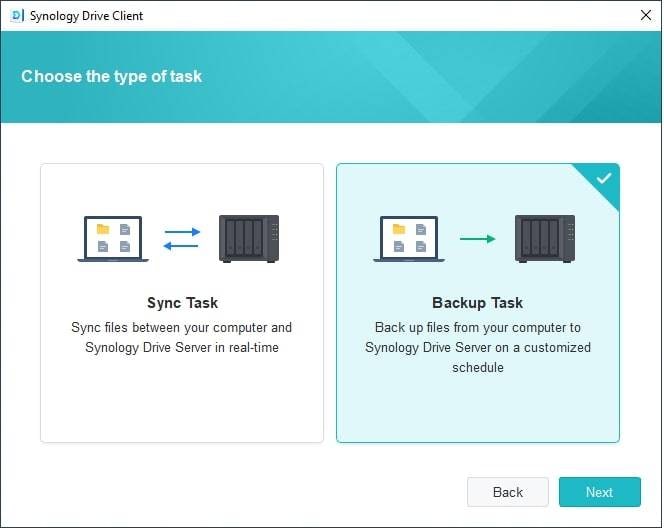
- Step 3: Select Backup Task and hit Next.
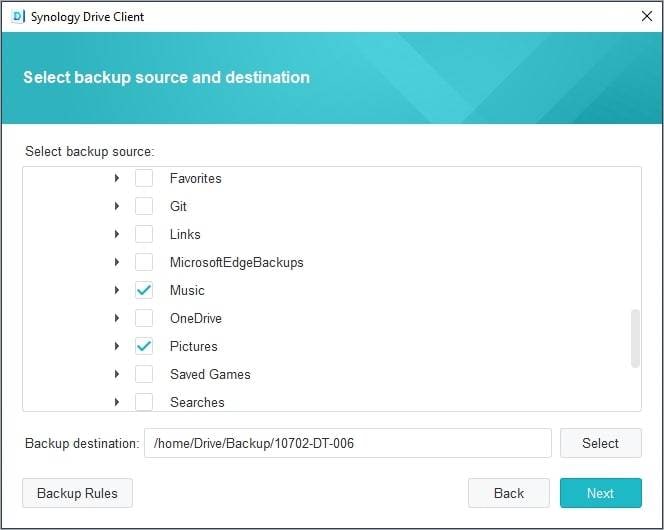
- Step 4: Choose all the folders and files you wish to back up, select the backup destination, and click Backup rules.
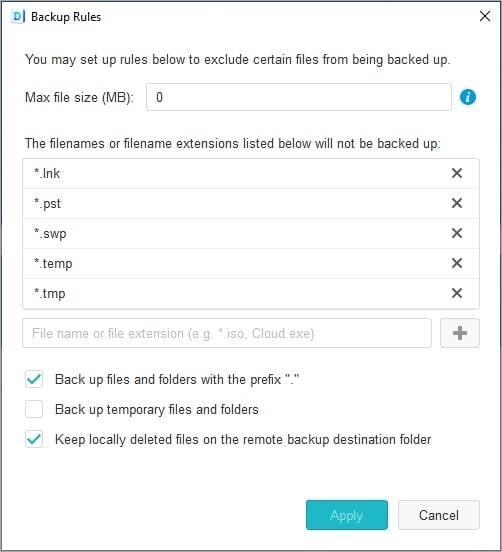
- Step 5: You can exclude specific files and file extensions, set the maximum file size, back up temporary folders and files, and back up those with the “.” prefix. More importantly, you can check the option to keep the backed-up files on your Synology NAS even if you delete them on your Windows or Mac. Once you set up everything, click Apply > Next.
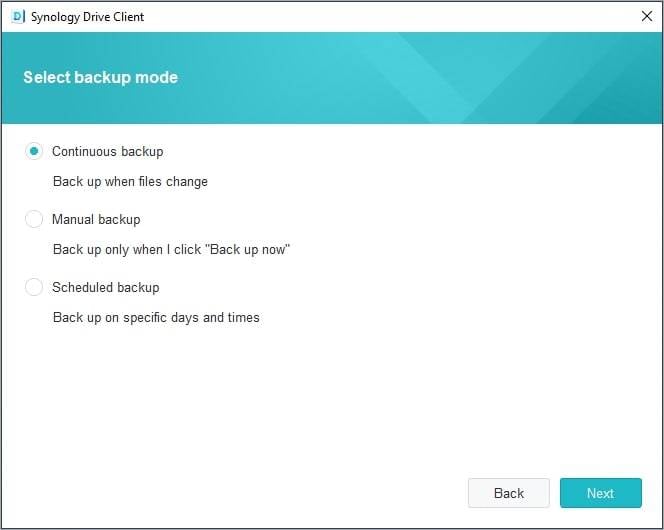
- Step 6: Choose the preferred backup mode — Continuous, Manual, or Scheduled — and hit Next.
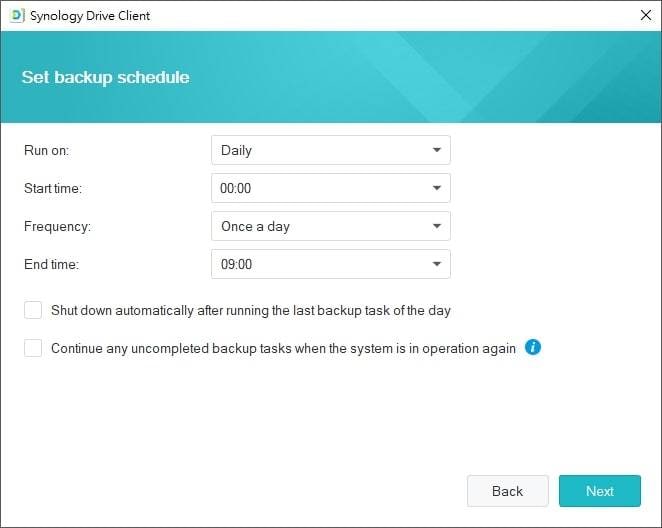
- Step 7: If you’ve chosen the Scheduled mode (the other two don’t have additional steps), set the days, frequency, and start and end time for subsequent backups. Enable the “Continue any uncompleted backup tasks when the system is in operation again” option so you don’t need to start over if a power outage or another hiccup interrupts the process. Click Next.
- Step 8: You’ll see a backup settings summary. Click Back if you wish to adjust anything or Done to proceed.

That’s it. Synology Drive Client will close but run in the background. You can access it in the system tray to view the progress.
How To Restore or Download Files From Synology Drive
Synology Drive lets you restore backed-up files to previous versions (it keeps a maximum of 32) and download them to your device. However, you must enable version control first.
Here’s what to do:
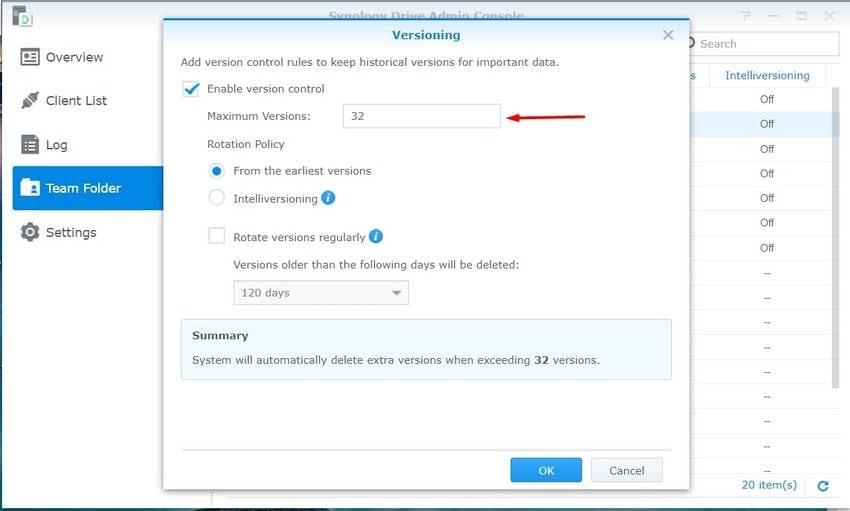
- Step 1: Launch Synology Drive Admin Console in your DSM. Go to Team Folder, click the desired folder, and select Versioning. Tick the Enable version control checkbox, specify the maximum historical versions, choose the preferred rotation policy, and hit OK.
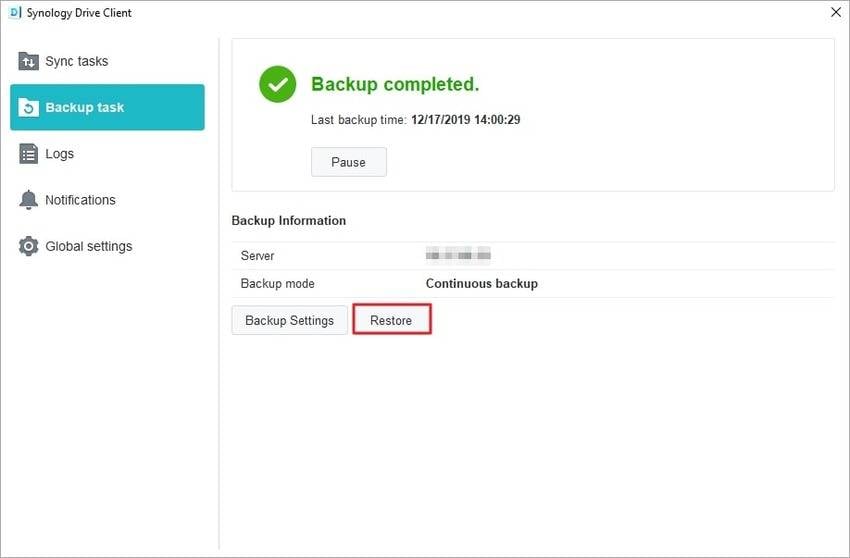
- Step 2: Launch Synology Drive Client and go to Backup Task > Restore.
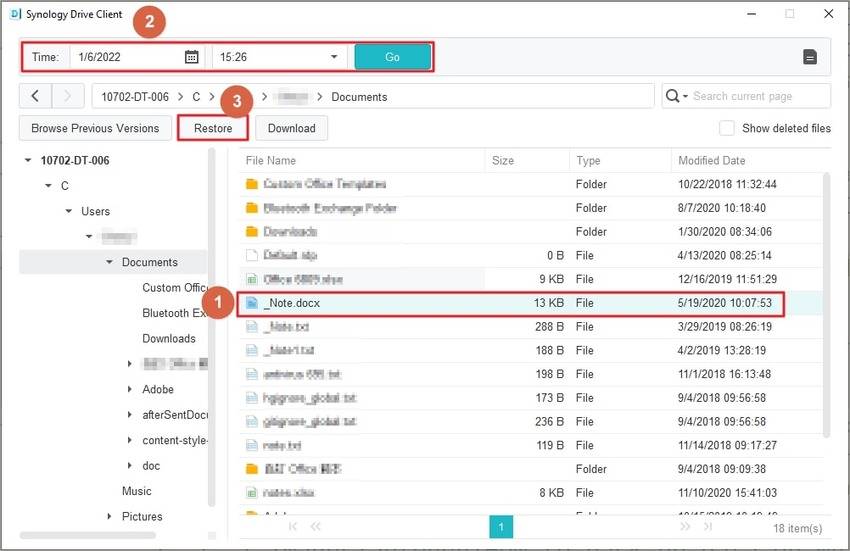
- Step 3: Select the desired file, choose the date and time of a specific version (optional), and hit Restore.
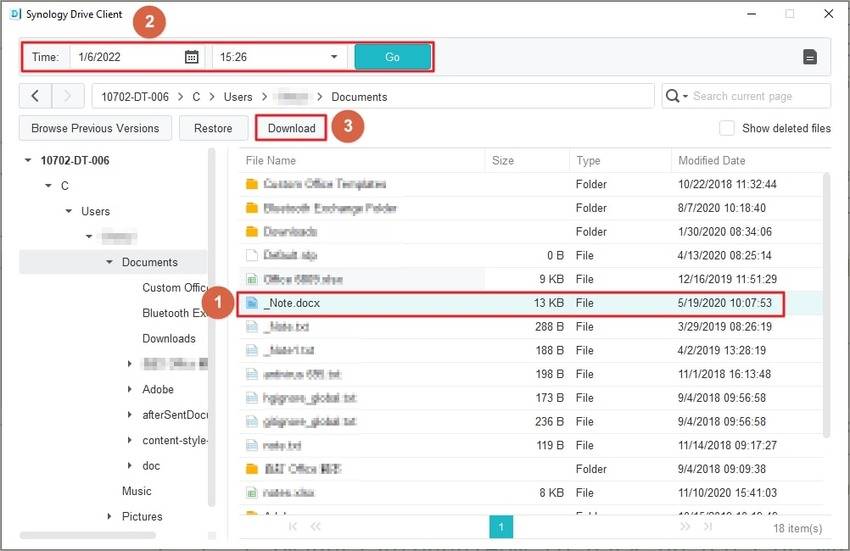
- Repeat Step 3 to download the file to your device but click Download instead.
As you can see, data restoration is a breeze with Synology Drive — and you don’t have to worry about losing accidentally deleted folders and files.
Consider a Simpler Third-Party Backup Software for Synology NAS Backup
The Synology Drive Server package is a convenient, all-in-one solution for backing up, syncing, and managing data across devices. However, going back and forth with all its tools, no matter how straightforward, can be a chore — which isn’t how you want to spend your time.
A third-party backup tool can save precious time. For instance, Wondershare UBackit — a backup manager for Windows — can back up your computer data (e.g., files, partitions, and disks) to local disks, external drives, USB flash drives, and NAS devices.
Like Synology Drive, Wondershare UBackit supports continuous, incremental, and scheduled backups and lets you encrypt and restore them to previous versions. However, you don’t have to jump through hoops to enable version control because it’s available by default.
Here’s how to back up computer data to a Synology NAS device with Wondershare UBackit:
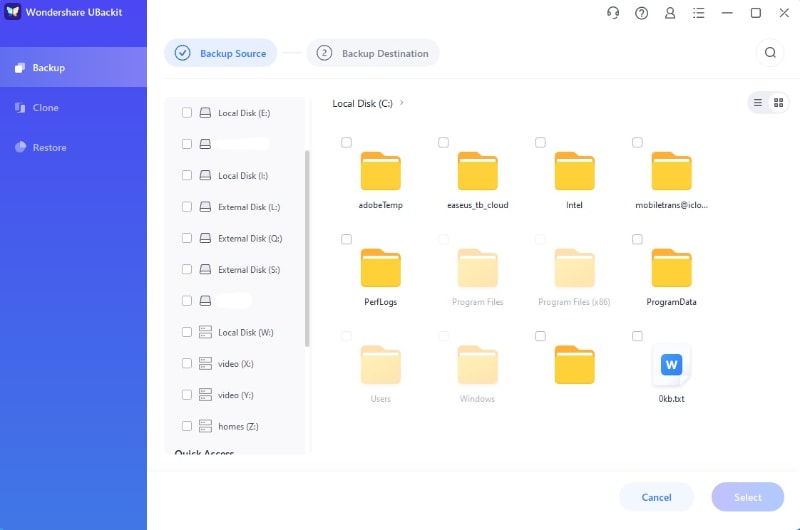
- Step 1: After downloading and installing Wondershare UBackit, launch the program, click Backup, and select File & Folder Backup or Disk Backup according to your needs.

- Step 2: Choose the files, folders, or disks you wish to back up and click Select.
- Step 3: Select your Synology NAS device that has been mapped to your computer and hit Backup.

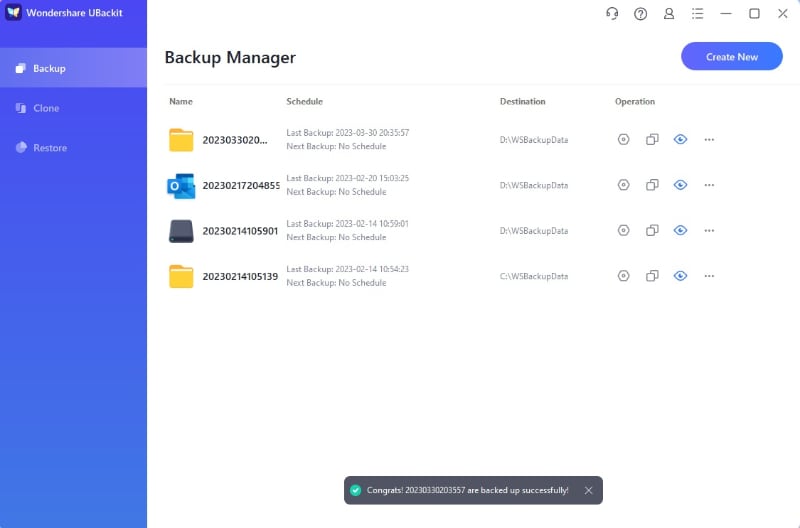
- Step 4: Once the process completes, you can schedule subsequent backups for continuous data protection and rename the folder for seamless management.
Wondershare UBackit also lets you clone your hard drives, and partitions and back up Outlook emails and NAS devices, making it a fantastic alternative to Synology Drive.
Conclusion
Backing up computer data with Synology Drive is highly convenient, primarily because of its cross-platform compatibility and high security at no additional fees.
However, setting up the necessary package and desktop client can be time-consuming, which is where third-party tools like Wondershare UBackit come into play. Try it for free to explore the features and see how they fit your needs.


