

 TL;DR:
To create a Windows 10 bootable USB, you must use a flash drive with at least 8GB of storage and configure it using Microsoft's Media Creation Tool, Rufus, or the built-in Command Prompt.
● The Media Creation Tool automatically downloads the required Windows 10 installation files, while Rufus requires you to manually supply a pre-downloaded Windows 10 ISO file.
● Users comfortable with the Windows terminal can use the DiskPart utility in Command Prompt to manually execute commands that format the USB drive to NTFS and set the primary partition as active.
● Formatting the USB drive will erase all existing data, requiring dedicated recovery software like Recoverit to restore files if accidental deletion occurs.
Ask AI for a summary
 ChatGPT
 Perplexity
 Gemini
 Claude
 Grok
Grok
Are you tired of having to install Windows 10 from scratch every time your computer crashes? Creating a bootable USB drive can save you time and effort in reinstalling the operating system. This guide will show you how to make a bootable USB drive for Windows 10. Whether you prefer using software or want to do it without any additional tools, we've got you covered. So, let's get started!
In this article
How to Make Windows 10 Bootable USB with Software?
Making a Windows 10 bootable USB requires a minimal set of skills and knowledge. However, what if you are not an expert in this field while expecting a professional outcome? Software can be your good choice. With proper software, all you need to do is to follow the instructions, then software does the rest.
Way 1: Make Windows 10 Bootable USB with Media Creation Tool
What is Media Creation Tool?
Media Creation Tool is a Microsoft product that allows you to create your own installation media using a flash drive. In our case, we will create a bootable USB for Windows 10.
What You'll Need?
To create a bootable USB drive for Windows 10 using the Media Creation Tool, you will need the following:
- A USB drive of 8GB.
- A computer. Please make sure it can be connected to the Internet.
- The Media Creation Tool, which you can download from the official Microsoft website.
How To Create Windows 10 Bootable USB With Media Creation Tool?
- Connect your USB drive to your computer.

- Download and run the Media Creation Tool from the Microsoft website.
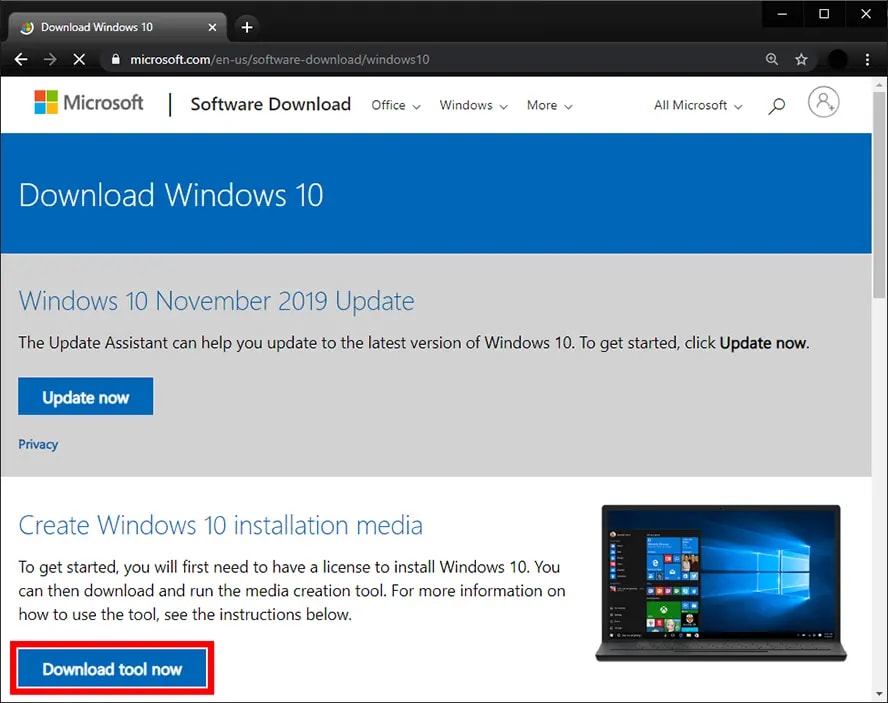
- Accept the license terms and choose the Create installation media (USB flash drive, DVD, or ISO file) for another PC option.

- Select the options, as reference in the image down below, of Windows 10 that you want to install.

- Choose the USB flash drive option and select your USB drive from the list.

- Click on Next and wait for the Media Creation Tool to download and copy the necessary files to your USB drive.

- Once the process is complete, you will have a Windows 10 live USB drive.
Way 2: Make Windows 10 Live USB with Rufus
What is Rufus?
Rufus, which stands for The Reliable USB Formatting Utility, is a free and open-source tool that helps you to create bootable USB drives for different Operating Systems, including Windows 10.
What You'll Need?
To make a bootable USB drive using Rufus, you will need to refer to the following steps:
- A USB flash drive of at least 8GB.
- The Rufus software, which you can download from the official website.
How To Create Windows 10 Bootable USB With Rufus?
- Connect your USB drive.
- Download and run Rufus from the official website .
- Select your USB drive from the dropdown menu.
- Under the Boot selection section, click on the Select button and choose the Windows 10 ISO file.
- Leave the other settings as default, unless you have specific requirements.
- Click on the Start button and wait for Rufus to format your USB drive and make it bootable.

- Once the process is complete, you will have a bootable USB drive for Windows 10.
How to Make Windows 10 Bootable USB without Software?
Using software is good but you could not have any control over what is going on. If you are familiar with Windows terminal, Command Prompt will be your better choice. Below are several simple guidelines for you to create a Windows 10 bootable USB in a professional manner.
What is Command Prompt?
The Command Prompt is a command-line interpreter that is accessible on Windows operating systems. With this tool on your computer, you can interact with the system by executing commands.
What You'll Need?
- A Windows 10 computer
- An 8GB USB flash drive
How To Create Windows 10 Bootable USB With Command Prompt?
- Connect your USB drive.
- Open Command Prompt as an administrator.
- Now open the DiskPart utility. Write diskpart and press Enter to execute the command.
- Write list disk and press Enter. This command will display the list of available disks.
- Identify your USB drive based on its size and type select disk X (replace X with the corresponding disk number).
- Write clean and press Enter. This action will eliminate all current partitions on the USB drive.

- The command to type here is create partition primary as we need to create a new primary partition. Press Enter to execute.
- Write the command select partition 1 and Press Enter to execute.
- Write active and press Enter. The partition is now set as active.
- Write the command format fs=ntfs quickly and press Enter to format the partition as NTFS.
- Write assign letter=x and press Enter.

- Exit the DiskPart utility now. Type exit and press Enter.
- Copy the contents of the Windows 10 installation ISO to the USB drive.
- Your USB drive is now bootable and ready to install Windows 10.
How to Recover Data from Windows 10 After Booting Your PC?
After successfully booting your PC with the Windows 10 USB drive, it's essential to ensure the safety of your data. Accidental deletion or formatting can lead to data loss. To recover your valuable files, we recommend using Recoverit, a powerful data recovery software. Recoverit is designed to help you recover lost or deleted files from various storage devices, including SSD and HDD.
In addition, Recoverit can even rescue your data from a computer being unbootable. Please refer to the video below for in-deep practice.
To recover data from Windows 10 after booting your PC, follow these simple steps:
- Download, install, and launch Recoverit on your Windows 10 computer.
- Initiate the software and choose the location where your lost data was saved.

- Recoverit will analyze your storage device, and then start the scanning process.

- After the scan is finished, you can preview the files and choose the ones you wish to restore.

- Click the Recover button and select a secure location to save the restored files.

With Recoverit, you can recover your lost data with ease and peace of mind.
Conclusion
In conclusion, creating a bootable USB drive for Windows 10 is a straightforward process that can save your time and effort in reinstalling the operating system. Whether you choose to use software like the Media Creation Tool or Rufus, or prefer to do it without any additional tools using Command Prompt, the choice is yours. Additionally, don't forget to safeguard your data by using a reliable data recovery software like Recoverit. Download Recoverit today and ensure the safety of your files after booting your PC with Windows 10.


