

 TL;DR:
You can recover an unsaved Excel file on macOS by retrieving the cached document from the hidden AutoRecovery sandbox, extracting background system dumps from the local temporary directory, or rolling back versions via Time Machine.
● Access the isolated Microsoft AutoRecovery sandbox by pressing Cmd + Shift + G in Finder and entering ~/Library/Containers/com.microsoft.Excel/Data/Library/Preferences/AutoRecovery to locate and restore your automatically saved files.
● If Excel crashed during background calculations, launch Terminal and execute the open $TMPDIR command to reveal the hidden TemporaryItems folder, where you can locate cached assets and manually change their .tmp extensions to .xlsx.
● If your Mac uses an Apple Silicon chip (M1, M2, M3, M4), you must run data recovery tools like Wondershare Recoverit immediately, as the internal SSD's native TRIM commands will permanently wipe the physical data blocks of unallocated files.
Ask AI for a summary
 ChatGPT
 Perplexity
 Gemini
 Claude
 Grok
Grok
Although many newer tools do the same things even better, Excel is still essential because of its simplicity and functionality. Anyone can use Excel to make life easier, especially when working on maths-related tasks. Excel is a powerful tool used for data and business analytics.
But if you've lost your important Excel spreadsheet because of a crash, mistake, or virus, you're probably wondering if and how to recover your file. You'll be happy to know that you can recover your file. Here are all the methods to recover unsaved Excel files on Mac.
| Methods for Mac Unsaved Excel Files Recovery | Step-by-step guide |
| From the Recent List | Go to Excel->File->Open Recent..Read More |
| Check AutoRecovery Folder | Navigate to Applications->Utilities->Terminal->Enter the command..Read More |
| From a Temporary Folder | Navigate to Application > Utilities > Terminal..Read More |
| Recover Unsaved Workbooks in Excel | Launch Recoverit. Click the File->Info->Manage Workbook..Read More |
| Using Time Machine Backup | Click Time Machine->Enter Time Machine->Find the file..Read More |
| Through Online Backup | Go to the official iCloud website->sign in->click on iCloud Drive and Browse..Read More |
| Using Data Recovery Tool | Launch Recoverit->Scan the drive->Wait for it to find the unsaved file..Read More |
🔍 Recovery Mapping Index: Choose the Best Method for Your File State
Excel files on macOS exist in different data states depending on how the application closed. Use this matrix to match your file's state with the most effective recovery tool:
| Document File State | Root System Cause | Primary Local Path | Recommended Action |
| Unsaved Workbook (Crash) | Excel application or macOS unexpectedly closed. | Sandboxed AutoRecovery system path | Retrieve from the hidden Microsoft User Container folder. |
| Unsaved Workbook (Closed Menu) | Accidentally clicked "Don't Save" when closing. | Volatile RAM Cache / $TMPDIR | Run a deep cluster scan with Wondershare Recoverit immediately. |
| Overwritten Worksheet | Modifications saved over an older version. | System Snapshot / File History | Roll back the file state using native Time Machine or OneDrive history. |
| Deleted / Empty Trash | File pointers removed from the system catalog. | Unallocated Disk Sector Blocks | Use Wondershare Recoverit to perform raw sector rebuilding. |
How To Recover Unsaved Excel Files on Mac
Many people forget to save their Excel files and turn off the program, creating a problem. On the other hand, you might also lose your files if your computer turns off or restarts in the middle of your work. Luckily, there are some proven methods you can use to recover unsaved Excel files on Mac:
Method 1. Restore an Unsaved Excel File From the "Recent" List
If you haven't saved an Excel file and turned off the program and the file has even completely disappeared, you can use the "Recent" list feature to recover the files and discover where they're stored. Here are the steps you should follow:
- Start Excel and click on File->Open Recent, and find the unsaved Excel file.

- Click on the file, wait until it opens, click File->Save As->Workbook, and select the desired location.

Method 2: Extract Files from the Hidden Office AutoRecovery Sandbox
Modern versions of Microsoft Excel for Mac (including Microsoft 365, Excel 2021, and 2019) run inside isolated system sandboxes. To access their hidden, automated recovery directories without hitting access errors, follow these steps:
- Open the Go to Folder Utility Tool: Click on an empty space on your desktop to activate Finder. Look at the top menu bar, select Go, and then click on Go to Folder... (or press the keyboard shortcut Cmd + Shift + G).

- Input the Modern Sandboxed Excel Path: Copy and paste the following exact relative directory string into the search input path field and press Return:
~/Library/Containers/com.microsoft.Excel/Data/Library/Preferences/AutoRecovery - Isolate the Cached AutoRecovery Target Archive: Look for files that begin with the phrase "AutoRecovery save of" or match the name of your lost file. Check the date modified timestamp to find your missing work.

- Restore and Convert the File Extension: Drag the found file out onto your desktop. Right-click the file, select Open With, choose Microsoft Excel, and immediately click File > Save As to save it as a standard
.xlsxworkbook.
Method 3: Extracting Excel Caches from the macOS POSIX Temp Directory
If an Excel workspace crashes while running background calculations, the operating system often dumps active document arrays into hidden system environment paths. You can open these paths directly through the macOS Darwin subsystem:
- Launch the Terminal application: Press Cmd + Space, type Terminal, and hit Return.

- Open the Temporary Directory: Type the following system command to read your environment's temporary directory variable and open it in Finder:
open $TMPDIR
Press Return. A hidden Finder window will open. Locate and open the folder named TemporaryItems. - Isolate Cached Assets: Look for temporary items labeled with an Excel icon or files using a
.tmpfile format. - Restore and Convert Extension: Copy the file out to your desktop, change the file extension from
.tmpto.xlsx, and open it directly inside Excel to check your data.
Method 4. Using Time Machine Backup
All Mac devices have the Time Machine tool. It's a built-in recovery software to back up all your data or even whole drives. If you use Time Machine to backup your Excel files to a backup disk, you can recover your Excel files quickly.
Here are the steps:
- Navigate to the folder where your Excel files were saved using Finder.
- Click on the Time Machine icon (backward clock) in the Menu Bar. Select Enter Time Machine.

- Find the Excel file you're missing using the arrows on the right side of the screen. Find the date before you've deleted the file. Select the file and click Restore at the bottom of the screen.

Method 5. Through Online Backup (iCloud)
Many Mac users have cloud backups set in place. You can use Google Drive, OneDrive, or iCloud. However, most Mac users use iCloud because this is the native cloud support for OS devices, and it syncs seamlessly with iPhones and other Apple devices.
Here are the steps:
- Go to the official iCloud website and sign in to your account.

- Click on iCloud Drive and Browse.
- Locate your Excel file on the list of backed-up files, select it, right-click, and click Download a Copy. Select the destination, and your Excel file will return to your drive.

Method 6. Recover Unsaved Workbooks in Excel
Here’s a step-by-step guide to recover overwritten or unsaved Excel files using the Manage Workbook feature in Microsoft Excel:
- Launch Excel on your computer and click the File->Info->Manage Workbook options.
- From the dropdown menu, select Recover Unsaved Workbooks and open the unsaved file you want to recover.
- Click Save As to recover the unsaved Excel file.
Method 7. Recover Unsaved Excel Files on Mac Using Recoverit
When all the methods introduced above don't work for you on recovering unsaved or corrupted Excel files on Mac, it's time to try the most successful method for data recovery. Wondershare Recoverit is specifically designed to recover Excel files, meaning you can always turn to this software if other data recovery tools fail.
It offers a high success rate for restoring deleted/unsaved Excel files, including other office documents. It can recover Excel files from USB drives, hard drives, SD cards, and crashed Mac devices and works with all formats, including XLS, XLSB, XLTX, XLSM, SLSX, XLT, XML, TSV, CSV, etc.
Before you can use it, you will have to download and install the tool.
Here are the steps for recovering Excel files using Recoverit:
- Start the program and click Hard Drives and Locations on the left panel, then select the drive where your lost Excel file was located.

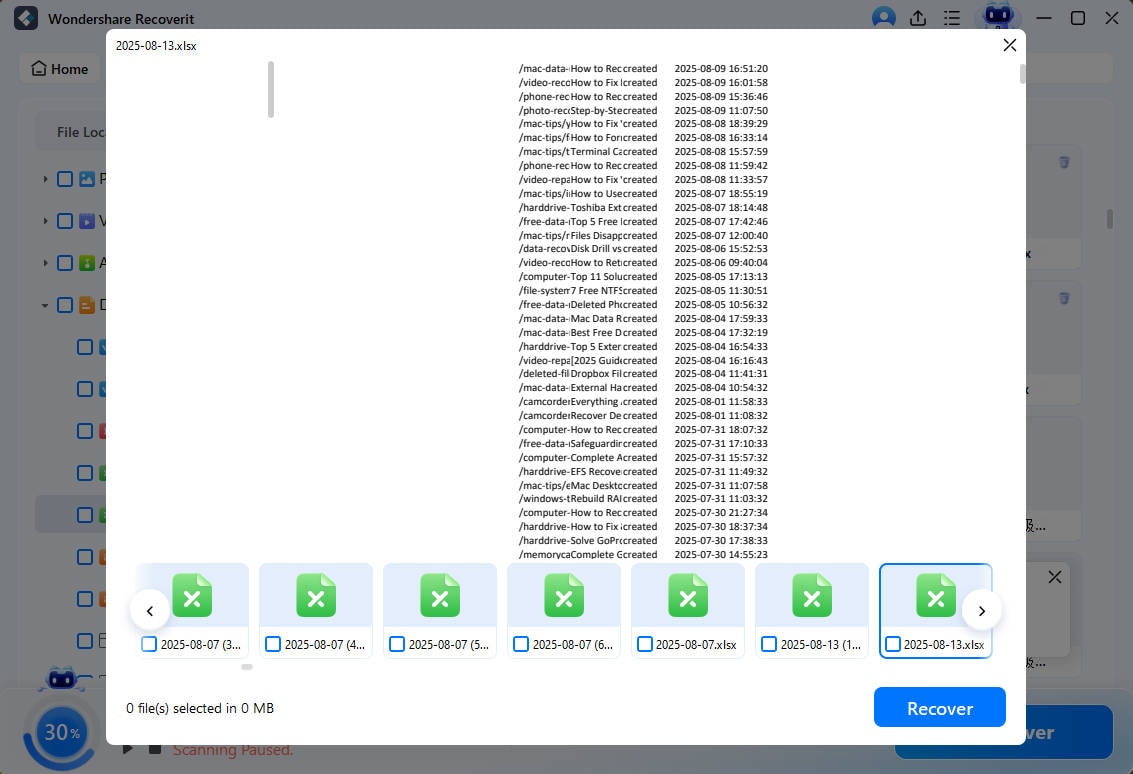
- Wondershare Recoverit will automatically start scanning the drive and display any discovered files in real-time. Select your Excel file and click Preview to see if this is the document you're looking for.

- After reviewing the file, click Recover in the bottom right corner.
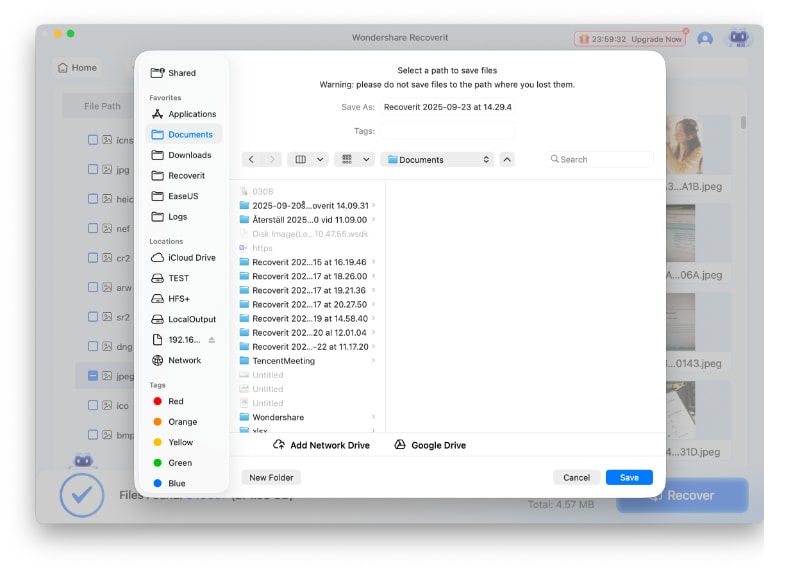
- Select the save location and click Save.
When Excel closes without saving or a file is emptied from the Mac Trash, the physical data blocks remain written on your storage drive. However, if your Mac uses an Apple Silicon chip (M1, M2, M3, M4) with an internal SSD, native background cleanup processes like TRIM commands will eventually wipe these unallocated blocks.
To maximize your chances of a successful data recovery, run the Wondershare Recoverit automated scan as quickly as possible before the system overwrites or purges these file remnants.
How to Manage Excel Files Properly on Mac
Even though there are many recovery methods available, you need to adopt some good practices to prevent losing Excel files on Mac in the future.
- Save files in a dedicated folder: Save all your essential files in a dedicated folder. If you work on multiple projects, create a separate folder for each;
- Name your files numerically: Create a sense of order by numerically and logically naming your files;
- Turn on AutoSave and AutoRecover: Turn on these features to make it easier to recover files in the future;
- Use backups: Use Time Machine and cloud backups to make recovery hassle-free.
Conclusion
Professional recovery software is the best option for recovering deleted and unsaved Excel files on Mac. You can recover unsaved files using the "Recent" feature, AutoRecover & AutoSave, or your Temporary Folder. If you've deleted Excel files, restore them from Trash, Time Machine, or iCloud backup.
Take the time to follow all these steps carefully and determine how you lost your files so you can select the correct recovery method. If not, you can always use Wondershare Recoverit to return your files quickly.
FAQ
-
Can I recover an Excel File I didn't save?
If you haven't saved your Excel spreadsheet, you can recover them using AutoRecover & AutoSave, the Temporary Folder, or the Recent feature. -
How do I AutoRecover in Excel for Mac?
To recover Excel files on Mac using AutoRecover:
1. Navigate to Applications, Utilities, and Terminal.
2. Write "defaults write com.apple.Finder AppleShowAllFiles true" in your Terminal and hit Enter.
3. Open Finder, press Enter, and write: "/Users/username/Library/Containers/com.microsoft.Excel/Data/Library/Preferences/AutoRecovery," click Go.
4. Find your Excel file and copy it where you want it stored. -
How do I open a previously saved Excel File on a Mac?
You can open the Excel file by double-clicking the file or by starting Excel and using the Open feature. -
How do I recover a hidden Excel File on a Mac?
If your Excel file is hidden, type "defaults write com.apple.Finder AppleShowAllFiles true" in your Terminal and press Return. -
Can you bring back permanently deleted files on Mac?
Yes, you can recover permanently deleted files on Mac using a recovery tool like Wondershare Recoverit. After downloading and installing Recoverit, follow these steps:
1. Start Wondershare Recoverit and scan your hard drive.
2. Go through the recovered files, find the Excel spreadsheets, select them, and click Recover.
3. Select the save location. -
Where is the AutoRecovery folder on Mac?
The AutoRecover folder on Mac is located in: /Users/username/Library/Containers/com.microsoft.Excel/Data/Library/Preferences/AutoRecovery. -
How do I restore Excel history on Mac?
Open an Excel document on your Mac, then go to File, Revert To, and Browse All Versions. Here, you can see the history of a document and restore it to a desired version.


