

 TL;DR:
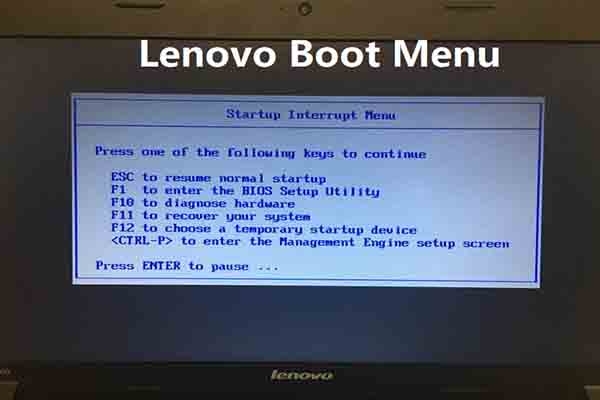
To access the Lenovo boot menu, power on your device and repeatedly press F12, or press the dedicated physical Novo Button while the computer is completely turned off.
● If Windows 11 Fast Startup ignores your F12 keystrokes, bypass it by holding the Shift key while clicking Restart in the Start Menu to force the Advanced Startup menu.
● When booting from USB 4.0 or Thunderbolt 4 drives on modern 2026 models, you must format the drive as GPT (UEFI) and connect it specifically to the USB-C port marked with a Battery icon.
● If the system crashes and remains completely unbootable, you must use a separate functional computer to create a bootable USB recovery drive using a tool like Wondershare Recoverit to extract your data before repairing the OS.
Ask AI for a summary
 ChatGPT
 Perplexity
 Gemini
 Claude
 Grok
Grok
Picture this: you've just purchased a brand-new Lenovo computer, and you're eager to dive in and explore its features. But first, you need to access the Lenovo boot menu key to customize your device's settings and optimize its performance. Fear not! In this article. We’ll talk more about the steps to access your Lenovo device's boot menu. We will also provide other options to open the boot menu on your computer in case the shortcut keys don’t work. So, let's dive in!
| Lenovo Series | Primary Boot Key | Alternative Method |
| ThinkPad (T, X, P, E) | F12 | Enter Key (to Pause) -> F12 |
| IdeaPad / Yoga / Legion | F12 or Fn + F12 | Novo Button (Side/Pin-hole) |
| ThinkCentre (Desktop) | F12 | F1 or F2 for BIOS |
| Modern Win 11 Tablets | Volume Up + Power | Advanced Startup Menu |
What is Lenovo Boot Menu?
The Lenovo Boot Menu key allows users to access a special menu during the startup process. This menu provides options for managing the computer's boot process and accessing various tools and settings.
Users can typically select their preferred boot device, enter the computer's BIOS settings, run hardware diagnostics, or boot from networked devices or USB flash drives, depending on the available options. The Lenovo boot menu key required to access the Lenovo Boot Menu varies by computer model, and users should consult their user manual or watch for on-screen instructions during startup to access the menu and make the desired selections.
How to Access Lenovo Boot Menu?
Lenovo offers two convenient methods for accessing the boot menu, which allows you to choose the device from which your computer will start. Let's explore both of them:
| Scenario | Boot Menu Action | Data Recovery Action |
| System Crash / Blue Screen | Boot from USB Recovery | Use Recoverit Bootable Media |
| Broken Hard Drive | Run Hardware Diagnostics | Recoverit Deep Scan |
| OS Update Failed | Roll back via BIOS | Fix Corrupt Boot Files |
Method 1: Lenovo Boot Menu Shortcut Key
Using the Lenovo BIOS key is a commonly employed method to access the boot menu not only on Lenovo computers but also on various other brands.
Wondering how to do it? The first method involves using a specific key during the computer's startup process. Follow these steps:
Step 1: Power on your Lenovo computer. As your computer starts up, press the dedicated boot menu key. Keep in mind that this key may vary depending on your Lenovo model. Refer to this table to indicate the key to access the boot menu.
| Different Lenovo Desktop/Laptop Models | Lenovo Boot Menu Key |
| IdeaPad N, V, Y series | F12 |
| IdeaPad P Series | After the Lenovo Logo F12 |
| IdeaPad S, U, Z Series | F12, Novo Button |
| B, E Series | F12, Novo Button |
| Edge, Flex Series | Novo Button |
| G Series | F12 |
| K, M, V Series | F1 |
| N Series | F2 |
| S, Y Series | Novo Button |
| Z Series | Novo Button Z50-70 |
| ThinkPad edge, e431, e531, e545,helix, I440, I540, s431, t440s, t540p, twist, w510, w520, w530, w540, x140, x230, x240, X1 carbon | F12 |

Step 2: Once you've pressed the Lenovo Boot Menu key, a boot menu will appear on your screen. Use the arrow keys to navigate the options and select the device you want to boot from.
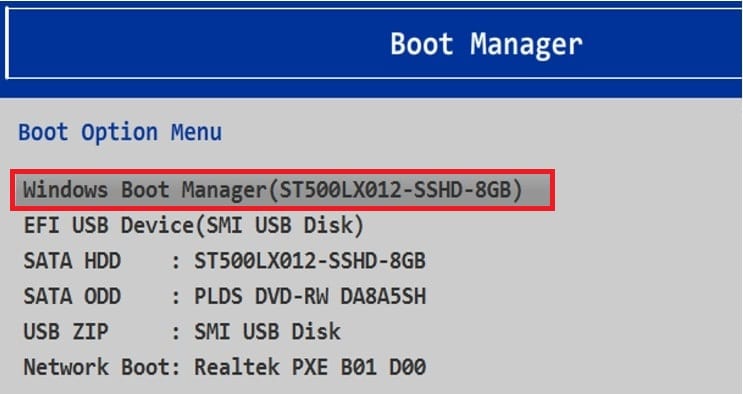
Step 3: Highlight your choice and press the Enter key to confirm your selection.
Method 2: Novo Button
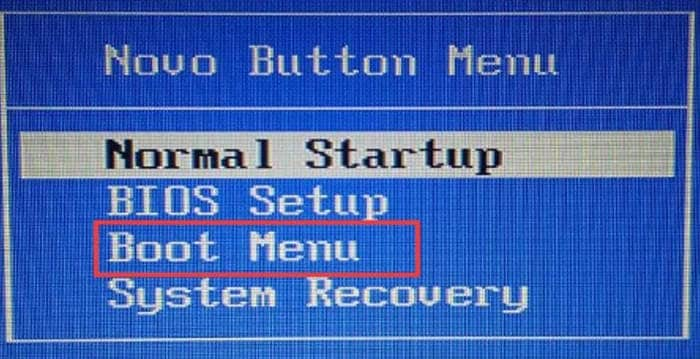
The NOVO button is a distinct physical button that you can find on select Lenovo laptops and desktops. It allows your PC to power on and directly enter Boot mode. Typically, it's situated near the power button or on the side of the device. This button grants swift entry to a specialized menu called the "Novo Button Menu" or "System Recovery Menu." Within this menu, users can perform various system-related tasks.
The NOVO button serves as a handy alternative, particularly if you prefer having a dedicated button for accessing the Boot Menu. Here's how to make effective use of it:
Step 1: Turn off your Lenovo device. Next, locate the NOVO button on your device.
Step 2: Press the NOVO button and hold it for a few seconds. Release it when the boot menu becomes visible.

Step 3: Use the different arrow keys to navigate the options presented in the Boot Menu. Select your preferred option and confirm your choice by pressing the Enter key.
2026 Troubleshooting: Disable Fast Startup
If your F12 key is ignored, Windows 11 is likely using Fast Startup, which puts the kernel in hibernation rather than a full shutdown. To bypass this:
- Hold the Shift key while clicking Restart in the Start Menu.
- This forces the "Advanced Startup" menu.
- Select Use a device to see the Boot Menu options directly, or select Troubleshoot > UEFI Firmware Settings to enter the BIOS.
Using either of these easy methods, you can access the boot menu on your Lenovo computer and pick the device you want to boot from. These methods are useful for tasks like changing the boot order, booting from a USB drive, or troubleshooting startup issues.
What to Do When Your Lenovo Computer is Unbootable
Booting your computer with the earlier methods is often the simplest way to get your Lenovo up and running. However, there are times when computers encounter issues that hinder successful booting for various reasons.
In such challenging situations, a valuable solution to consider is Wondershare Recoverit. This software can come to your rescue when your computer refuses to boot.
Key Features:
- Recoverit, the data recovery expert, can restore various file types and systems like NTFS, FAT, HFS+, and APFS, all at no cost or commitment.
- Effortlessly recover lost data from various devices and storage media, including PC/Mac, hard drives, USB drives, SSDs, external hard disks, pen drives, action cameras, drones, dashcams, camcorders, music/video players, and more.
- It can retrieve lost data from various situations, including accidental deletion, formatting, device corruption, virus attacks, unknown error codes, etc.
- This tool is one of the industry's leading tools for successful data recovery across a wide range of data loss scenarios, boasting a remarkable 95% recovery success rate.
How to Use Recoverit
If your system experiences a crash, you have the option to use Recoverit for the recovery of your lost or inaccessible data.
Step 1: Getting Ready for Crash Recovery
Begin by downloading and installing Recoverit on a functional computer, and have a blank USB drive ready to connect to this computer.
Within the Recoverit application, simply navigate to the left side of the interface and choose the System Crashed Computer option. Then, press Start to initiate the recovery process.

Step 2: Generating Bootable Media
To initiate data recovery on a non-bootable computer, you must first generate bootable media to kickstart the system.
- Generate a Bootable Drive
If your Windows computer cannot start, you can utilize Recoverit to produce bootable media and retrieve your data.
Ensure that a blank USB drive is connected to the operational computer and is recognized. Choose the drive for bootable media creation and then click Create to commence the process.

Creating a bootable drive involves two essential steps:
Formatting the USB drive
Crafting a bootable drive
When you create a bootable USB drive, a notification will warn you about the need to format the USB flash drive. It's crucial to ensure that you have backed up any vital data before proceeding with the formatting.
Once both processes are completed, the bootable drive required to initiate your crashed computer will be successfully generated.
- Boot Your Unresponsive Computer Using a USB Drive
Once you have completely created a bootable USB flash drive, follow the steps outlined below:
Link the USB flash drive to your computer.
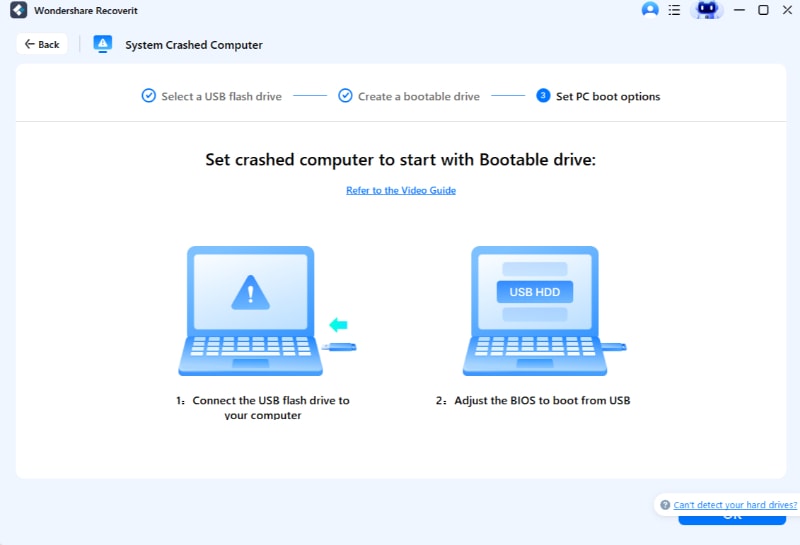
Adjust the BIOS settings to enable booting from the USB drive. To do this, restart your non-responsive computer and press the BIOS entry key when the initial screen is displayed.
Every computer system features a BIOS option that allows users to make custom adjustments to BIOS settings. To access it, press the BIOS Entry key as your computer powers up.
Step 3: Retrieving Data from the Crashed Computer
After following the preceding instructions, you will notice that your previously unresponsive computer is now operational. At this point, you can select either Hard Disk Copy or Data Recovery based on your specific needs.

- Hard Disk Copy
- Opt for a Hard Disk Copy, and then specify the directory for the copy.
- Attach a functional hard drive to the crashed computer.
- Select the connected hard drive and click the Copy button. You can monitor the data copying process from the crashed computer to the hard drive.
- Once the copying process is complete, a message will appear stating, "Data copy completed.”
- Data Recovery
- If you choose Data Recovery, you can begin by selecting a disk for scanning.
- Connect a functional hard drive to the crashed computer.
- After the scanning, you can designate a location to save the recovered data. You can choose the hard drive connected to the crashed computer and tap Recover. Recoverit will then recover data from the crashed computer to the hard drive.
- A successful recovery will be confirmed with the message "Congratulations! Files recovery completed."
After retrieving the data, it is advisable to save them to a secure location.
When To Use Lenovo Boot Menu?
The Lenovo Boot Menu key is a versatile tool that enables users to manage the boot process and access important system functions, making it valuable for various tasks related to system maintenance, troubleshooting, and customization. Here are some scenarios where the boot menu is significant.
Booting from a USB Drive
When you need to install or repair the Windows OS, you can use the Boot Menu to choose a USB flash drive as the boot device. This is often necessary for tasks like reinstalling Windows, Linux, or other operating systems.
On modern Lenovo laptops (like the Carbon X1 or Legion series), not every USB-C port is "Bootable." Always use the port marked with a Battery icon (Always-on USB) or the one closest to the rear of the device. If using a USB 4.0 or Thunderbolt 4 drive, ensure the drive is formatted as GPT (UEFI); legacy MBR drives will not appear in the Lenovo Boot Menu on 2026 models.
Troubleshooting Boot Issues
If your computer is experiencing boot problems, you can access the Boot Menu to choose diagnostic tools or the BIOS settings to troubleshoot and potentially resolve the issue.
Changing Boot Order
You may want to temporarily change the boot order to boot from a different device. For example, if you have a bootable USB drive with a live operating system for troubleshooting, you can set it as the primary boot device in the Boot Menu.
Accessing BIOS Settings
The Lenovo Boot Menu key often provides an option to enter the BIOS settings. You can configure various hardware settings, including CPU, RAM, and storage options. This is particularly useful when you need to make low-level hardware changes.
Network Boot
If your organization uses network boot services, the Boot Menu can initiate a network boot, which allows you to load an operating system or run diagnostic tools from a network server.
Conclusion
Accessing the Lenovo boot menu is important for troubleshooting and recovery. This article has outlined the necessary steps to access it.
When you need to recover data on Lenovo or any other device, Wondershare Recoverit is a reliable choice. Keep this versatile tool ready for fast and effective data retrieval in tough situations. Make Wondershare Recoverit your trusted solution in these circumstances.
FAQ
-
How do I access the boot menu on a Lenovo laptop?
To access the boot menu on a Lenovo laptop, turn off the laptop, then press the power button and immediately press the F12 key repeatedly until the boot menu appears. Use the arrow keys to navigate and the Enter key to select an option. -
What if the F12 key doesn't work to access the boot menu?
If the F12 key doesn't work, try using the Fn + F12 key combination or the Novo button (if available on your Lenovo model). The Novo button is a small circular button, usually located near the power button or on the side of the laptop. Press this button when the laptop is off to access the boot menu. -
How can I change the boot order in the BIOS on a Lenovo laptop?
To change the boot order in the BIOS on a Lenovo laptop, turn off the laptop, then press the power button and immediately press the F1 or F2 key repeatedly until the BIOS setup menu appears. Navigate to the "Boot" tab using the arrow keys, and then change the boot order by selecting the desired device and pressing the "+" or "-" key. Save the changes and exit the BIOS by pressing the F10 key.


